
In today’s tutorial, we’re going to learn how to draw a strawberry using graphite pencils.
Strawberries are perfect subjects for drawing for two reasons. First, they show up everywhere, from Renaissance still-life paintings to modern food photography, because they’re bright, textured, and instantly recognizable.
Even the name Fragaria × ananassa, the garden strawberry, hints at how carefully this fruit has been cultivated and admired over time.
Secondly, they’re simple at first glance, yet packed with detail, something that all artists fancy. Strawberries have soft curves, glossy highlights, and hundreds of tiny seeds catching the light.
You’ll be hard-pressed to find a better subject to practice and refine your shading techniques.
Let’s begin:
Drawing a Realistic Strawberry in 7 Steps
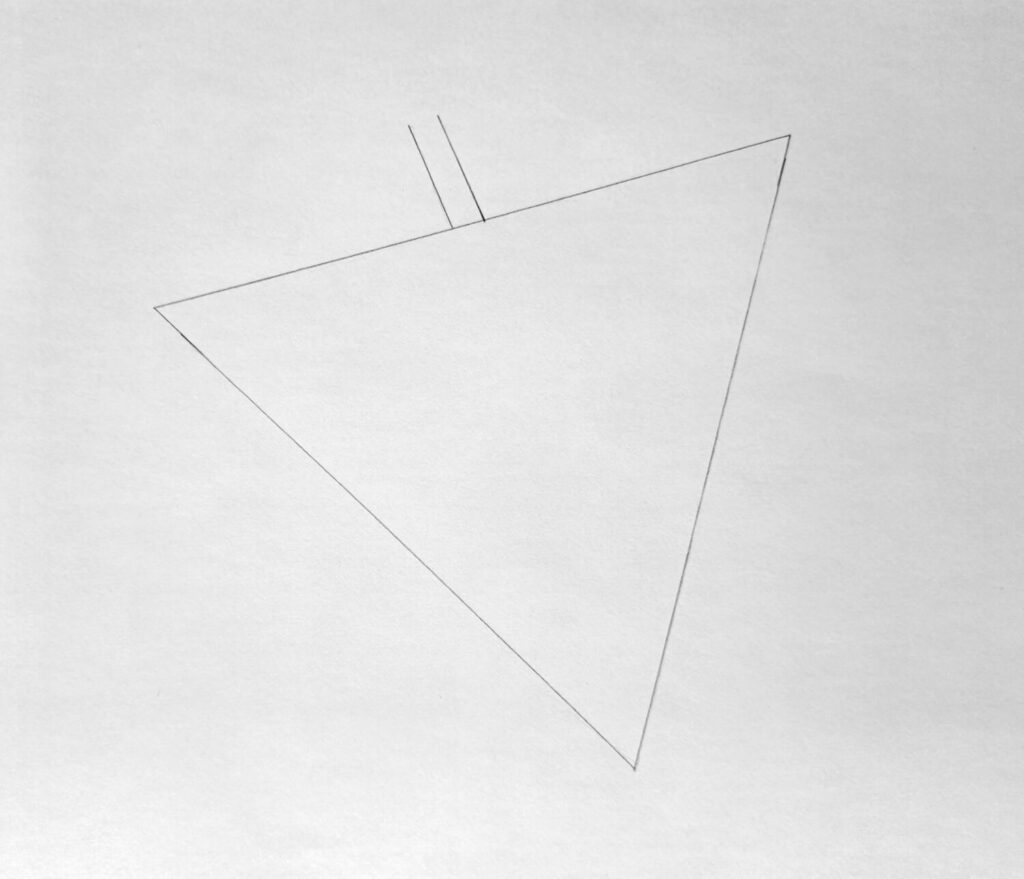
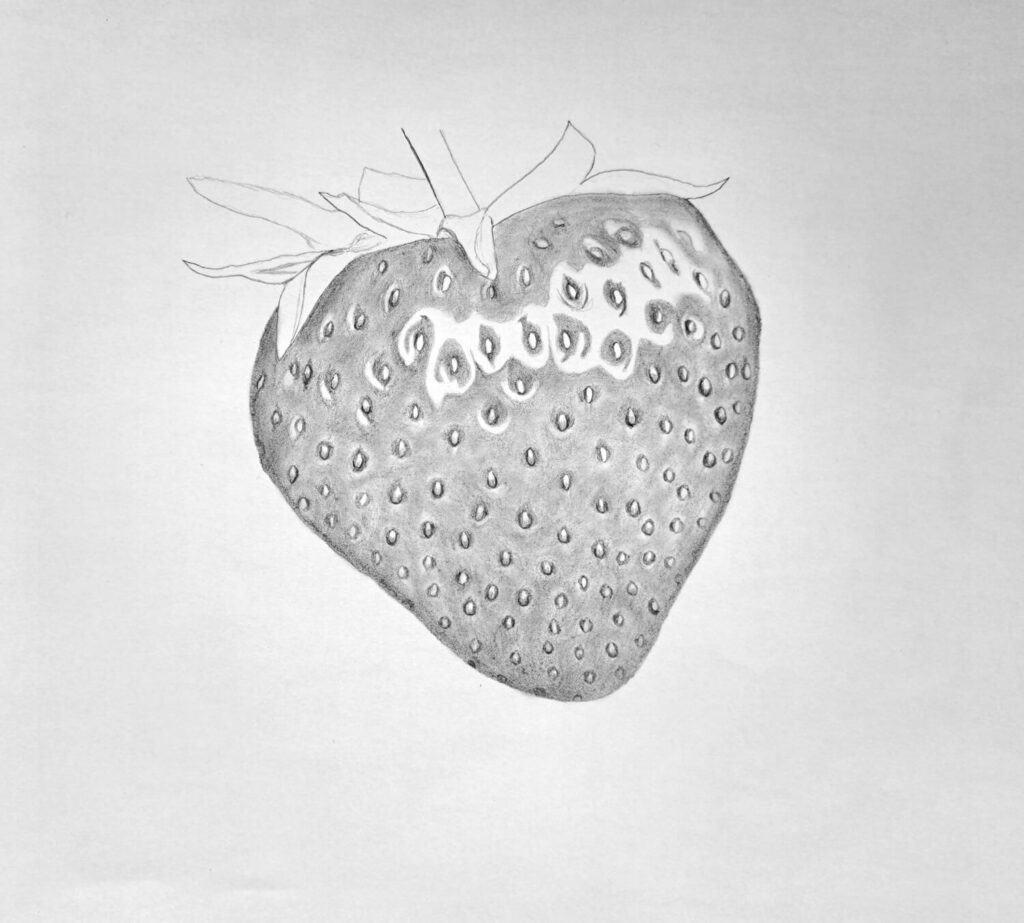
Sketch an Inverted Triangle
For most irregular and complex drawings like portraits, I always recommend beginning with gridlines and focusing on a single box at a time.
Strawberries are different since they have an almost definite shape that tapers toward the bottom. If you observe them closely, the shape resembles an inverted triangle.
Therefore, begin by sketching a simple inverted triangle. While at it, keep it light and use soft pressure with your pencil. A 3H to H pencil is ideal since you can easily erase later on.
You can proceed to add two reasonably sized parallel lines to resemble the stem, as I have done.
Sketch the Shape of the Strawberry
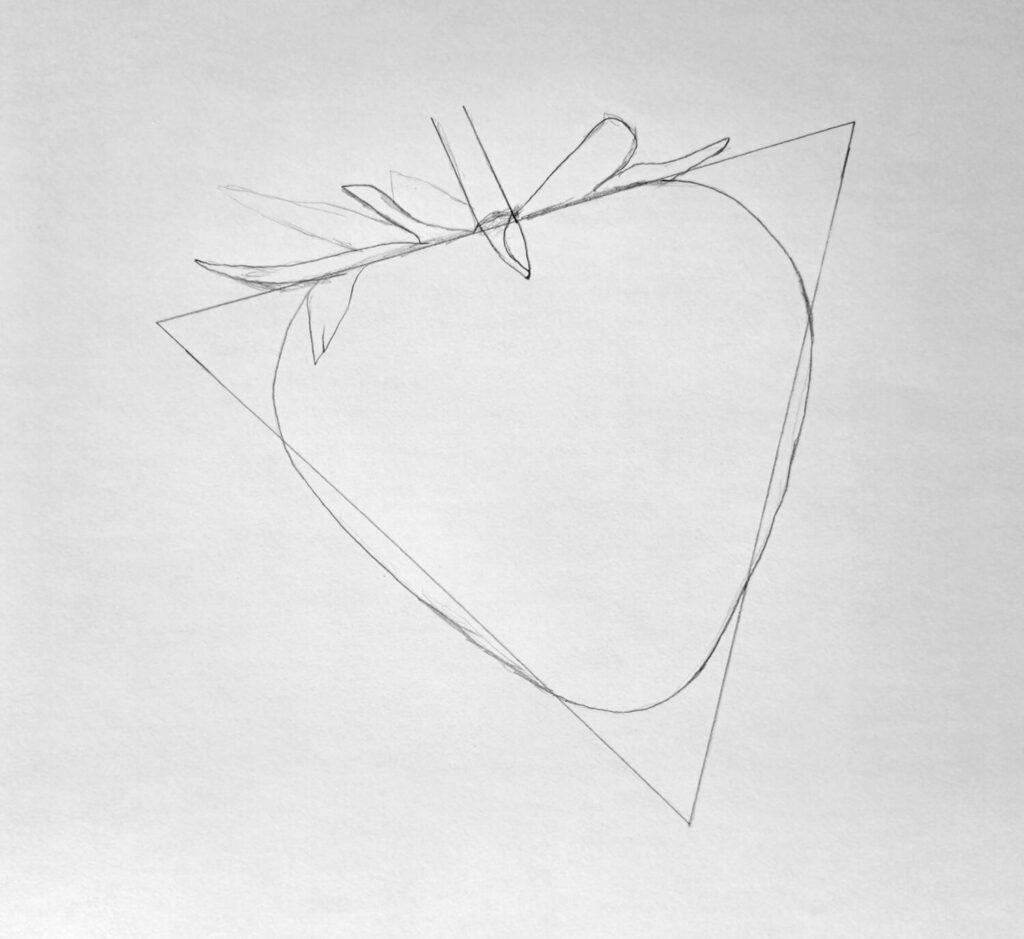
Remember that the job of the triangle is to guide you as you sketch the strawberry. This means it shouldn’t limit you because the idea is to come up with an organic shape that resembles a triangle.
Therefore, feel free to round out the sides, bulge the middle slightly, and flatten the top just a bit where the leafy crown sits.
Next, sketch the calyx, the leafy top that hugs the fruit. Add small, pointed leaves radiating outward. They overlap, twist, and vary in size.
Again, keep your sketch as light as possible.
Complete the Strawberry Sketch
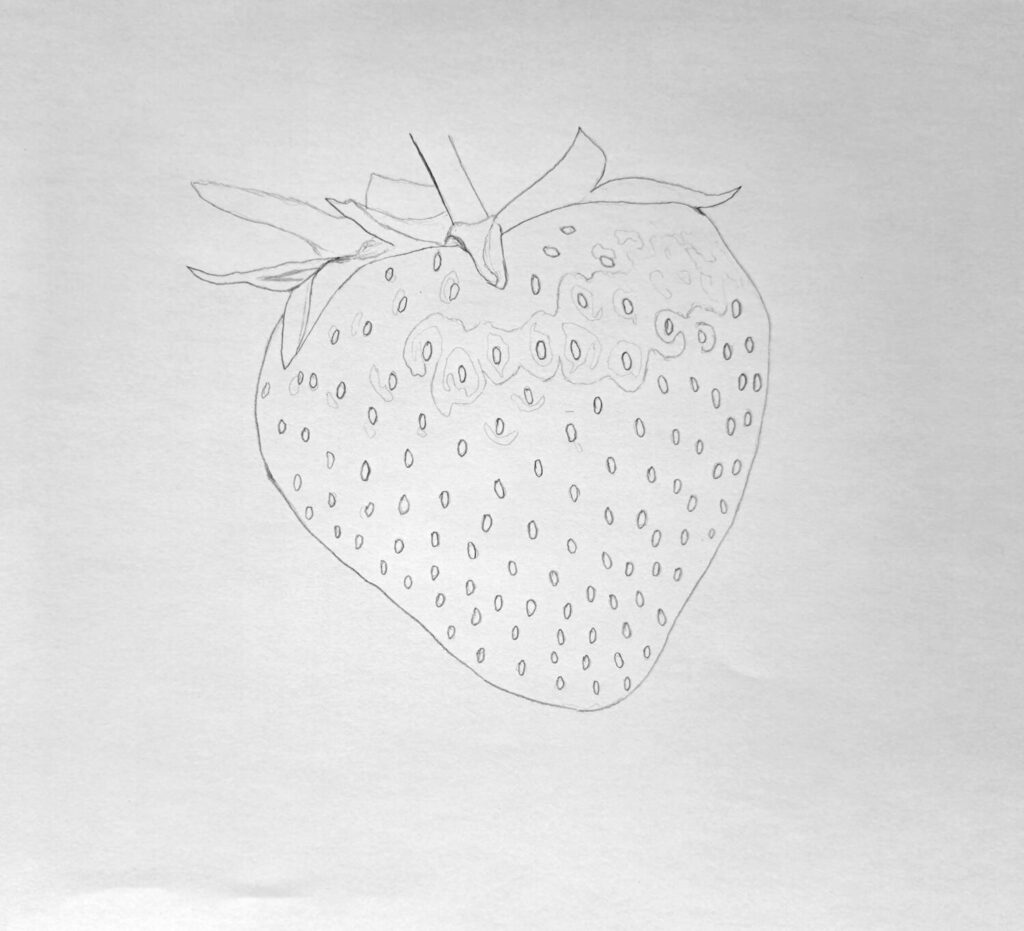
At this point, we don’t need the guiding triangle. So, you can proceed to erase it. Next, refine the outline by adjusting the outline, adjusting the calyx, and the leaves around the crown.
Then, start placing the seeds. Strawberries don’t have random dots slapped on top. Those seeds, called achenes, follow subtle rows that wrap around the form. The seeds are embedded in shallow pits across the fruit’s surface.
At this point, we’re just sketching small vertical ovals that are evenly spaced.
Shade the First Layer with an HB Pencil
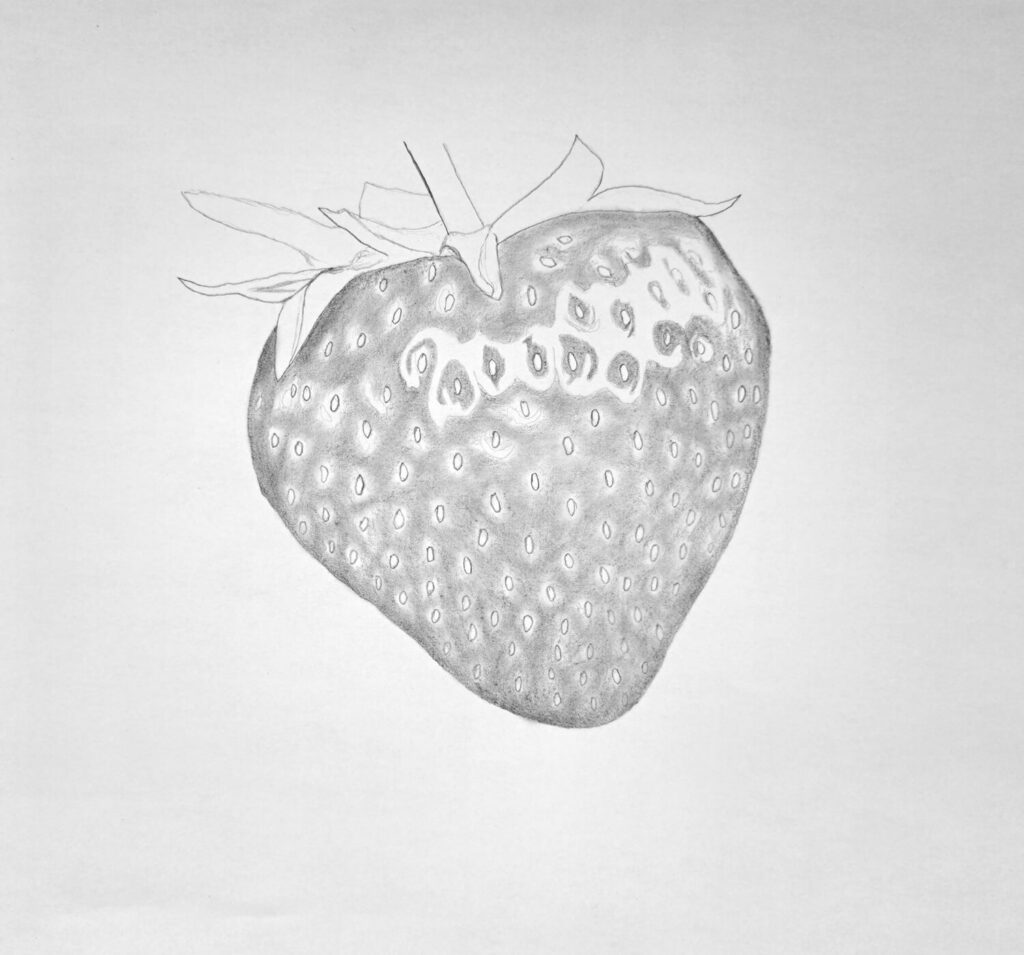
The first step is to carefully think about your light source. Is it coming from the left? Right? Above? If you’re using a reference image, observe it keenly to understand where the dominant reflection is.
And then, with an HB pencil, start shading the body of the strawberry. Leave a highlight area untouched. That bright patch is what makes the fruit look juicy.
Shade using small circular motions or light layers. Don’t press hard because gradual layering builds richer tonal values than heavy pressure does.
Once you’re satisfied, use a blending stump to spread the graphite evenly. And remember, skip the seeds and every other thing for now.
Shade the Seeds and Around Them
Each seed catches light differently. Shade around each seed slightly darker than the surrounding surface. This creates the illusion that the seed sits in a tiny depression.
Then lightly shade one side of each seed to suggest form. Leave a small highlight on the opposite side if your light source calls for it.
It sounds tedious, and honestly, it can be. But this step transforms your drawing from flat to three-dimensional (at times, this is the true test of drawing realism).
Shade the Stem, Leaves, and Calyx
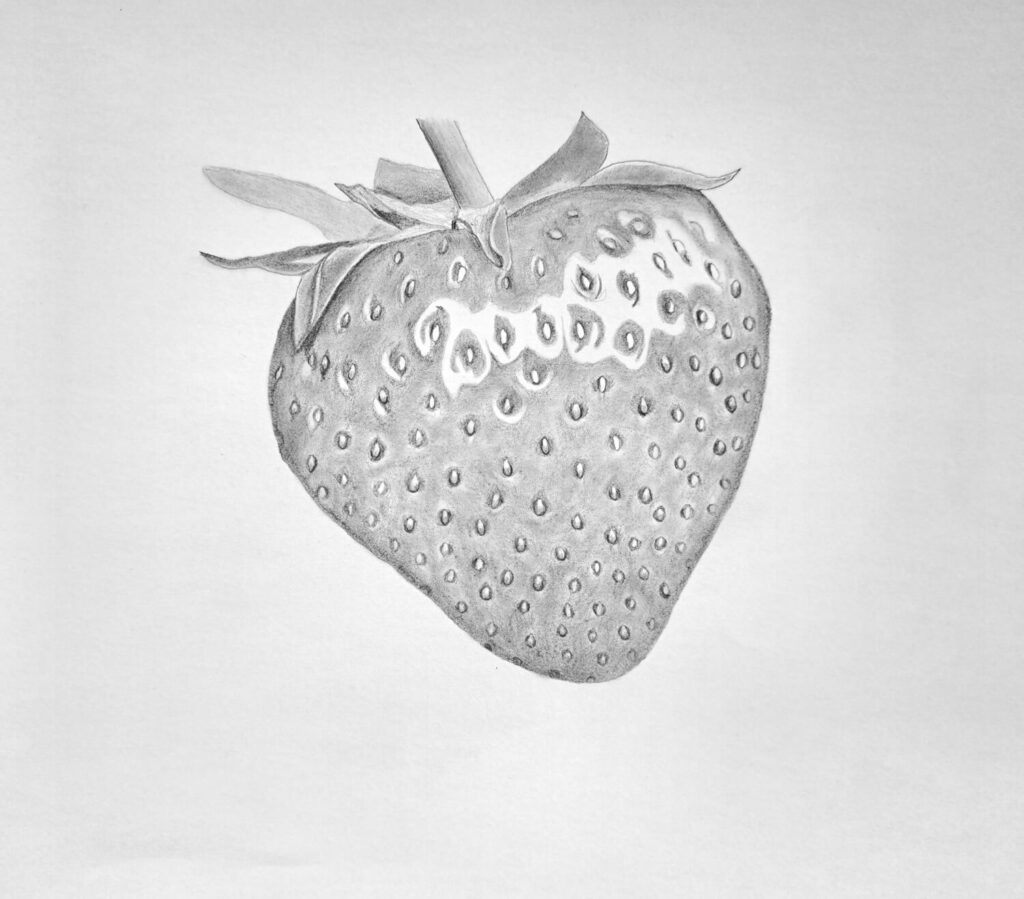
Again, using an HB pencil, begin shading the leaves.
They’re usually lighter than the fruit but have deeper shadows in their folds. Start with light shading. Then darken the areas where leaves overlap or curl.
Don’t worry about the leaf veins at this point. We just want to give these features a clean, uniform shade.
Finally, shade the stem. It’s cylindrical, so create a soft gradient from light to dark. For instance, depending on the light source, one side could be dark with a smooth transition to the next.
Finalize by Adding Details (Shadows & Highlights)

This is the polishing stage.
Add darker accents in the deepest shadows. Strengthen contrast where needed. Sharpen a few seed edges selectively.
Strawberries have tiny hairlike structures on their surface. They’re subtle, but they catch light. With an eraser kneaded to a point, lightly flick short strokes outward from some seeds. Don’t overdo it.
A few hints are enough. Do the same for the leaves to create an illusion of veins.
The last part is stepping back, often squinting at your drawing. Does it appear as round, juicy, and three-dimensional as you’d hope?
If yes, you’re there.
You may also be interested to learn how to draw:
Conclusion
You’ve just read through seven easy steps to draw a realistic strawberry. While these steps focused on using graphite pencils, they’re still applicable when painting or using colored pencils.
I plan to update this tutorial with tips on how to approach it, should you prefer to color or paint.
Therefore, bookmark it, join my newsletter, or save it on Pinterest so that you never miss future updates. I hope you’ve been inspired to keep drawing!