
The monarch stands out among all the butterflies.
Its orange-and-black patterned wings are iconic. Scientists even use monarchs to study migration, climate change, and ecosystems.
But most importantly, butterflies are a fantastic drawing subject for beginners.
They’ve got a clear symmetry that makes them easier to map out, but at the same time, their details push you to slow down and really observe.
This guide will walk you through the process step by step. You’ll start with simple guidelines, then build up the body and wings, and finally add shading for realism.
I’d also recommend bookmarking this tutorial or saving it on Pinterest, because I’ll update it with a colored pencil version in the days to come. You won’t want to miss it! (Updated down below).
Let’s begin:
How to Draw a Realistic Butterfly Step by Step
Drawing the guidelines

Every good and realistic drawing starts with a guide. Think of these guidelines as scaffolding that holds everything in place.
Before we continue further, having a reference is encouraged, especially for beginners. So, start with a straight vertical line. This line will align the butterfly’s body.
Next, add two diagonal lines that intersect in the middle of that vertical line. These diagonals will help you place the wings evenly on both sides.
Pro Tip: Keep the guidelines as light as possible since we’ll need to erase them later. Pressing the pencil will damage the paper, and the marks won’t be erased smoothly. I’ve made mine darker in the illustration so that they’re visible on screen.
Sketching the butterfly’s body
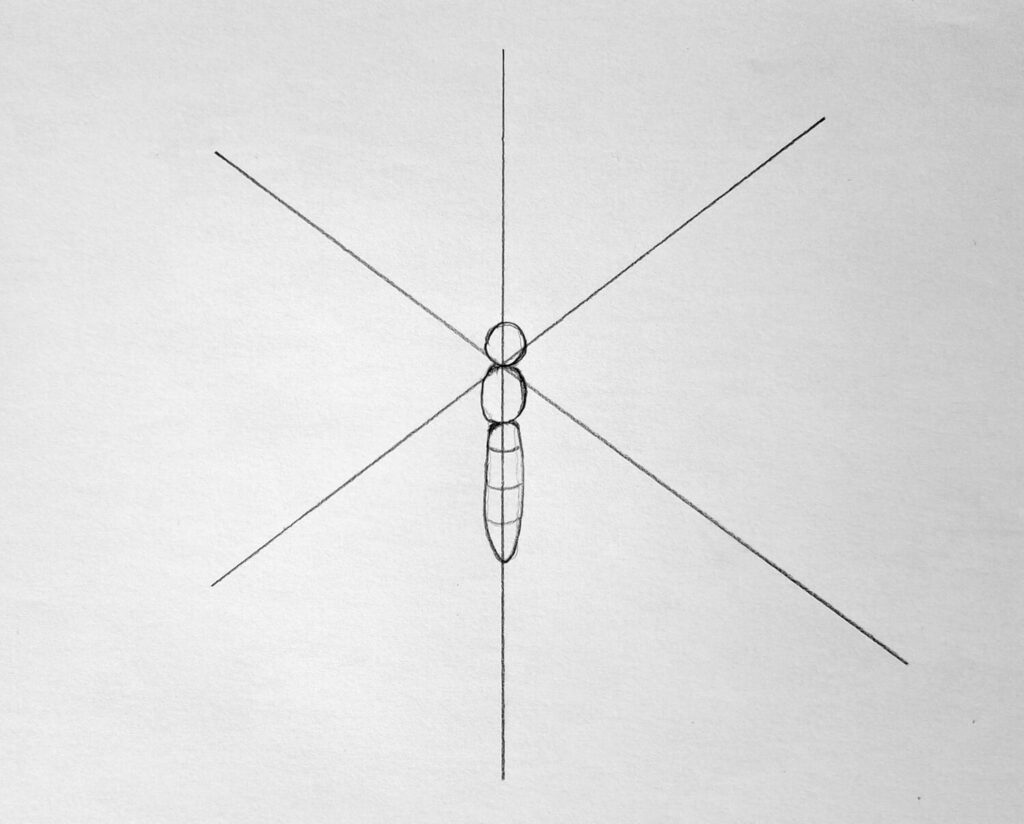
Butterflies aren’t just wings, and the body matters more than you might think. Break it down into three simple shapes along that vertical line.
At the very top, draw a small oval for the head. Just below, add a medium oval for the thorax. And finally, stretch out a long oval for the abdomen. These stacked shapes form the core of your monarch.
The shapes don’t have to be perfect, and if I’m not clear with my instructions, just refer to the illustration included above.
Drawing the butterfly wings
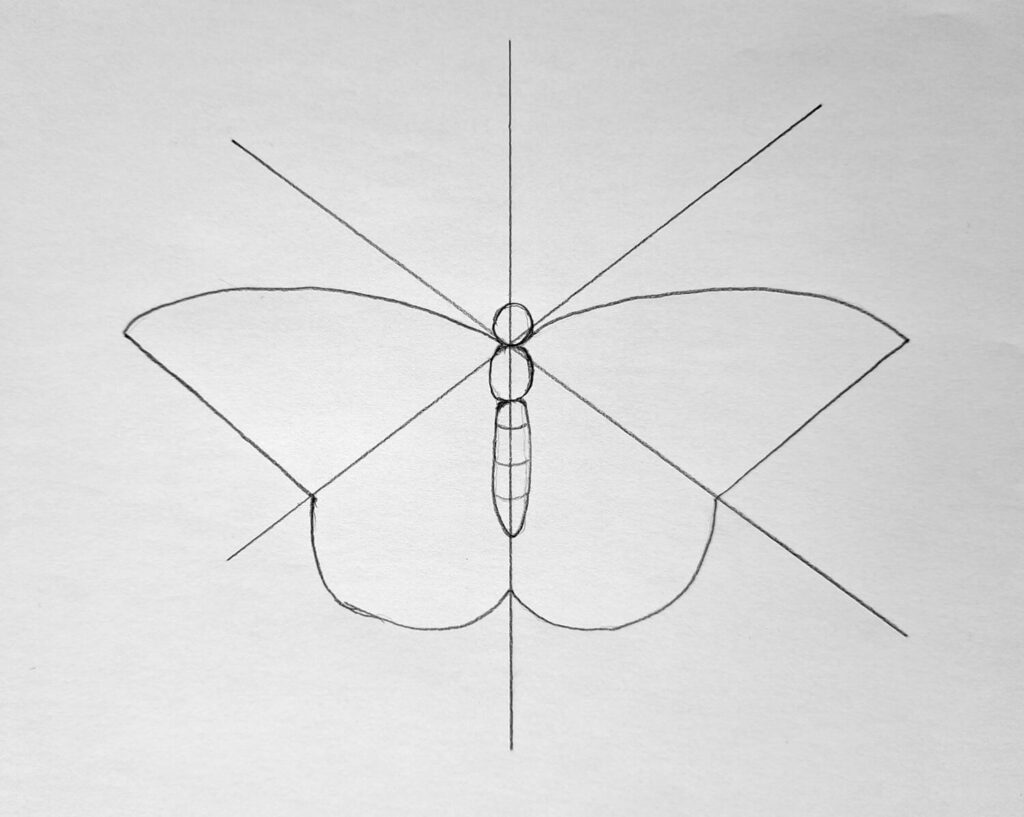
Monarch butterflies are often recognizable by their wings. Therefore, we need to capture that as accurately as possible. And that’s where the diagonal lines come in.
Therefore, from the center where the diagonal and vertical lines cross, draw two equal downward curving lines, one on the left and one on the right. Let each line sweep down and join the lower diagonal lines, forming the top large wings.
Now draw two upward curving lines, again one on each side, starting from the base of the abdomen. Let those arcs up and meet the diagonal lines at the same point where the top wings joined, forming the bottom wings.
Keep the curves smooth and balanced so the wings look symmetrical.
Pro Tip: Draw lightly at first so you can tweak the curves. Use the center intersection as your anchor, and step back to compare both sides as you work.
Completing the sketch
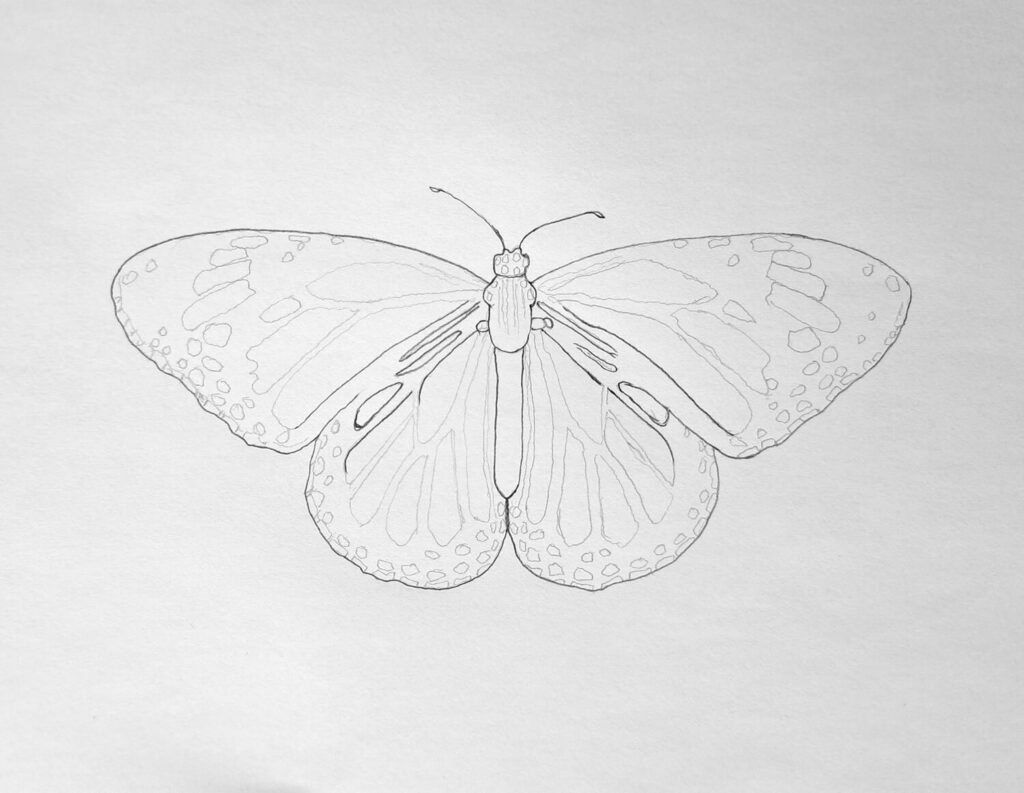
Time to bring it all together.
Start by erasing the guidelines. Without them, you’ll really see the butterfly take shape.
Refine the lines by replacing the straight edges with gentle curves. Real wings aren’t ruler-straight; they’ve got subtle bends that make them look alive.
Now add details to the wings. Monarchs have bold black outlines with white spots near the tips, and their orange sections are divided by black veins. Try to sketch all the details and just aim to capture the pattern.
If you’re unsure, look up a reference photo from a reliable source. Here are free monarch butterfly photos to choose from.
Shading the dark values on the butterfly wings
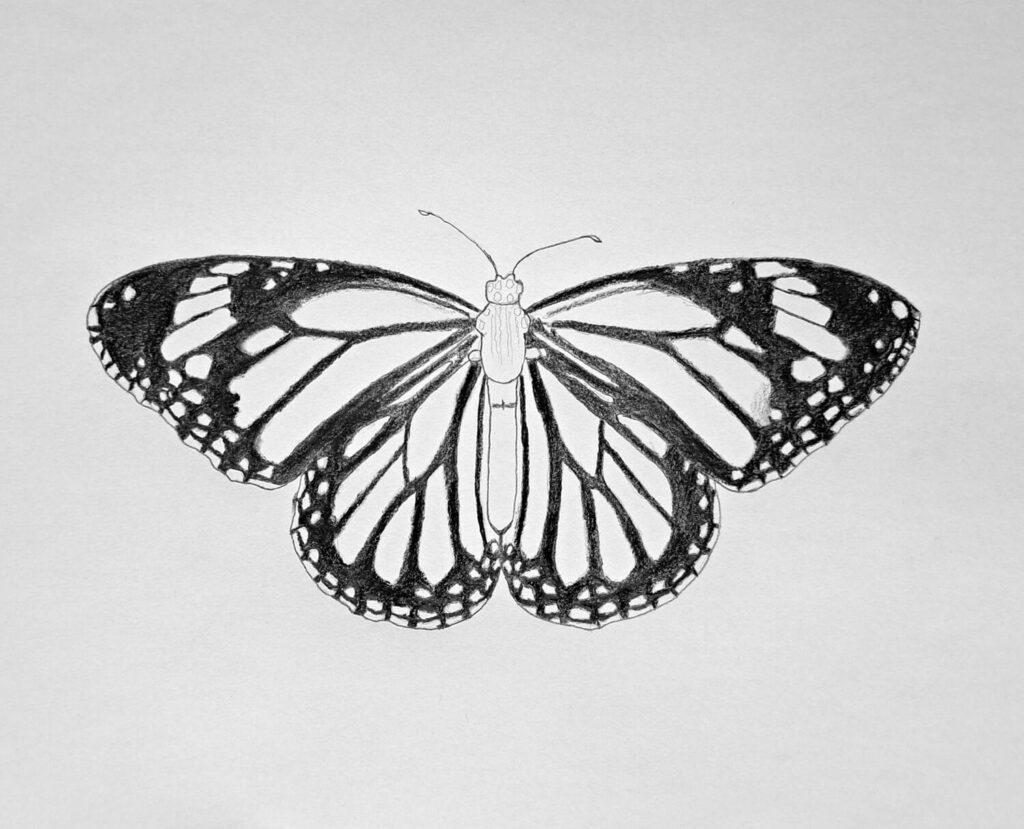
Shading is what transforms your sketch from a flat outline into something realistic. Start with the darkest parts: the thick black veins and edges of the wings. Use a soft pencil (like a 6B or 8B) and press lightly at first, layering until the blacks feel rich.
Alternatively, if you want it even darker, feel free to use charcoal.
Pay attention to the direction of your strokes. Follow the curve of the wing instead of shading in random directions. It adds dimension and flow.
When shading, I’ll leave out all the dots around the wings so that they appear truly white. Alternatively, you can use an eraser, preferably a battery-powered one, to do it.
Completing the light values and the butterfly’s body
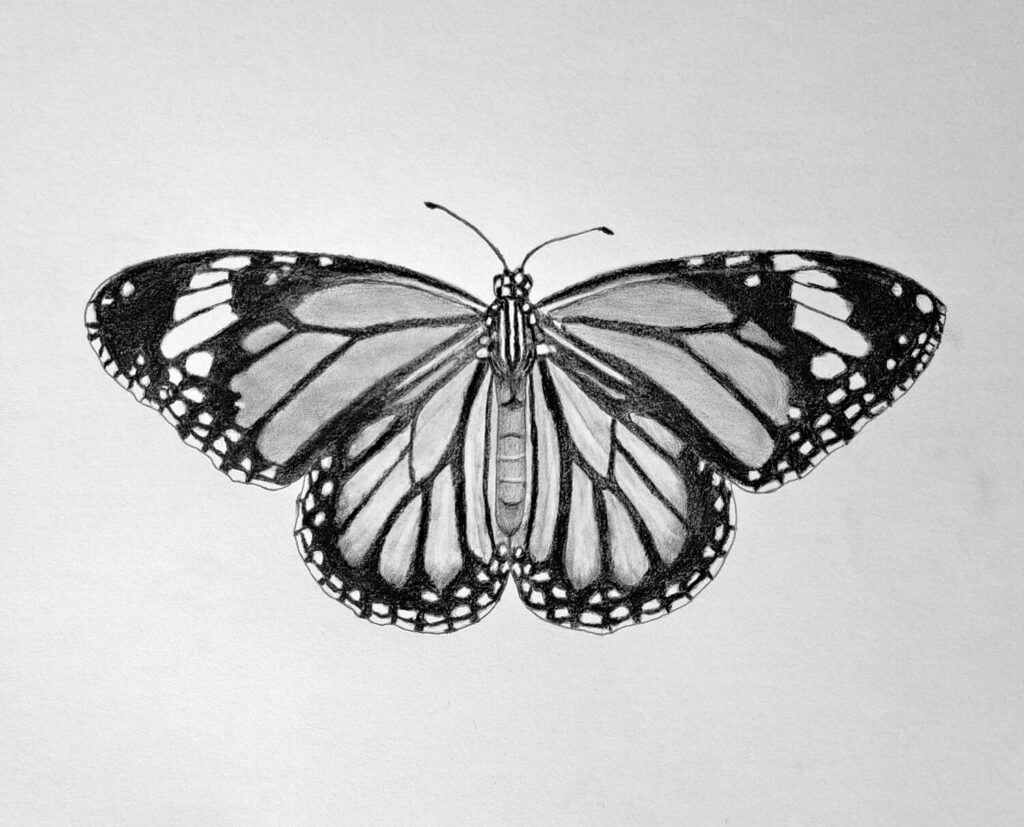
Once the darkest areas are in place, move to the lighter parts. Shade the orange areas lightly, leaving highlights where the light might hit.
Even though monarch wings are bright in real life, think in terms of light and shadow. Darken where the wings overlap, and lighten the tips to suggest thinness.
For the body, shade the thorax and abdomen with gentle strokes to give them texture. Monarch bodies are fuzzy, so a little softness in your pencil work goes a long way. Also, don’t forget the antennae.
Shade the head and thorax a bit darker with white dots using the same strategy we used when shading dark values. The abdomen is also divided into sections – use an HB pencil and a kneadable eraser to get in those.
Part 2: Colored pencil version coming soon
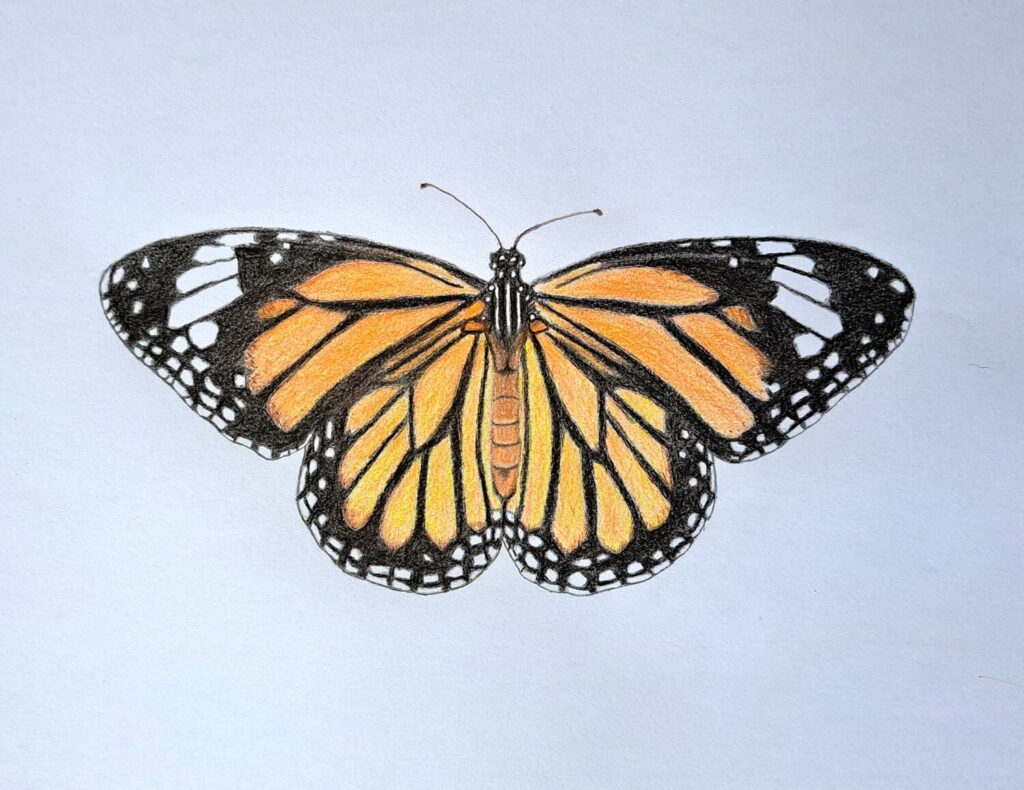
If you’re itching to add color, don’t worry, I’ll cover a colored pencil version in detail soon. Monarchs practically beg to be drawn in orange, black, and white, and colored pencils are perfect for layering those bold hues.
Editors’ Note: I promised to create a tutorial on how to draw a butterfly using colored pencils. The initial idea was to make it a continuation of this guide. However, I thought it better to make it its own independent post.
You can check it out here – How to Draw a Butterfly with Colored Pencils
Besides, here are my top 5 tutorials to keep you busy and practicing:
- Drawing Basic Forms: Draw a Realistic Cylinder in 4 Easy Steps
- A Step-by-Step Tutorial on How to Draw an Elephant
- 6 Simple Steps on How to Draw an Apple Realistically
- Drawing a Cat’s Head: Learn How to Draw a Cat in Minutes
- The Definitive Guide to Drawing a Realistic Bird
Conclusion
There you have it!
By starting with guidelines, breaking down the body into simple shapes, and building the wings step by step, you give yourself a framework that makes the process easy-peasy.
Add shading, refine the details, and suddenly you’re looking at a butterfly that feels ready to take off from the page.
Artists often say monarchs are a symbol of transformation.
Maybe that’s why drawing one feels so rewarding. You start with a few rough lines and end with something vibrant and alive.
That’s the magic of art. Let me know your thoughts!