Every time someone asks me about drawing ideas or easy stuff to draw, I always mention basic forms, which include spheres, cones, cylinders, and now cubes. This is especially important if you are a beginner and want to practice shading on predictable surfaces.
But drawing basic forms isn’t just for beginners.
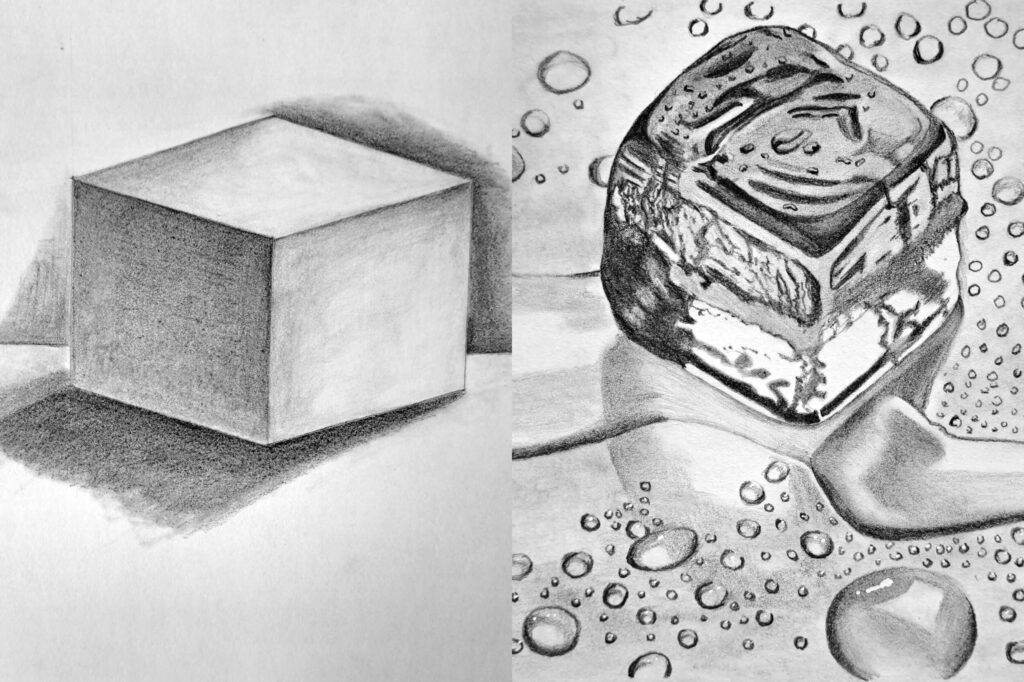
Most professional artists still practice drawing them to hone their craft. For those who are advanced, they prefer to tackle more complex textures like ice cubes, but the principles remain the same.
In today’s tutorial, I’m going to discuss how to draw and shade a cube, plus drawing an ice cube as an application.
Follow along:
How to Sketch a Cube (Line)
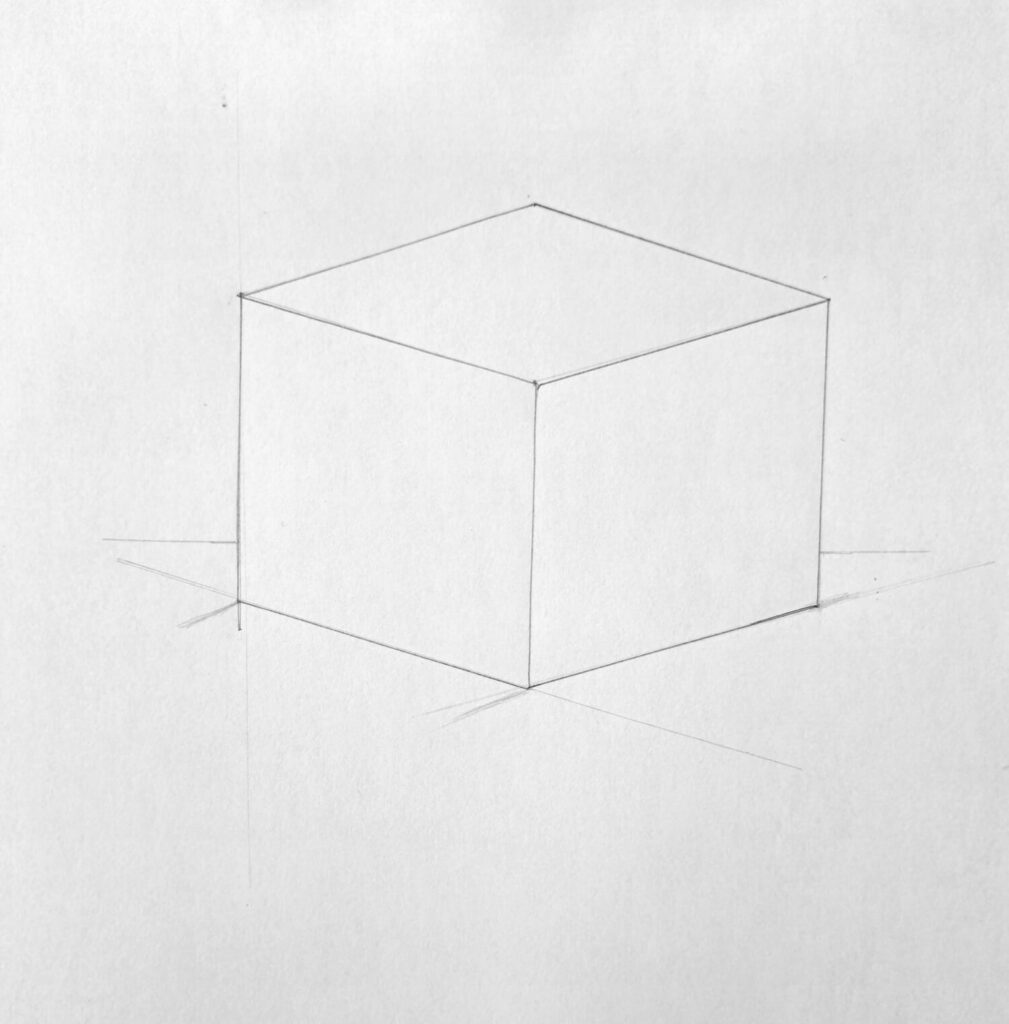
The best way to sketch a cube is to think of it as two squares joined with parallel lines at the corners. Begin by sketching a tilted square and then draw another square slightly offset behind the first one.
Now connect the corners. While at it, remember to make all the lines equal. But there’s a caveat when drawing a cube in one-point perspective.
When drawing in perspective, the square at the back will always appear smaller, hence the lines ought not to be equal. However, when the cube in question is relatively small, as in our case, there’s no need to sketch in perspective.
As you continue to sketch your cube, take a moment to check your angles.
Parallel edges should stay parallel. If one edge leans left and the other leans right, the cube starts to collapse visually.
Lastly, remember to keep the lines light at this stage since a cube sketch is really a framework for shading. Dark lines interfere with the shading process.
How to Shade a Cube
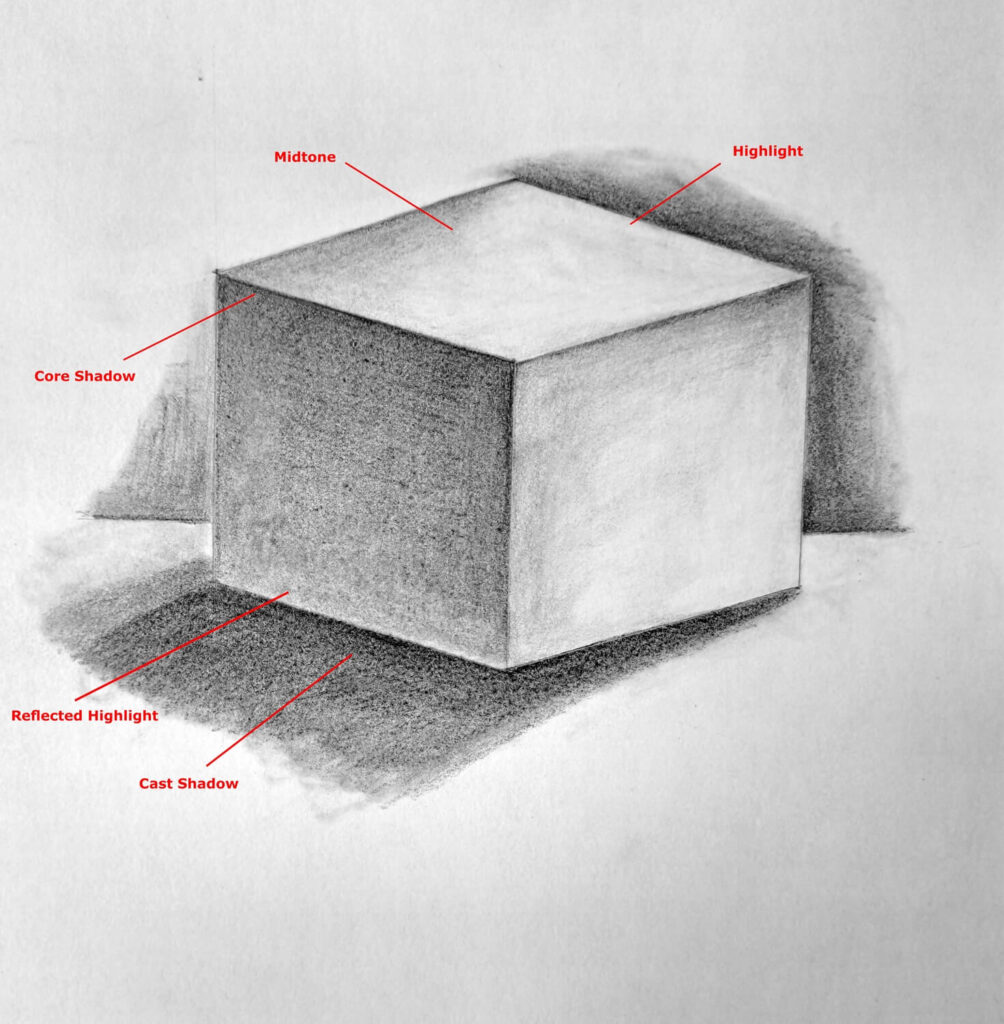
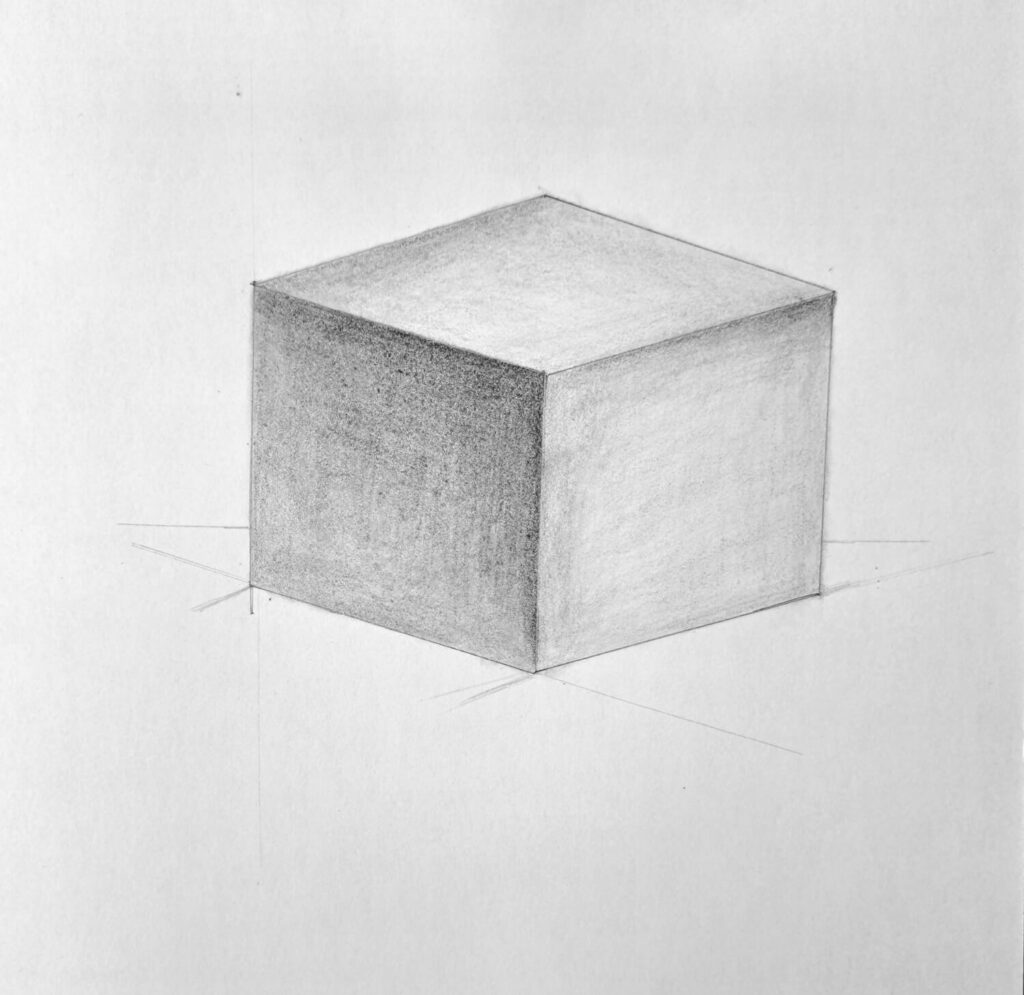
When an object light lands on the surface of an object, the shade is broken into five basic values: highlight, midtone, core shadow, reflected highlight, and cast shadow, as shown above in my drawing.
These value groups appear on almost every object under a single light source, which is why basic forms such as a cube are such great practice subjects.
Therefore, you need to determine your light source upfront since this will determine how you shade your cube.
Studies indicate that our brains assume light comes from above in most cases, which helps us interpret shaded shapes as three-dimensional forms. In other words, the brain already wants to believe your cube is real.
Your job as an artist is to suggest convincing value changes, and the brain will do the rest.
Shading the Midtones
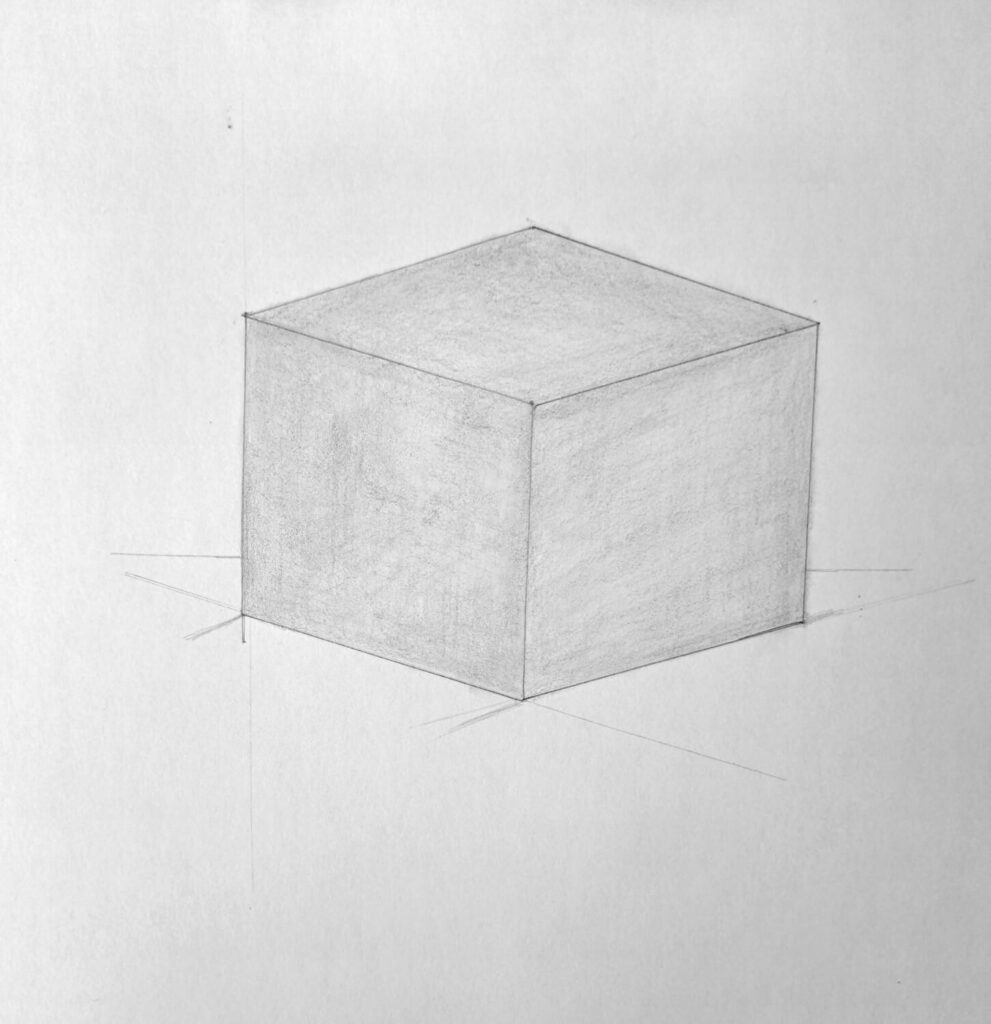
Although some people might find beginning with midtones surprising, it’s actually an easy trick to start your shading process.
The idea is to determine how dark your core shadow is vs the highlights and then pick an appropriate graphite pencil (HB in most cases). Then use your favorite shading method to uniformly apply the shade.
At this moment, don’t worry about the light source. The goal is to make your cube appear to have form and volume (solid-looking).
You can then use a Q-tip or tissue paper wrapped around your finger to blend for a smoother finish.
Shading the Core Shadow and Reflected Light
You cannot proceed with this step without determining your light source. Once done, move to the face that points away from the light. This side holds the darkest value on the cube itself.
Gradually layer graphite until it’s clearly darker than the midtone rendered above.
Near the edge between the light and shadow sides, add a slightly darker band. This is called the core shadow. It forms where light stops reaching the surface directly.
On the flip side, where the core shadow meets the surface on which the cube sits should be slightly light, indicating that some light will bounce off the surface and then onto the cube. This area is referred to as reflected light or highlight.
Shading the Cast Shadow, Background, and Highlight
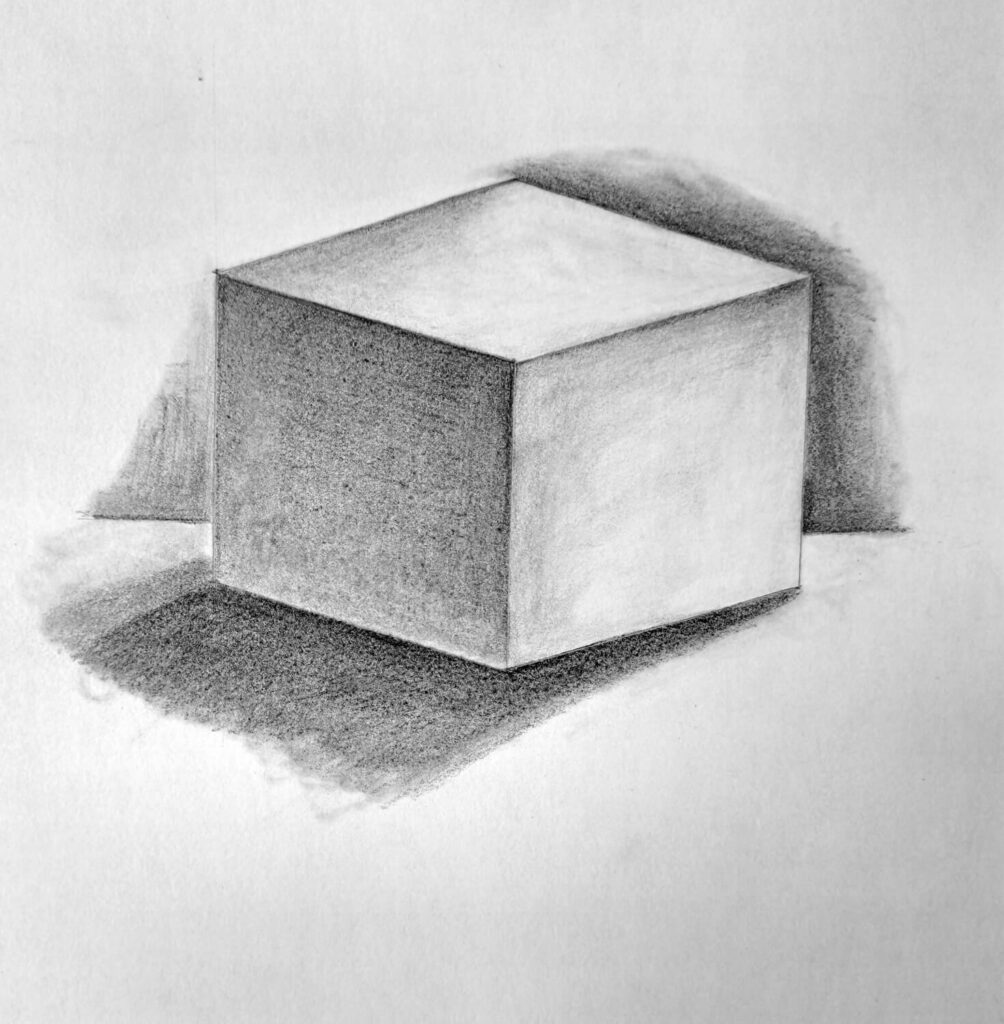
Now the cube needs contact with the surface it sits on.
Draw the cast shadow extending away from the light source. It usually starts darkest near the base of the cube and softens as it moves outward.
This shadow anchors the cube to the ground. Without it, the cube looks like it’s floating in space.
Next, lightly shade the background behind the lightest face. This trick helps the highlight stand out. Remember, at this point, we don’t really have the highlight since we started by shading the midtones.
Therefore, to render that, get a kneadable eraser and dab off some graphite from the area and surface directly facing the light source.
If the transitions feel abrupt, blend lightly with a stump and additional pencil layers rather than smudging with your finger. Smudging can flatten values and make graphite look blurred.
How to Draw and Shade an Ice Cube (Application)
An ice cube is basically a cube that’s transparent, reflective, and irregular.
It sounds complicated, but the structure underneath is still the same cube you just drew. The trick is understanding that ice bends and scatters light instead of simply blocking it.
Besides, the ice cube contains water droplets, cracks, and cloudy areas that catch light.
Sketching and Shading the Dark Values
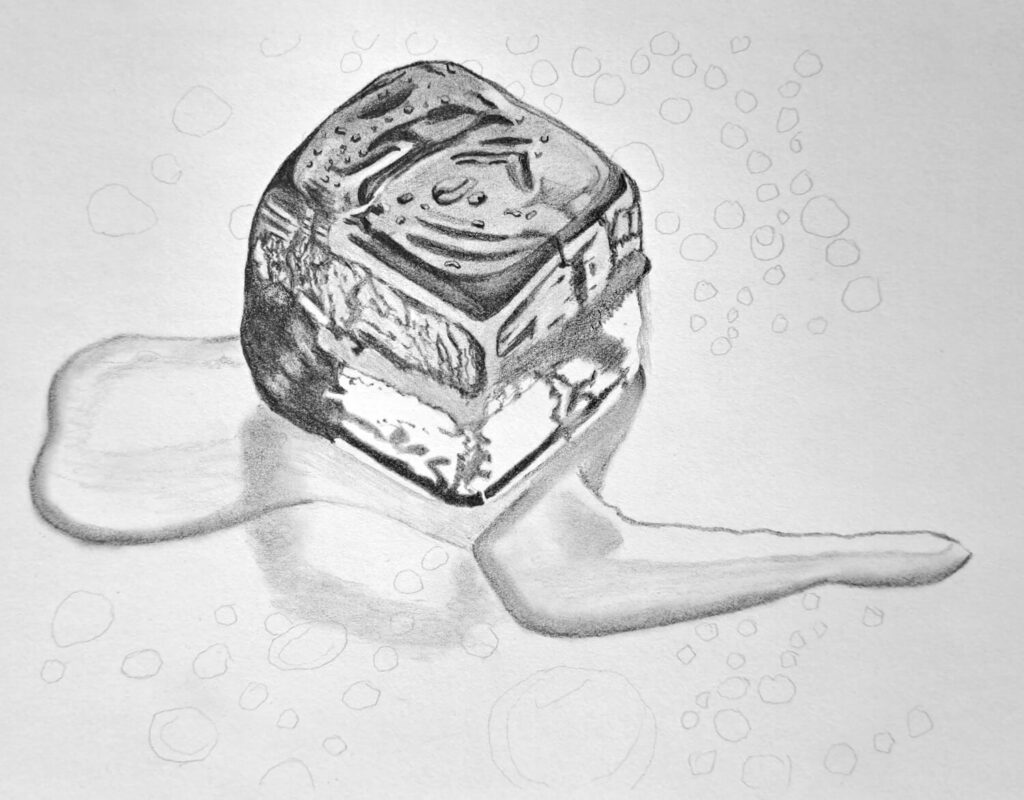
Start by sketching an uneven cube. I’d recommend you get a reference (a real ice cube or a royalty-free image). Ice rarely forms perfectly sharp corners, and some edges can look chipped or softened.
Next, identify the darkest shapes inside the cube. These often appear near edges, cracks, or overlapping internal planes.
Instead of shading whole faces evenly like before, block in these darker shapes first.
Use a soft and dark pencil like a 2B graphite. These values create the illusion of transparency because the eye sees darker shapes through lighter surfaces.
If you observe closely, you’ll realize that the same principles we used to draw a photorealistic glass of water are the same for drawing an ice cube.
Complete Shading of a Realistic Ice Cube
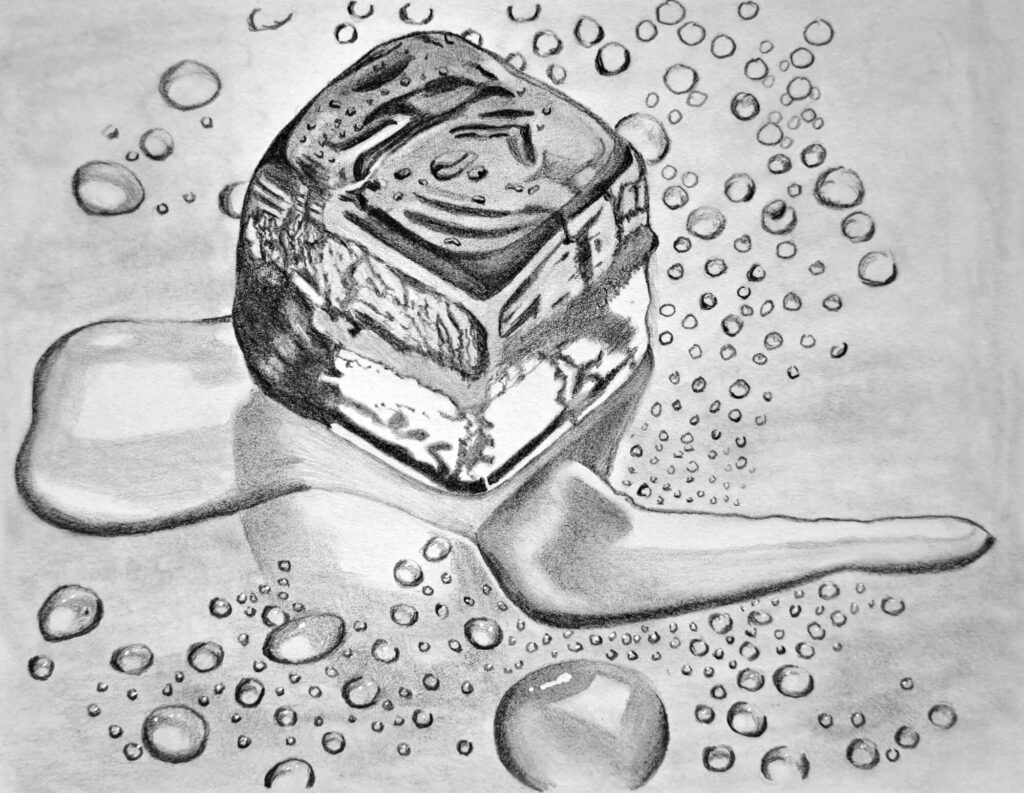
Now start layering midtones around those dark shapes.
Ice reflects and refracts light, so values shift quickly across the surface. Some edges may glow bright while nearby areas drop into shadow.
Leave sharp white highlights along certain edges. These highlights suggest the slick, wet surface of melting ice. Add soft gradients where light passes through the cube. These lighter areas suggest translucency rather than solid mass.
The cast shadow beneath the ice cube also behaves differently from the cube earlier. It often looks softer and lighter because light passes through the ice before reaching the surface.
A few subtle reflected highlights inside the cube can help sell the illusion. These small bright accents mimic how light bounces around inside transparent materials.
At the end of the process, the drawing should contain a mix of crisp edges, soft gradients, and bright highlights. Those contrasts are what convince the viewer they’re looking at cold, reflective ice instead of a simple shaded box.
The last icing on the cake is the running pools of water, together with water droplets. If you want to learn how to draw water droplets on a surface (leaf), then check out the article by clicking on the link.
Conclusion
Drawing and rendering basic forms isn’t only exciting, but also a way to unwind from the complexities of life. And the best part is, just about anyone can draw something they’ll feel proud of.
I hope you’ve been inspired to pick up your pencils, a sketchbook, disconnect from social media, and begin drawing.
As always, feel free to share with others.