
In 2023, a lotus-inspired art piece titled “Pink Lotuses on Gold Screen,” painted in 1973 by Zang Daqian, became the 3rd most expensive painting sold in an auction in Hong Kong. This is one of the many artworks done to celebrate and honor this amazing flower.
In its essence, the lotus symbolism is rich and varied, embodying concepts of rebirth, spiritualawakening, and resilience.
For everyday artists, it serves as a perfect drawing subject that rewards patience and gives enough drawing practice.
The good news is that you don’t need tricks or fancy materials to draw a realistic lotus flower. Instead, you need a piece of paper, some pencils or graphite or both, observation, and a basic understanding of how light and space work together.
This guide tutorial will walk through the process step by step.
Let’s start.
5 Easy Steps to Drawing a Realistic Lotus Flower
Step 1: How to Sketch the Basic Lotus Flower Shape
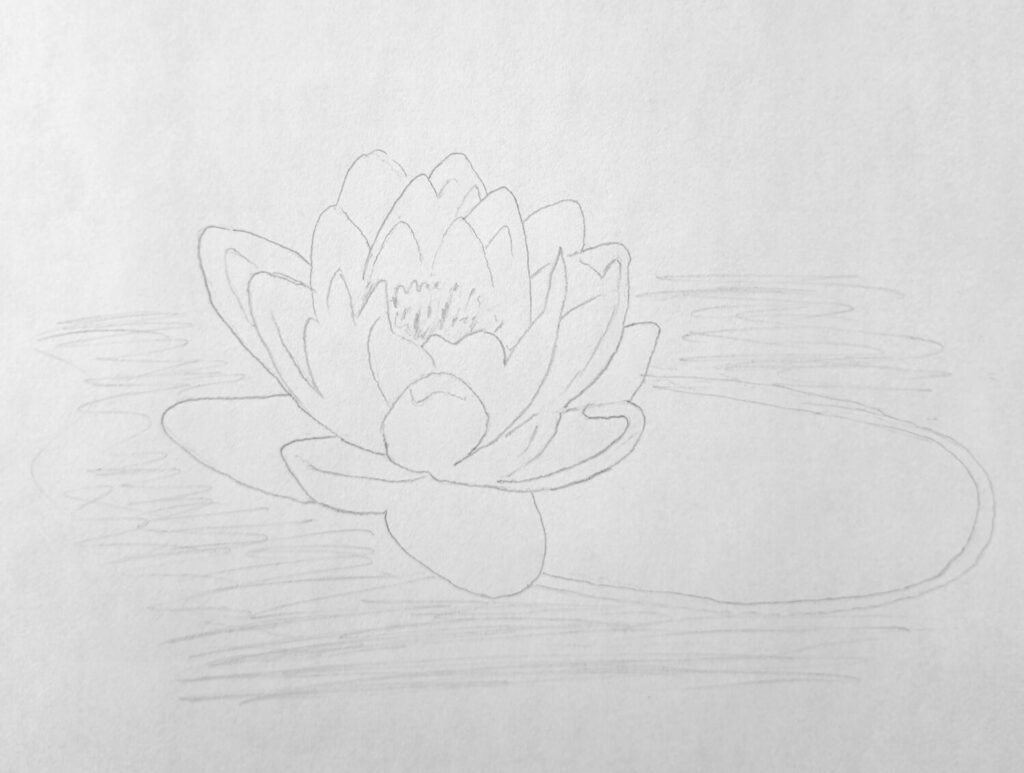
As with most drawings, a shaky foundation will almost always result in a disastrous outcome. That’s why it’s important to understand and master line drawing. When sketching the general outline of the lotus flower, remember to use a light pencil.
Start by lightly sketching a vertical guideline or slightly slanted if your flowers lean to the side. This helps maintain symmetry without forcing it.
Next, draw a wide, shallow oval centered on that line. This oval represents the core of the lotus where the petals radiate outward.
From that oval, sketch a few large, front-facing petals. Keep them broad at the base and gently tapered toward rounded tips. Let them overlap slightly, but leave breathing room between forms.
Botanically, lotus flowers grow in concentric whorls, with inner petals standing more upright and outer petals opening wider. This growth pattern is documented by institutions like the Royal Botanic Gardens, Kew, and it’s worth respecting early on.
Following natural structure now prevents awkward corrections later. And remember, to vary the size and shape of the petals for extra realism.
At this point, the drawing should feel underwhelming. Once you’re satisfied with your basic sketch, erase any guidelines, including the oval and the vertical line.
If you observe my sketch, you’ll realize that I’ve captured the leaf beneath as well.
Step 2: Shading the Negative Space
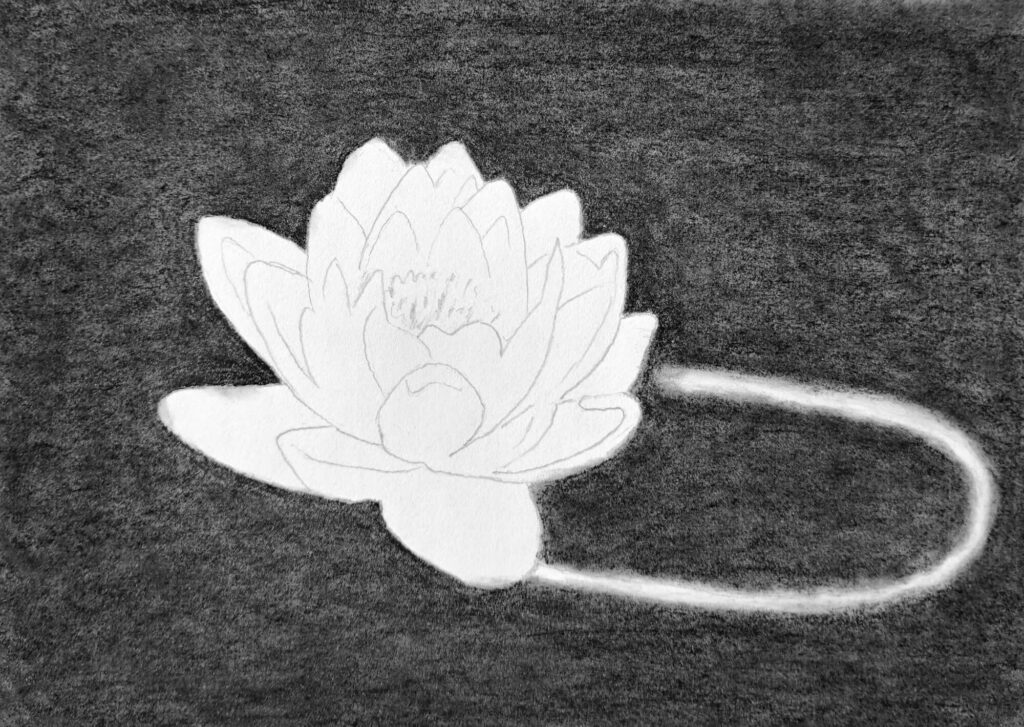
Now it’s time to make those simple shapes feel like a real flower by paying attention to what isn’t the flower at all.
Instead of shading the petals first, shade the gaps between them. Those narrow pockets of darkness where one petal overlaps another. I’ve also shaded the whole area surrounding the flower with charcoal (it’s faster), but you can also use a 6B pencil.
When you use a pencil, make sure not to press too hard because the shadow will appear too shiny.
This technique is called negative space shading as a way to improve accuracy and depth. It’s also come in handy for objects that are brighter, like lotus petals.
Step 3: Basic Shading of the Petals
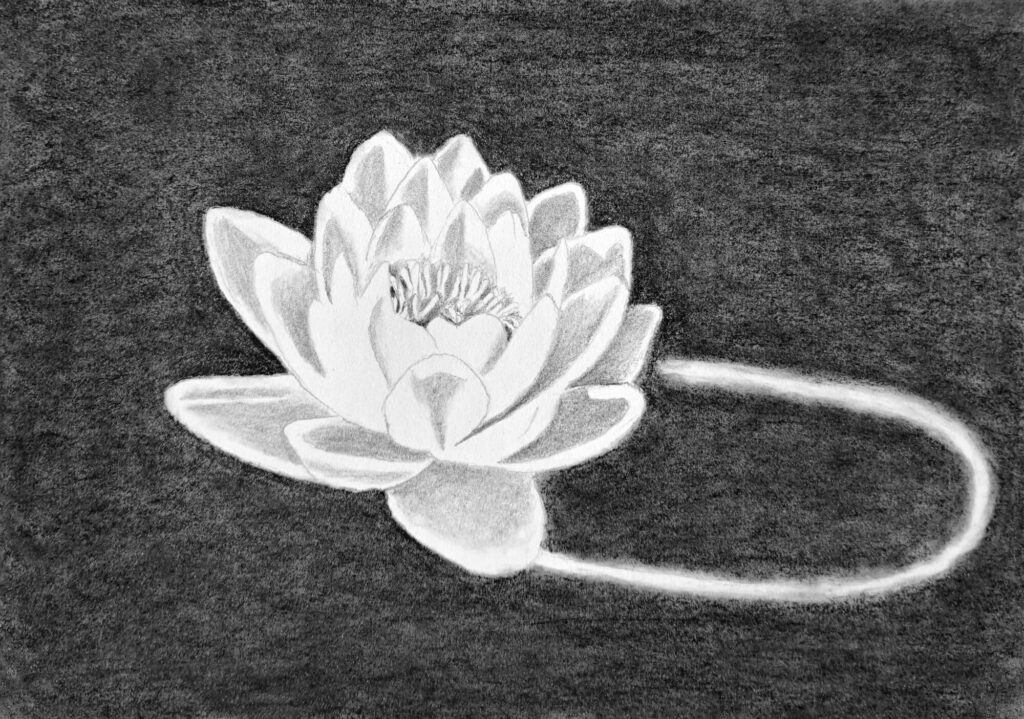
With the structure established, you can finally shade the petals themselves.
Lotus petals are thin and slightly translucent. Light doesn’t just hit them. It passes through them. Botanical studies explain how petal cell structure scatters light, creating smooth gradients rather than harsh contrast.
Start shading from the base of each petal and work outward. Use long, gentle strokes that follow the direction of growth. This reinforces form and keeps the petals from looking flat.
Leave the edges and tips lighter. These areas catch more light, especially on open petals.
If you’re unsure how dark to go, stop early. Most beginners over-shade at this stage. Instead, you’re building tone and layering the drawing.
By now, the lotus should feel solid. The petals have form. The light mostly makes sense. But something may still feel off. Like the flower exists, but nowhere in particular.
That’s because realism isn’t just about the subject. It’s about the space the subject lives in.
Step 4: Shading the Leaf Beneath the Lotus and the Cast Shadow
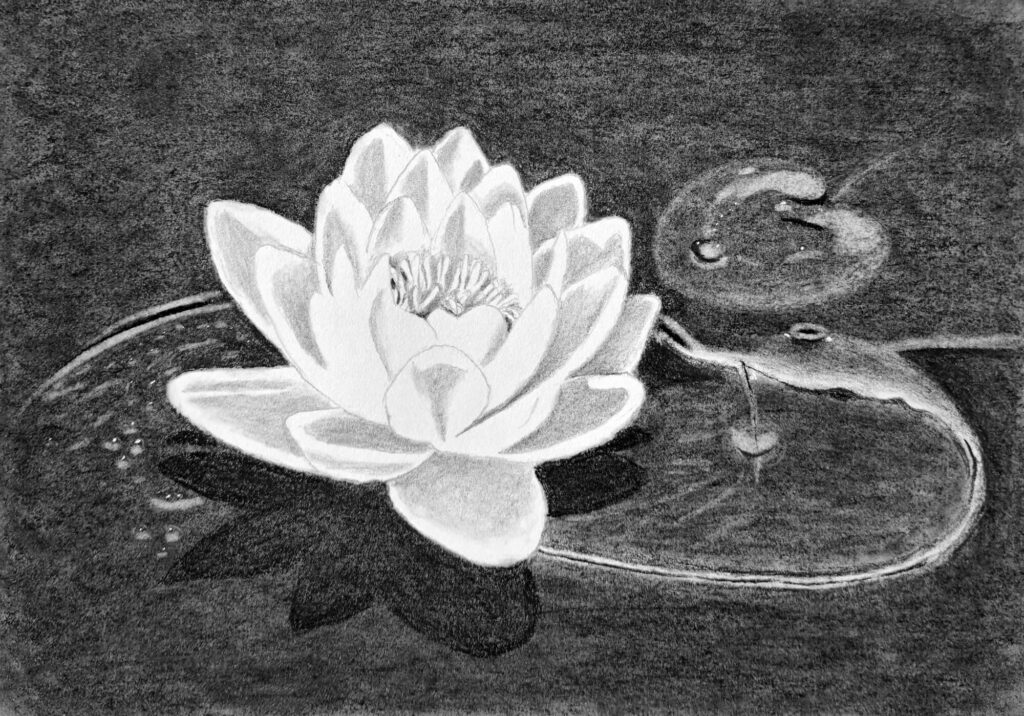
A lotus doesn’t float in isolation. It rises above water and often rests visually against a broad leaf beneath it.
Lightly shade the suggestion of a large lotus leaf under the flower. A wide, soft shape is enough for now.
Remember, we’ve shaded everything around the flower with dark values. Therefore, any representation of the leaf and its surroundings should be done by erasing and not shading.
For this purpose, I’ve used a kneaded eraser – molding it into a point and drawing on the surface.
Lotus leaves are thicker, more matte, and often partially shaded by the flower above. Horizontal surfaces that receive less direct light naturally appear darker. This is a basic principle of light physics and is commonly discussed in landscape and botanical drawing guides.
Now add the cast shadow of the flower onto the leaf or water surface. Keep the shadow soft-edged and uneven. It should be darkest near the base of the flower and fade as it spreads outward.
This step matters more than people expect. Shadows are visual anchors. Without them, the lotus floats like a sticker. With them, it belongs to the scene.
Once the leaf and shadow are in place, the lotus finally settles. It stops floating. It feels grounded.
Step 5: Final Shading – Shadows, Highlights, and Details
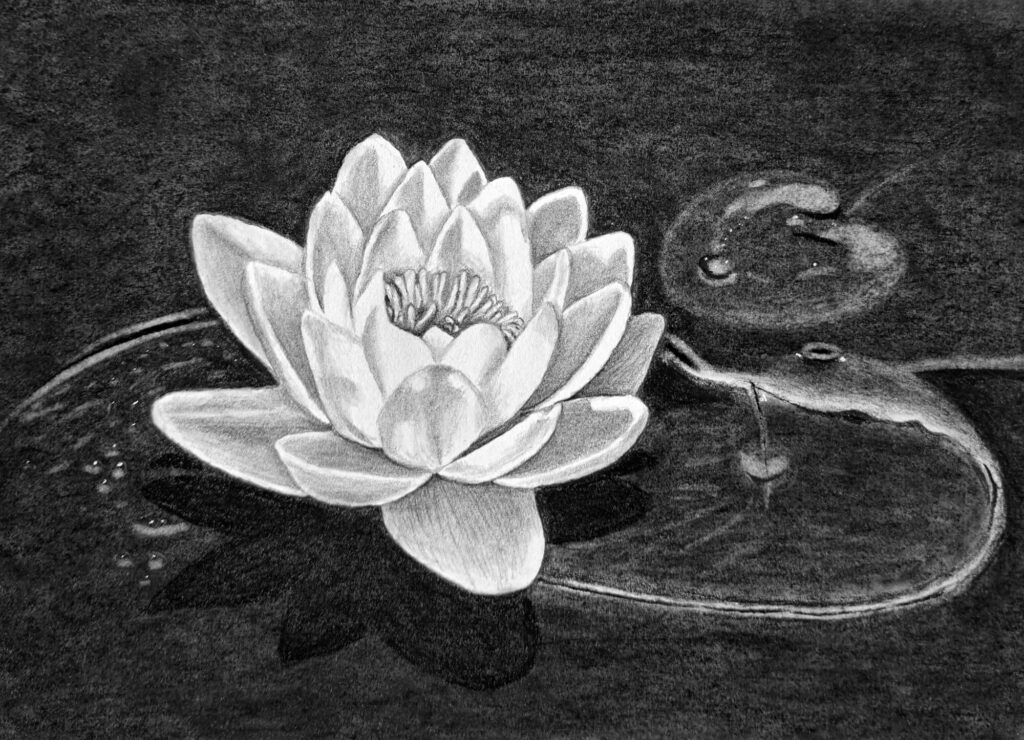
Deepen the darkest negative spaces where petals overlap. Reinforce cast shadows gently, especially near the base of the flower.
Add fine lines near the petal bases to suggest subtle folds and texture, but avoid outlining everything. Too many hard lines kill softness fast.
For highlights, resist the urge to draw them in. Instead, lift graphite with a kneaded eraser. Lightly dab along petal edges and raised areas. This subtractive method is commonly used by professional graphite artists.
Step back often. Squint at the drawing. Ask if the light still makes sense. If something feels wrong, it usually is.
At this point, you should feel proud of what you’ve achieved.
If you want to learn more about drawing flowers, below are some of my popular guides:
- Drawing cosmos flowers
- Drawing hibiscus flowers
- Guide to drawing tulip flowers
- Lily flower drawing
- How to draw an orchid
Conclusion
Here’s the thing. I’m always excited to draw and create these tutorials. Some more than others. But drawing this lotus flower was almost at the top for two reasons:
- I find my process to be easy and straightforward.
- It was an opportunity to learn the varied symbolism of this flower across the world.
I hope you’ll enjoy the process as well. If you do, I’ll appreciate it if you can share this post with a friend or on the social media of your choice to help spread the word.
All the same, glad to have you here.