
If you want to perfect drawing realism with pencils, you have to practice a lot. But most importantly, you have to attempt drawing stuff that scares you the most.
Think of drawing different textures like hair, fur, feathers, wood, metal, and many more. Most beginning artists avoid these subjects altogether. However, there’s one that scares even the most seasoned artist.
Drawing and rendering a scene that involves water reflections.
And I must admit, not long ago, I was in this very category. Not anymore. In fact, as I came to realize, drawing reflections in water is easy as long as you understand a few basic principles, which I’ll discuss in today’s tutorial.
Reflections in Still vs Disturbed Water
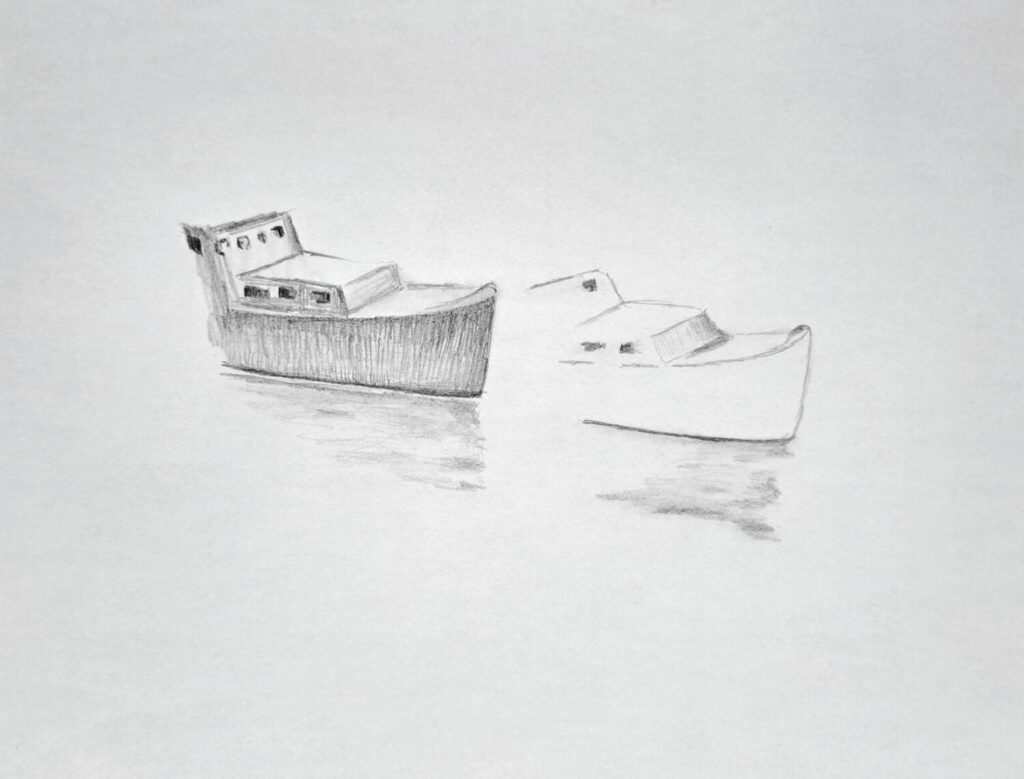
Reflections behave differently depending on the state of the water. For instance, in an enclosed harbor, the water often will become still, appearing as smooth as glass. Therefore, an object reflection will have very few ripples.
But you have to be careful when drawing such a scene.
Here’s why:
Most beginners think that reflections are the exact reverse of the object turned upside down. As you’ll realize by the end of this tutorial, it’s not necessarily true.
If, on the other hand, the water surface becomes broken by a moving object or the wind, it distorts the reflection.
And when the water is disturbed, it makes a series of hills and valleys. The sky is reflected in the hollows, breaking up the solid form and making the reflection appear longer. Besides, the many water ripples tend to lose the reflection with a slight diffusion under the object.
7 Basic Principles for Objects Reflected in Water
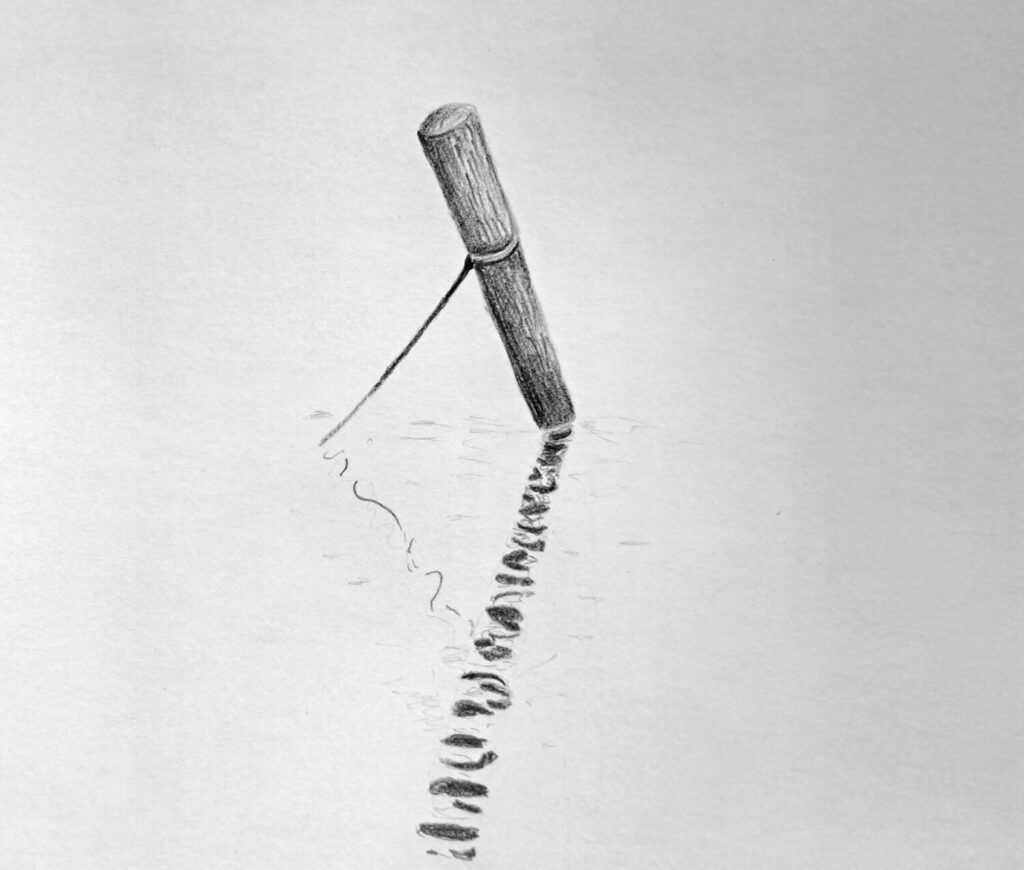
Reflection of a straight object should be as long as the object
When an object stands upright and perpendicular to a calm water surface, its reflection will usually appear close to the same length as the visible object above the waterline.
This happens because the water acts like a horizontal mirror, repeating the object downward at an equal distance. A post, tree trunk, or building reflected in still water often shows this clear one-to-one relationship.
In drawing or painting, this principle helps you judge proportions quickly.
If the reflected version of a straight vertical object is much shorter or longer without a reason, such as waves, perspective, or viewer height, the image can feel off. Start by matching the reflected length to the object itself, then adjust only if the viewing angle calls for it.
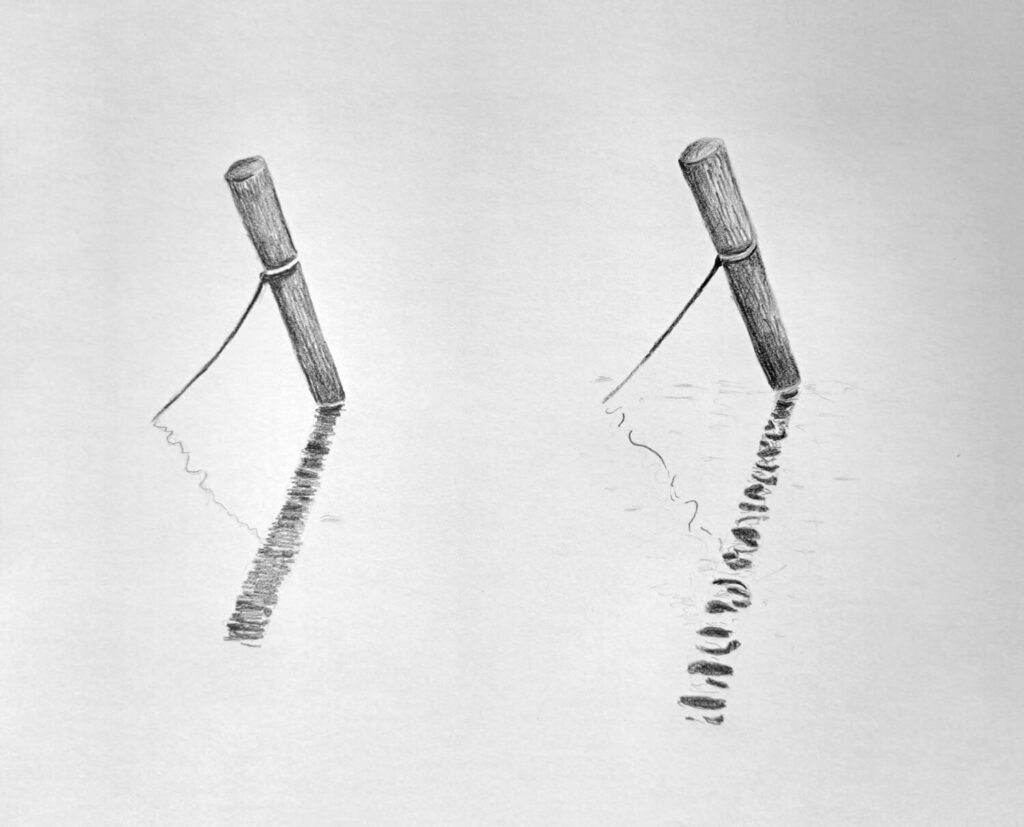
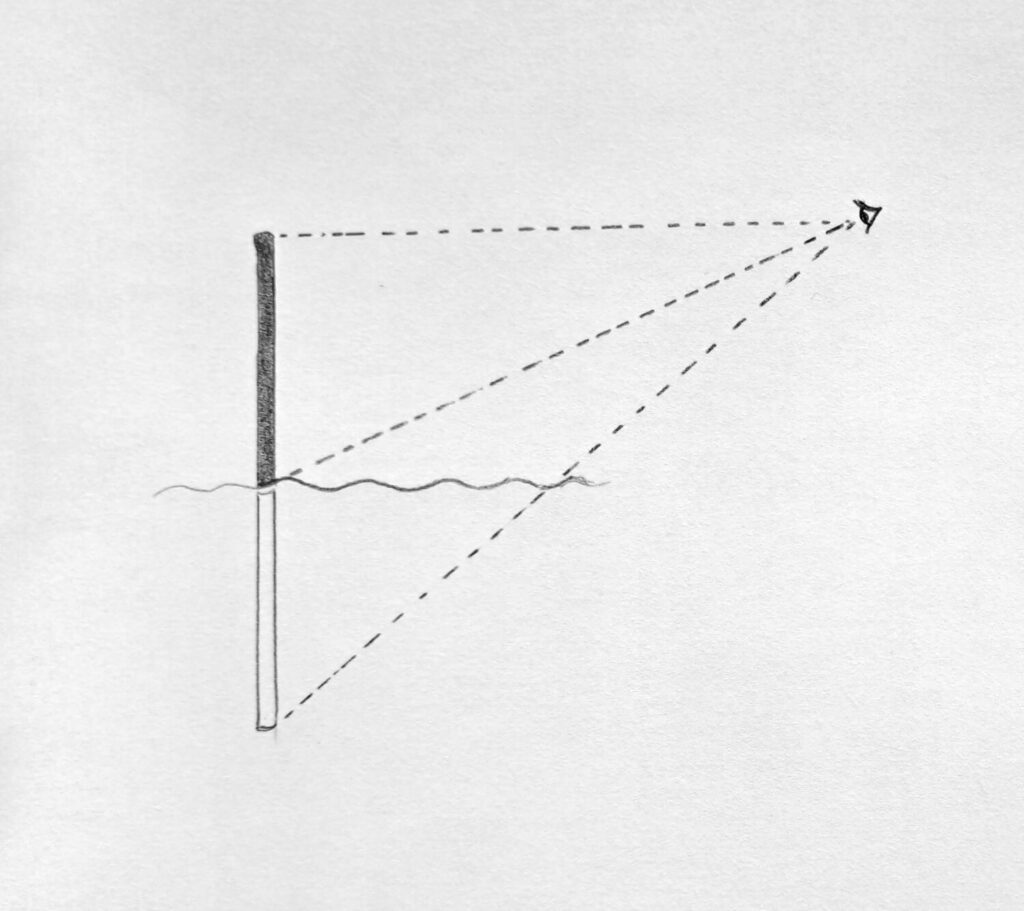
Reflection is longer if an object is leaning towards you
When an object tilts toward the viewer, the top of the object visually comes closer to your point of view.
Because of that angle, the mirrored image extends farther across the water’s surface and can appear longer than the object above the waterline.
This is common with leaning trees, signposts, or masts angled toward the observer.
For artists, this means you should not automatically copy the object’s exact visible height. Study the tilt first. If the object is coming forward toward you, allow the reflection to extend slightly more than expected.
This added length helps communicate depth and makes the leaning angle feel believable.
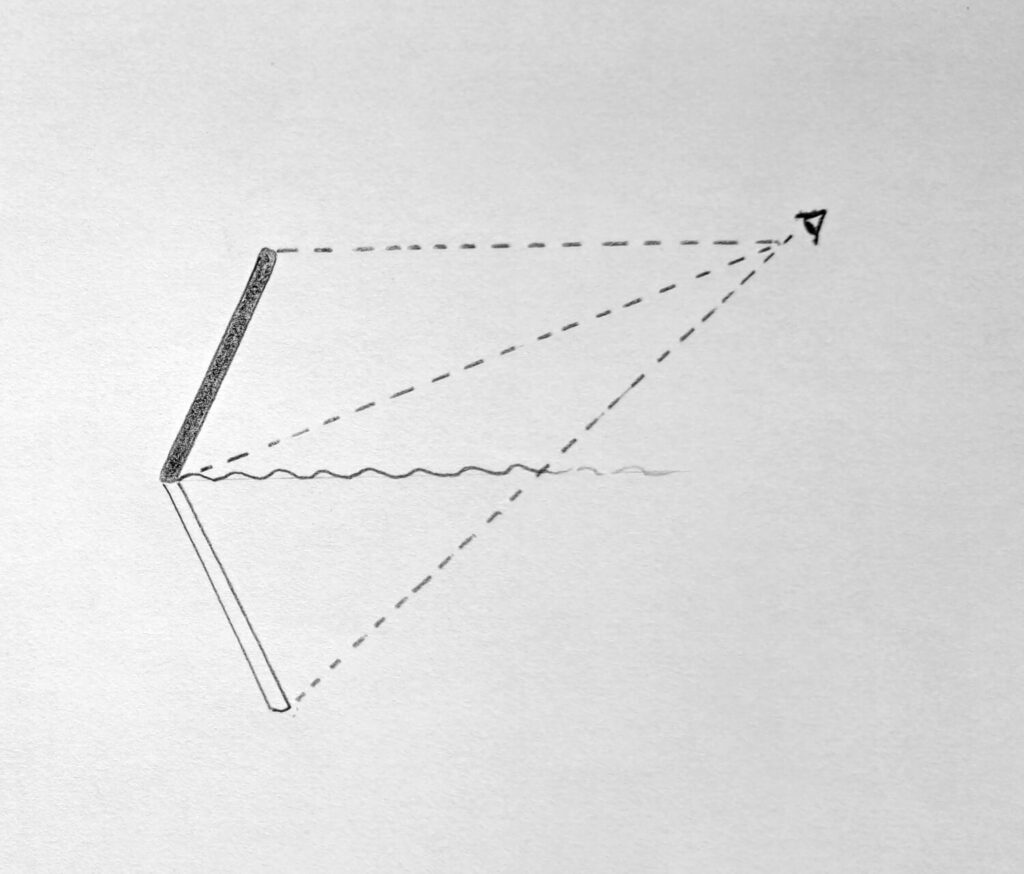
The reflection is shorter if the object is leaning away

If an object tilts away from the viewer, its upper portion recedes into space. Since that part is farther from your viewpoint, less of it projects into the reflection you see, making the reflected image appear shorter.
The stronger the backward lean, the more noticeable the shortening can become.
This matters when drawing fences, poles, or trees that angle into the distance. If you make the reflection the same length as a backward-leaning object, the scene may lose realism.
Shortening the reflection slightly helps reinforce perspective and shows that the object is moving away from you.
The reflection will always lean to the same side as the object
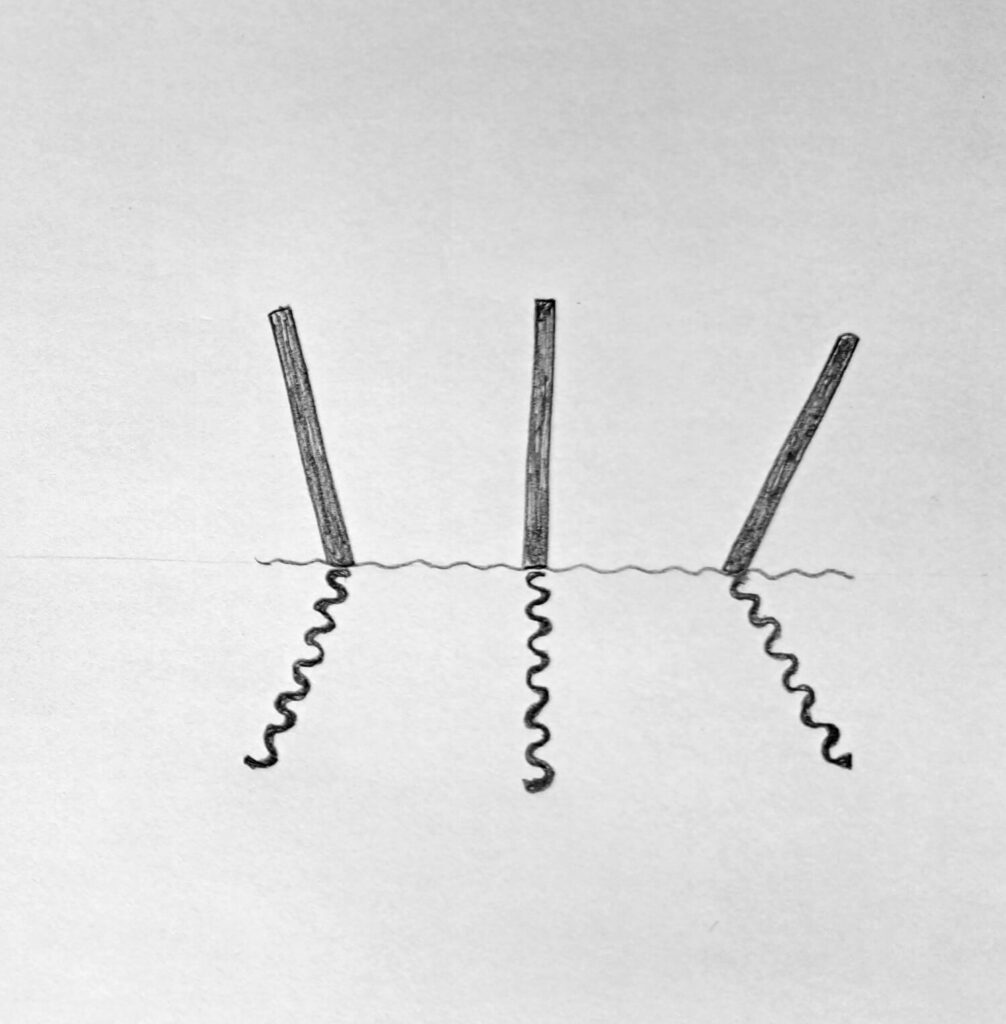
Water reflections reverse objects vertically, not horizontally. That means if a tree leans left, its reflection will also lean left.
The top of the tree becomes the lowest part of the reflection, but the sideways direction remains unchanged.
Many beginners accidentally draw reflections leaning the opposite way because they imagine a standard wall mirror.
In water, that would look incorrect. To check yourself, trace an imaginary vertical line downward from the object. The reflection should follow the same sideways slant while appearing inverted beneath the waterline.
Perspective is vital in drawing water reflections.
When drawing water and reflections, remember to use perspective (one-point perspective for a single object).
For example, the further the water goes away from your view, the less the distance there is between the ripples. This same rule applies where the reflections are more definite (still water).
The reflection near the base of an object is condensed and spreads out more and more as it comes towards your view.
The light source direction affects how dark or light the reflection appears.
How dark or light the reflection is depends upon where the light source (sunlight) is hitting the object.
If the side of an object is in shadow and the sunlight is hitting the top of the water, the reflection will be lighter than the object. If the sun is hitting the side of the object, however, the reflection will be darker than the side.
The color of the object affects the reflection.
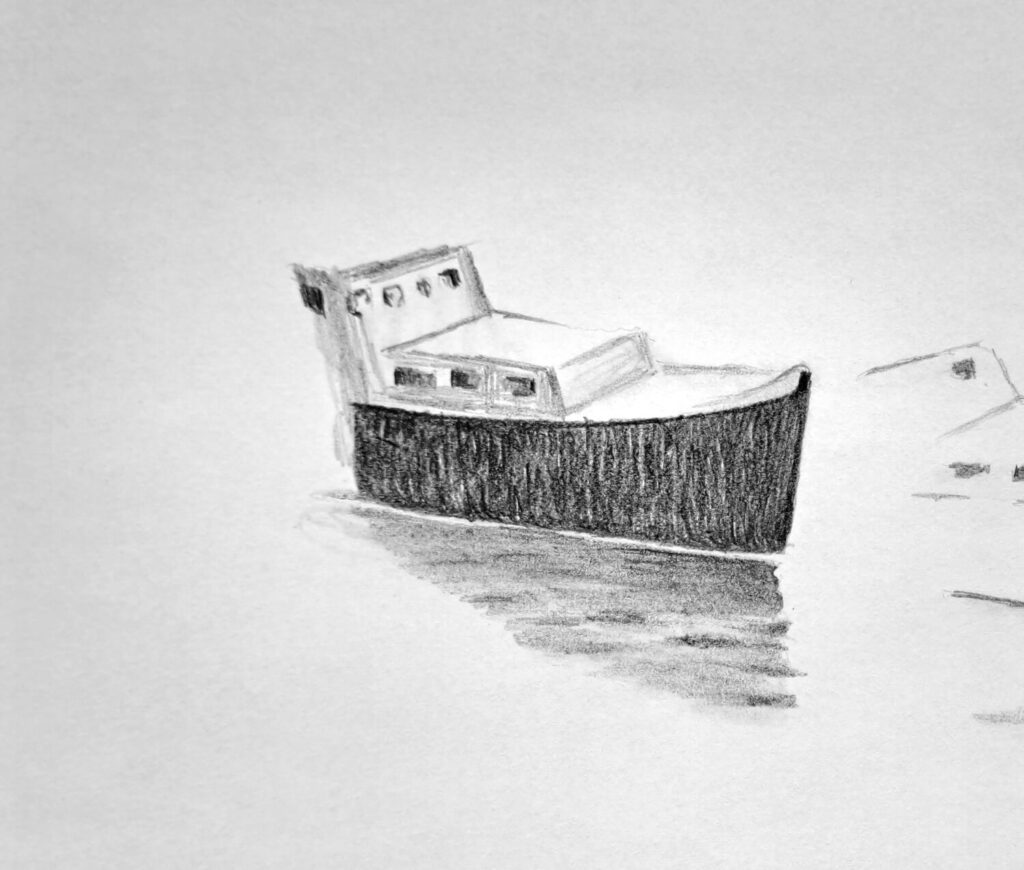
In most cases, the reflection of a black object will be lighter than the object itself.
This is due to the fact that no matter how dark the reflection, it will become lighter due to the transparency, the density, and the color of the water.
Application: A Boat Scene in a Harbor
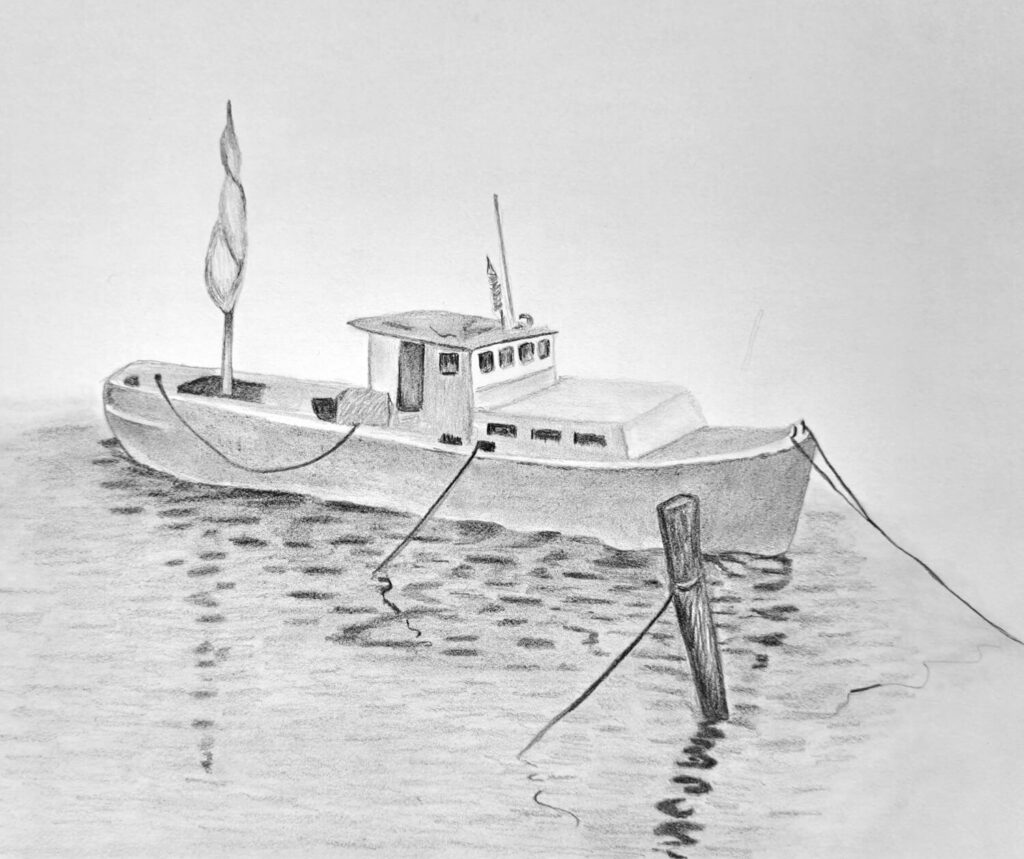
Now, let’s try to wrap everything we’ve discussed above by drawing a scene that exemplifies all those principles. Study my drawing and see how all the basics have been applied accordingly.
For practice, try to replicate the scene or choose a different one, draw reflections in water while applying this information.
Here are other recommended tutorials for you to check out:
Conclusion
You’ve just read how to draw reflections in water. I hope this guide has been helpful and that you’ve learnt something new.
The next step is to keep practicing drawing and applying these techniques to improve your craft.
And as always, consider sharing this guide with acquaintances, save on Pinterest, or sharing your artwork with me.
Whichever way, I’m glad to have you around!