
As a beginner or hobby artist, there’s nothing that is more mind-boggling than looking at those hyperrealistic Insta drawings and wondering if you can ever achieve that level of success.
And because you can’t believe it, for you, quitting is inevitable. That same mindset held me down for a long time until I realized it wasn’t that hard.
The secret?
Almost everything we draw is made up of basic forms. Think cubes, spheres, cones, and cylinders.
Cylinders, for instance, are everywhere: cups, candles, flowerpots, and even your morning coffee thermos.
So, learning how to draw one and shade properly is like unlocking a cheat code for realism. It may look intimidating at first, but trust me, this guide is going to make it a breeze for you.
Let’s walk through it together.
4 Easy Steps to Draw and Shade a Realistic Cylinder
Step 1: Drawing the Cylinder
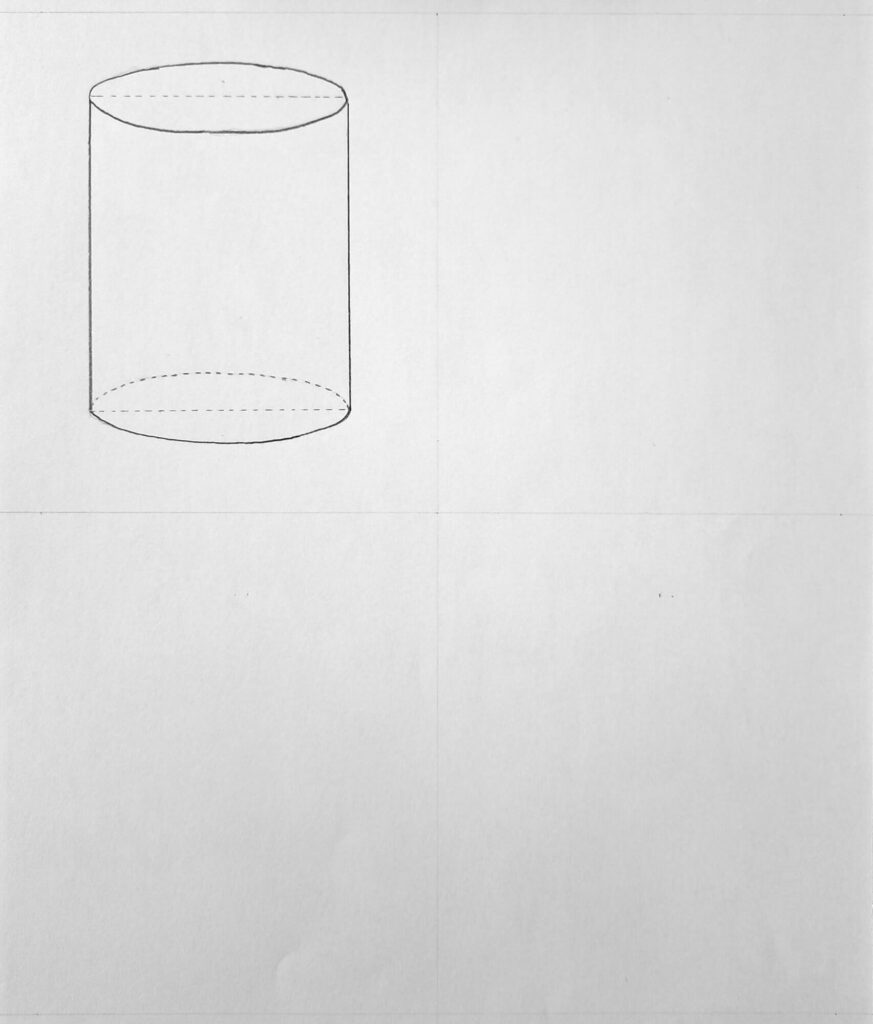
Before we jump into shading, we need a solid outline.
The easiest way to start is by drawing a tall rectangle. This rectangle is going to act like the “skeleton” of your cylinder. On the top and bottom edges of that rectangle, draw two ovals.
These ovals represent the round openings, and depending on where you’re looking from (above, eye level, or below), they’ll either be flatter or more open.
Now, connect the edges of the ovals with straight lines. Congrats, you’ve got the basic shape of a cylinder. It may not look fancy yet, but this is the foundation.
If you’re practicing perspective, try tilting your rectangle slightly so the top oval looks narrower than the bottom one. This trick instantly gives your cylinder depth, almost as if you’re looking at a coffee mug sitting on your desk.
For the outline, I usually use an H or HB pencil. They’re light enough that the lines don’t get too dark, and they erase cleanly if I need to fix something.
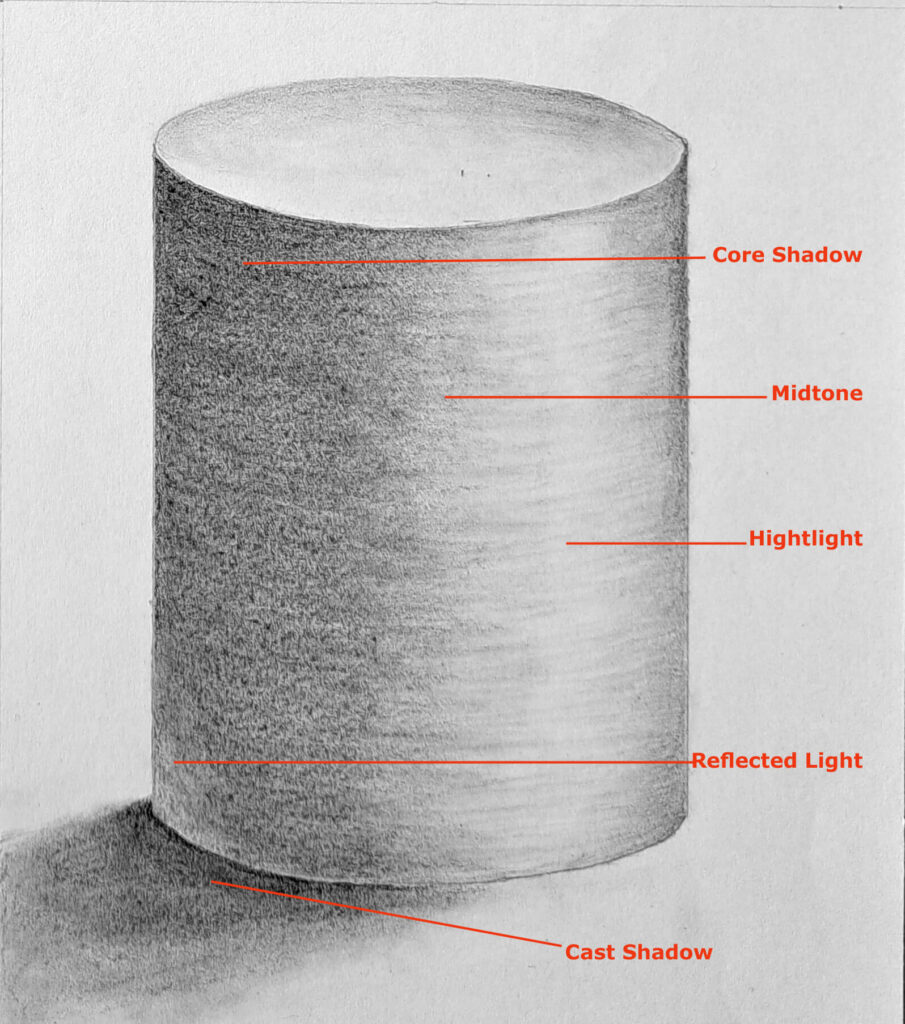
Step 2: Shading the Core Shadow (Dark Values)
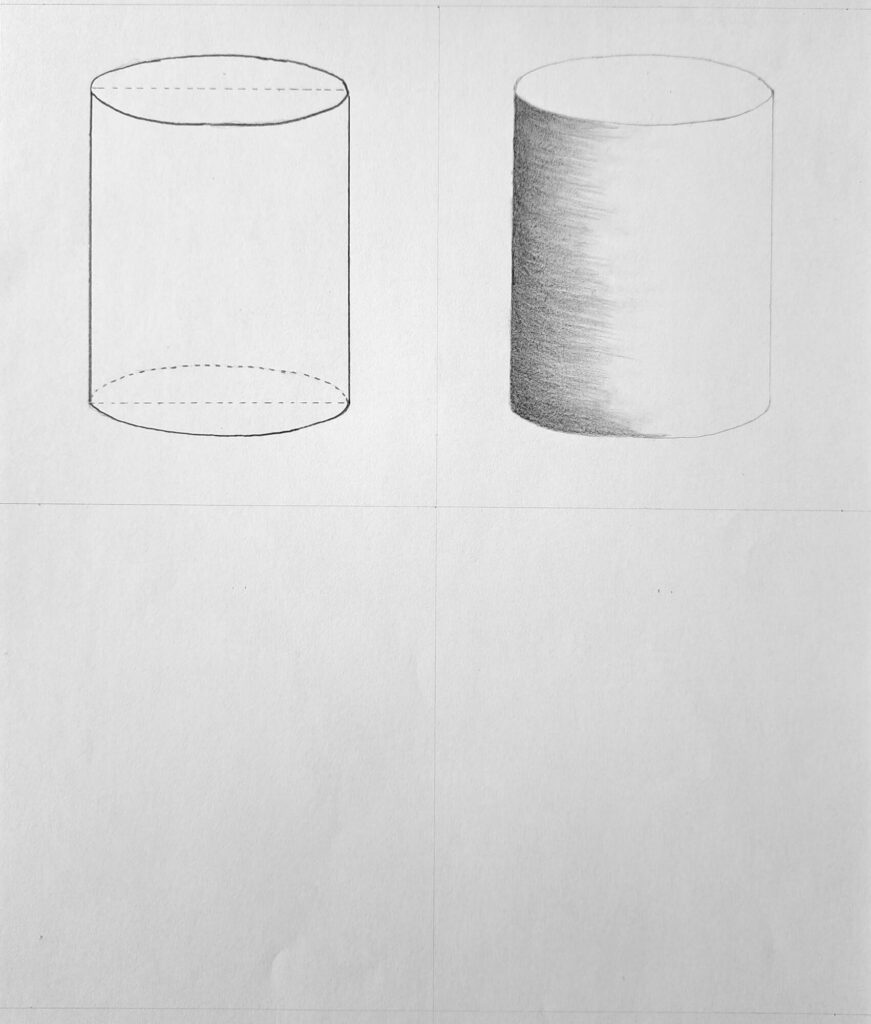
This is where the cylinder starts looking realistic.
Every rounded object has a core shadow. This is the darkest part where the light doesn’t reach directly. For a cylinder, the core shadow usually falls along one side, curving slightly to match the roundness.
I grab a 4B pencil for this part because it gives me that deep, rich dark. I shade in long strokes that wrap around the form, following its contour. Think of it like you’re hugging the cylinder with your pencil marks.
This is what creates the illusion of roundness.
After shading, I blend lightly with a blending stump or even tissue paper. Blending helps soften the edges and makes the surface look smooth, not scratchy.
Step 3: Shading the Midtones (Intermediate Values)
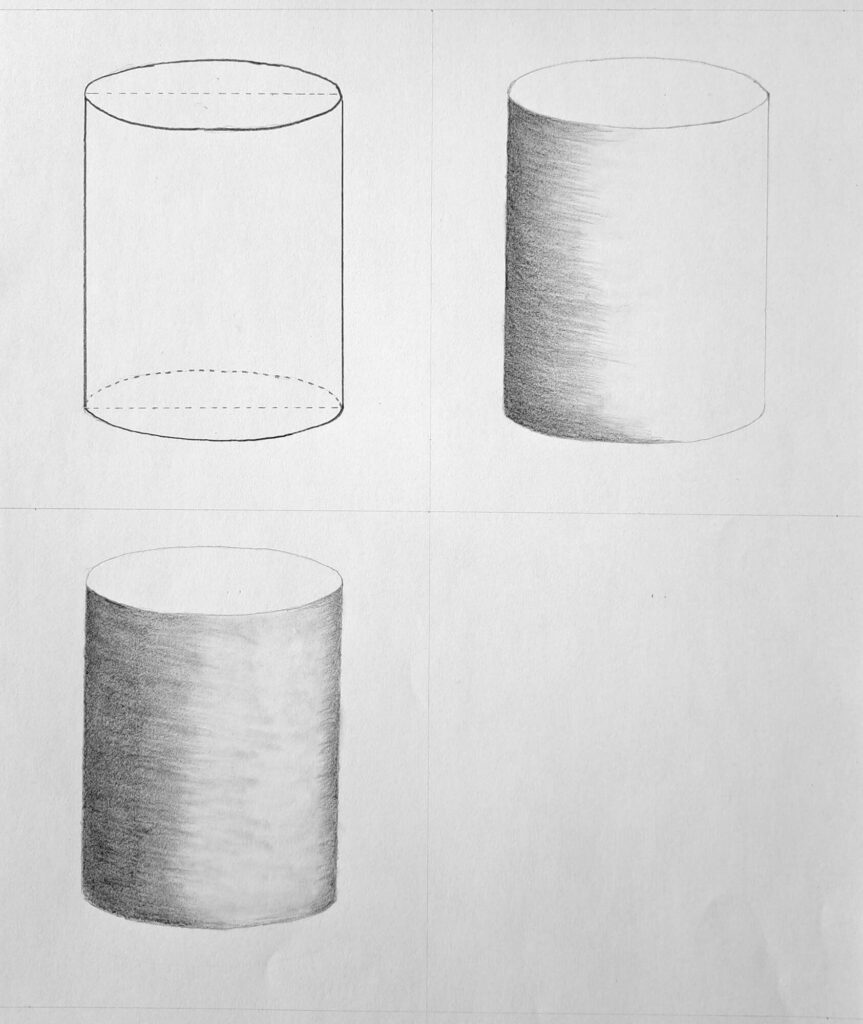
Right next to that core shadow, we have midtones. These are the in-between values that transition from light to dark. Without them, the cylinder would just look flat, like a cartoon.
For midtones, I usually use an HB or 2B pencil. My strokes here are shorter and layered, almost like I’m slowly building up the tones. I keep them close together so they overlap slightly, which creates a smooth gradient.
Blending again is key. I don’t want a sharp jump from dark to light. Instead, it should feel like a gentle curve, just like the actual object.
Do the same to the extreme opposite of the cylinder. In my illustration, that’s on the right side opposite the core shadow.
Step 4: Highlights and Shadows
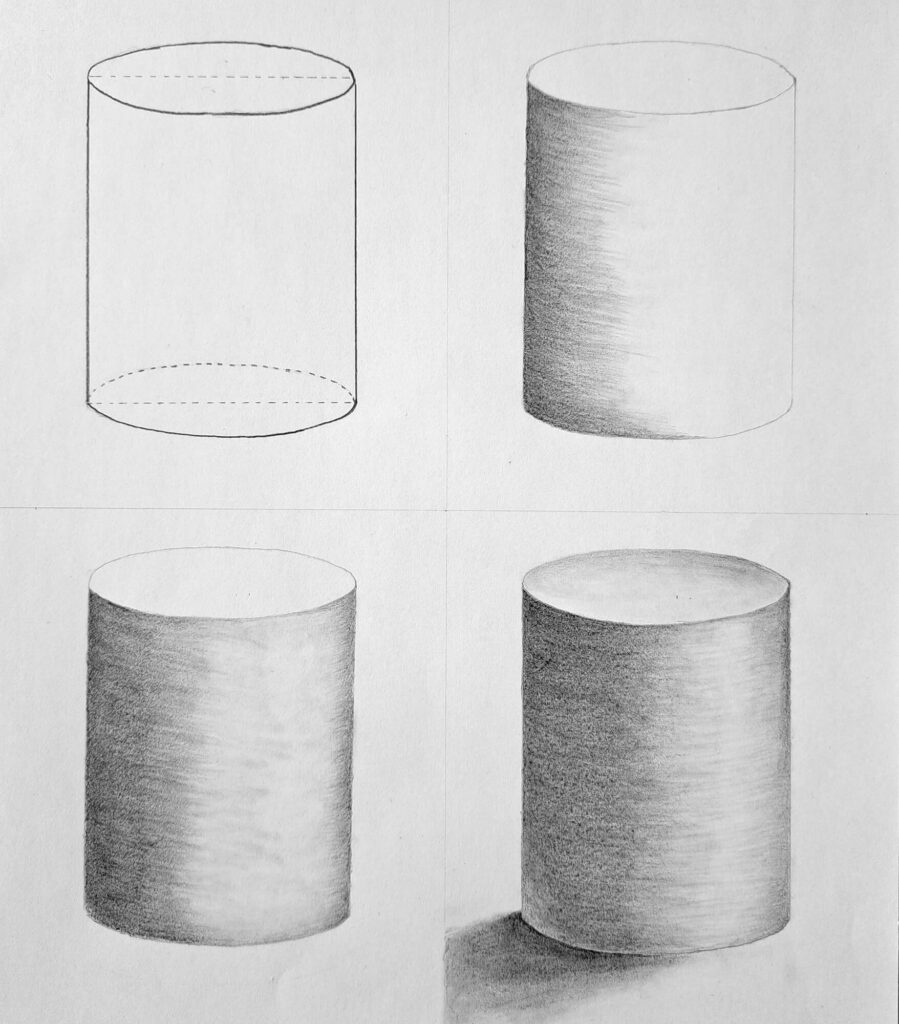
This is a vital step because we’re rendering the details that really bring the cylinder to life.
First, I shade the top oval. If the light is coming from above, the inside of that oval will be darker, especially near the edges. This gives the impression that the cylinder is hollow, like a cup.
If it’s a flat surface, like in my case, the darkest portion is opposite the core shadow, while the highlight is next to it.
Then, I add the cast shadow on the ground. I use a 6B pencil for this because cast shadows tend to be darker than anything on the object itself.
The shape of the shadow depends on the light source, so if your light is coming from the left, the shadow will stretch to the right.
Finally, I lift out highlights with a kneaded eraser. I dab gently along the brightest part of the cylinder (usually opposite the core shadow) and sometimes add a thin line of reflected light right next to the core shadow.
That tiny detail makes a huge difference since it tricks the eye into seeing real roundness.
Characteristics of a Cylinder (What to Pay Attention To)
By now, your drawing should show:
- A core shadow wraps around one side.
- Midtones transition smoothly between dark and light.
- A bright highlight where the light hits directly.
- A subtle reflected light on the shadowed side.
- A cast shadow on the ground.
These five elements: core shadow, midtone, highlight, reflected light, and cast shadow are the bread and butter of drawing any three-dimensional form.
Once you master spotting and shading them, you’ll be able to apply the same logic to almost anything.
Applying This to Real Objects: Drawing a Clay Pot
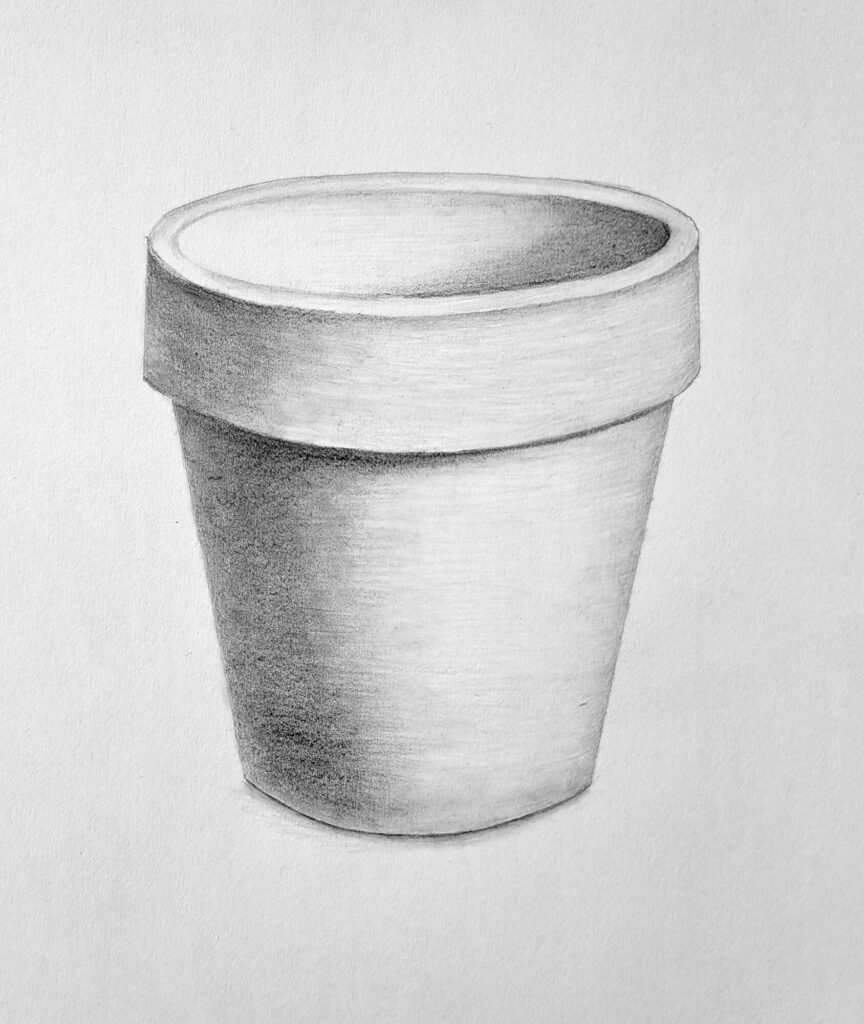
So, how does this cylinder knowledge help in real life?
Let’s say you’re drawing a clay plant pot. Most pots are just cylinders with a wider base or a lip at the top. If you start by sketching a simple cylinder, you already have the structure.
From there, you can tweak the proportions, add a wider top, or curve the sides slightly. But the shading rules stay exactly the same. The pot will still have a core shadow, midtones, highlights, reflected light, and a cast shadow.
That’s why practicing cylinders isn’t just busy work. It’s training your eye to see forms and light in the real world.
What else can you draw:
- A baseball bat
- A glass of water
- A stem of a plant, e.g, a rose flower stem
Conclusion
Drawing a cylinder might not sound glamorous at first, but it’s one of the most useful skills you can have as an artist.
It teaches you perspective, form, and shading all at once.
The best part?
Once you understand cylinders, you’ll start seeing them everywhere in cups, vases, arms, tree trunks, and even buildings.
So, grab your pencils and start practicing.