If you’ve been looking for an easy guide to help you learn how to draw a rose, then you need to read this post! To get the most out of it, grab your range of graphite pencils, a piece of paper, an eraser, and a blending stump, and follow along!
I have outlined 7 easy steps to guarantee that even a 7-year-old can follow along and draw a realistic rose without sweating it out.
However, don’t feel bad if your final piece doesn’t look exactly like mine, with time and practice you’ll be so much better at it, I promise.
For now, let’s just enjoy the process, shall we?
How to Draw a Rose: 7 Easy Steps for Drawing a Realistic Rose
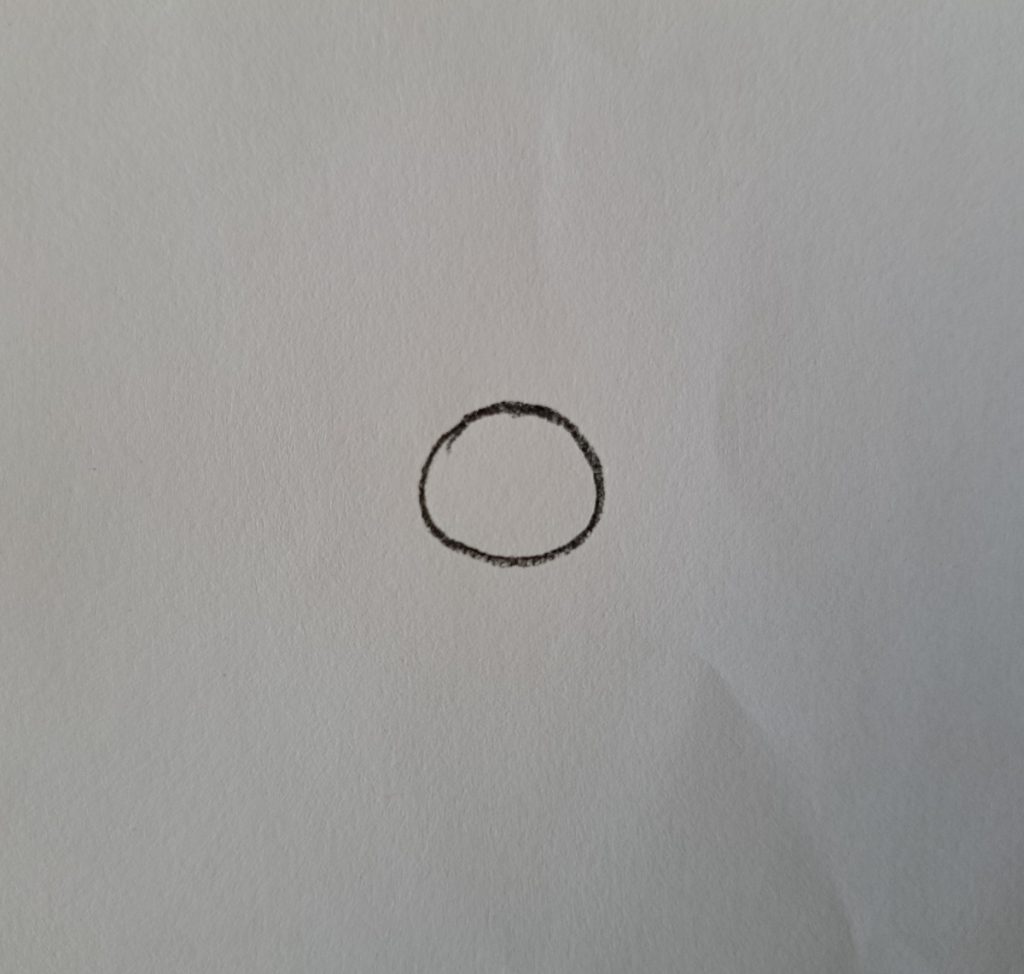
1. Drawing the Circle
Yes, you heard me right!
Just begin by drawing a simple small circle (Since ‘small’ is subjective, it will depend on the size of your drawing paper or your desired image size. Most importantly it doesn’t have to be a perfect one. Drawing by free hand will suffice.
This will be the center of our rose flower. Below is mine!
2. Draw the rose’s inner petals
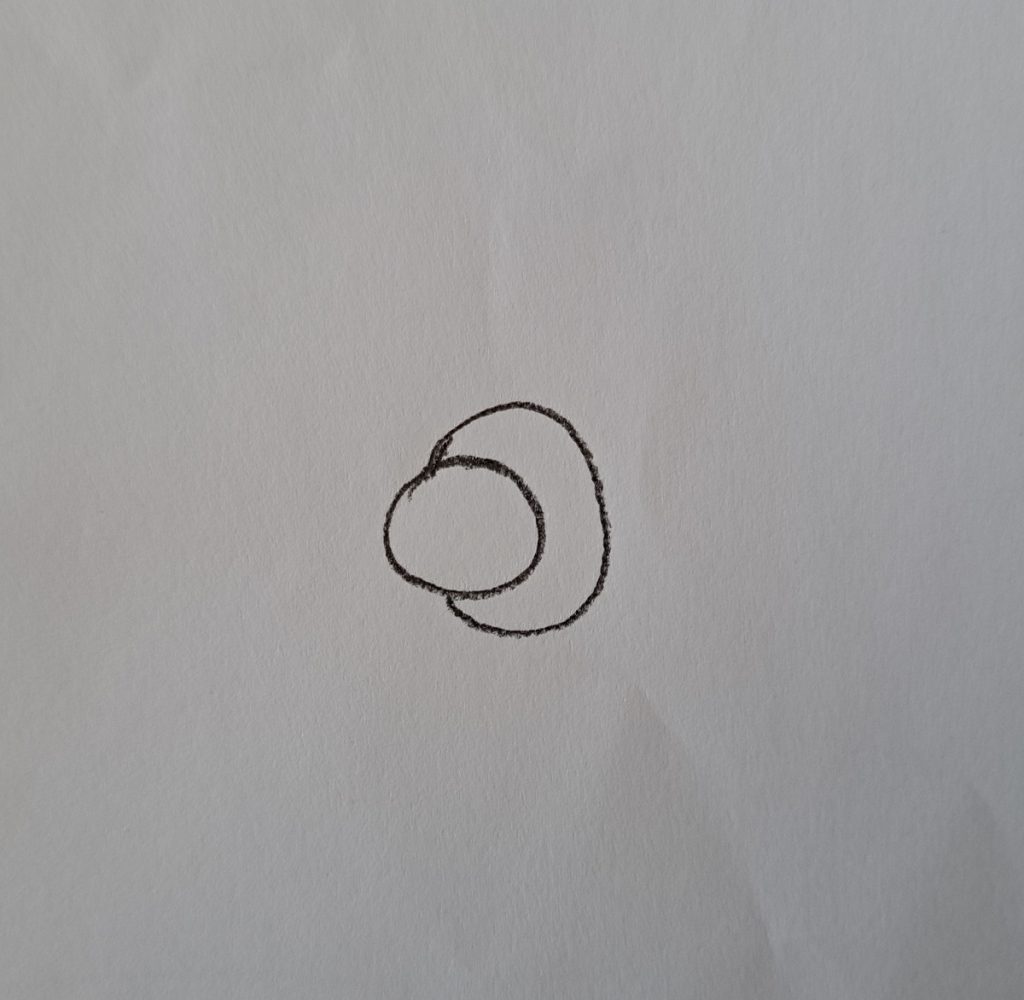
This is where the work begins but if you pay attention, it’ll be easy peasy. The inner petals of a rose are aligned tightly together forming a rounder and regular shape.
This means we need to start by drawing another circle twice as big as the first and overlapping at the side as demonstrated below.
Keep repeating until we have the center of our rose full of unfurled petals. Your final piece should look like below.
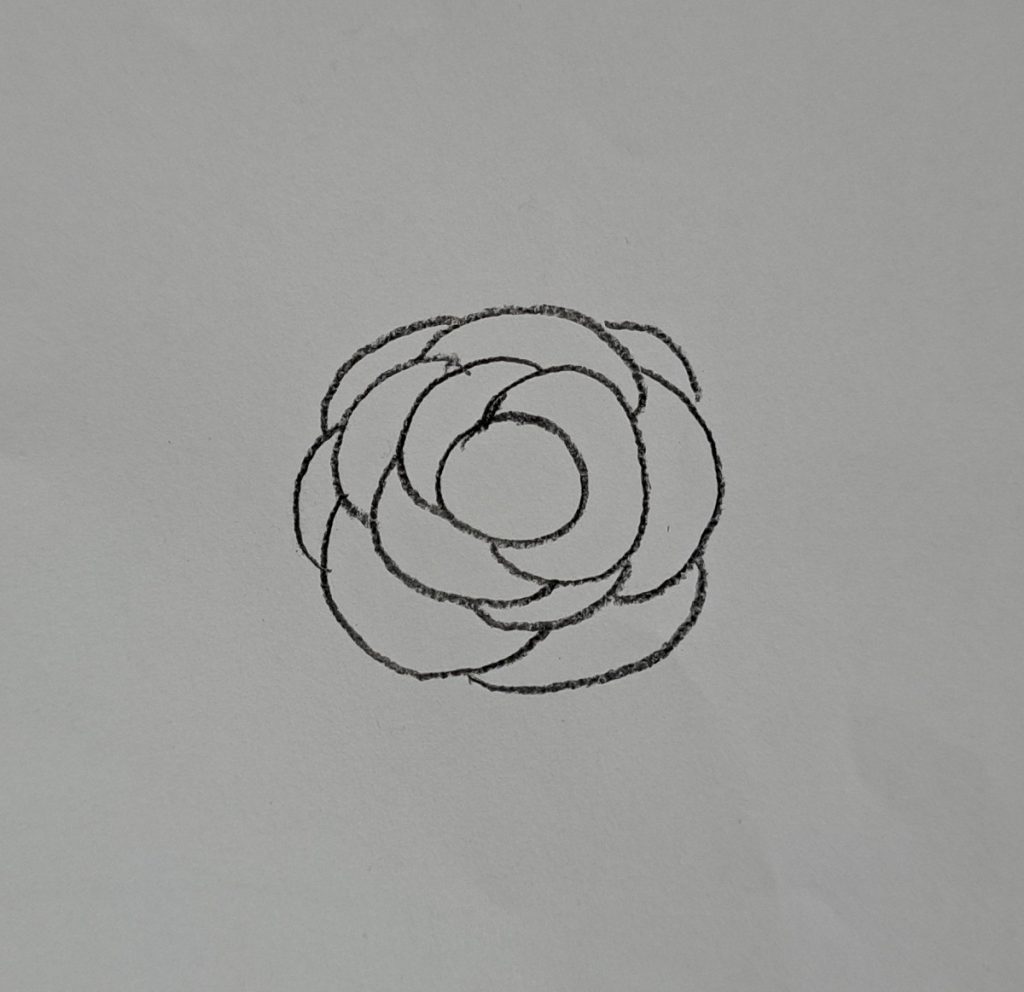
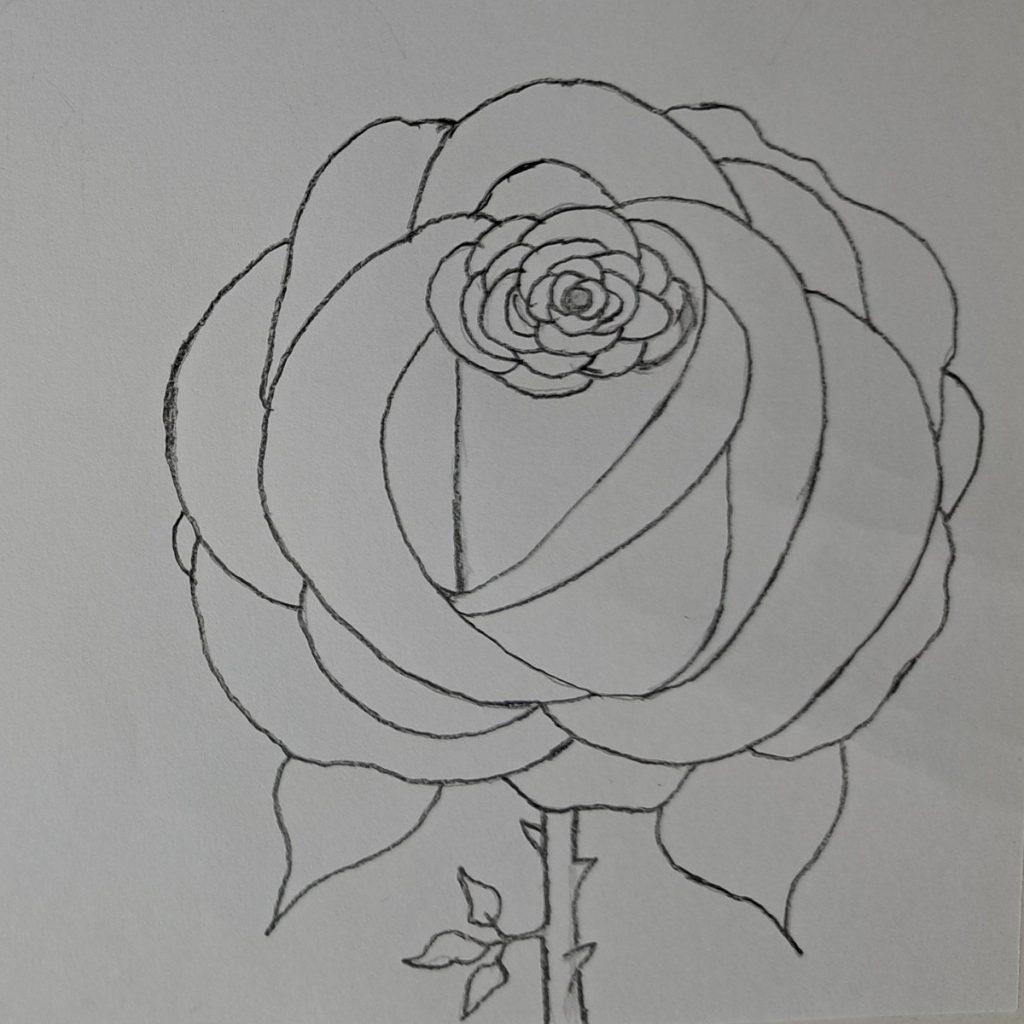
3. How to draw the outer petals
Here’s the thing, the trick to sketching the outer petals is to make them as irregular as possible. While at it, increase their size as you move from the center outwards.
That way, it will create the impression of an open flower.
Study my drawing below, which will give you more context. The idea here is to draw at least 11 outer petals. Remember, this is just a random number to guide your process.
The most important thing is to observe your drawing to ensure the flower doesn’t look ‘naked’. Having a reference photo helps to get a hang of it.
Alternatively, just copy my drawing exactly as is. With sufficient practice, you should sketch from memory without a hitch.
4. Drawing the rose sepals
The sepals are the small green leaves that support the petals when the rose is in bloom. In our case, they’ll help your flower drawing to pop and create an illusion of depth.
Ideally, there should be around four of them but only two will be visible. So, go ahead and draw the 2 sepals as shown below.
Don’t worry about making them leaf-like for now. We’ll get to that point later.
5. Draw the stem
This is probably the easiest step of them all. You just need to decide whether yours will be thornless or otherwise. And yes, there are thornless rose varieties and cultivars in the market.
In real life, I prefer those. However, as a drawing subject, I’d rather draw the traditional rose stem with thorns and all. The thorns will spice up our drawing!
So, let’s go ahead and sketch those triangular-shaped spikes.
While at it, I’ll go ahead and throw in one or two complete leaves. In my opinion, one is better. And just, like that, we have our complete sketch.
Pro Tip: While sketching your rose, do it as light as possible by using a light pencil such as 2H, H, or HB. In my case, I made mine bolder so that you could see the images.
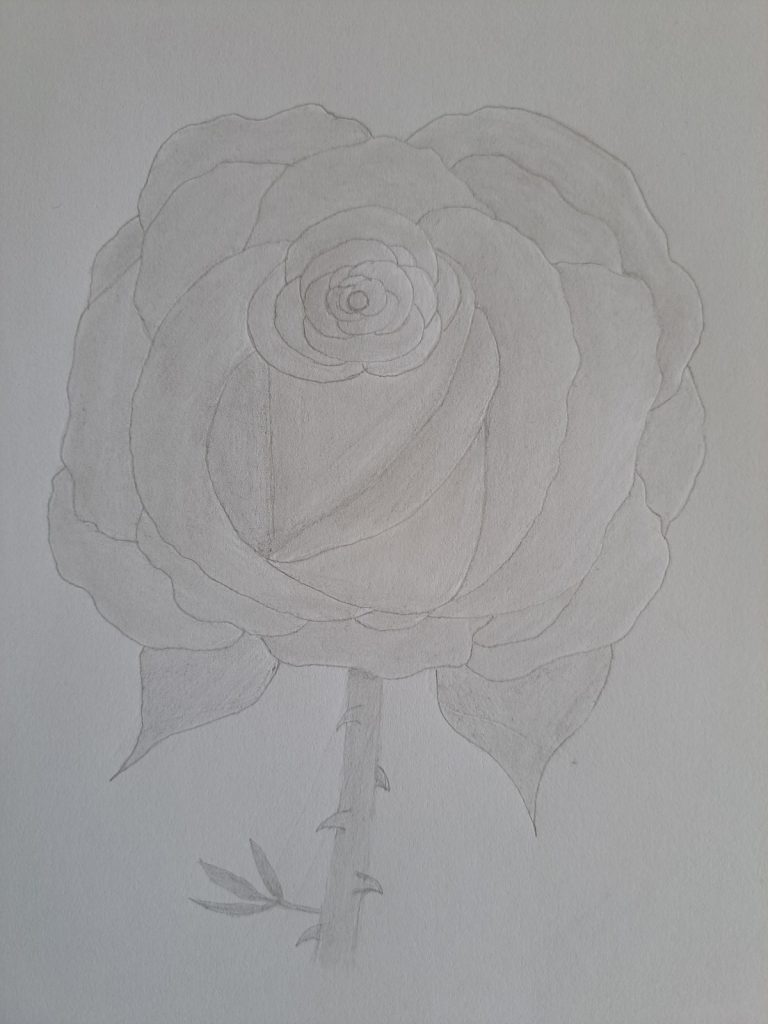
6. Shading for Substance
At this point, you’ve done all the heavy lifting and if you’re like most people, you’re pretty happy with your drawing.
I know I am.
But now, we need to start shading to give it a little bit of substance. Grab your HB pencil and shade your sketch uniformly starting with the petals. Make sure the pencil is slanting to give you a smoother shade.
After shading, you need to blend using a blending stump, tissue, or Qtip.
Don’t worry about the details for now. Besides, leave out the sepals and the stem for now. I decided to shade mine for uniformity.
7. Shading for Realism
Until now, we’ve avoided adding any details to our drawing. It’s now time to transform our rose drawing from good to amazing by making it as realistic as possible.
I hope you’re as excited about this step as I am.
The first thing we need to do is identify the areas that appear far from your eyes aka the darker areas and those that reflect the light aka the petal edges.
Remember the 1st circle that we drew?
Get a 6B pencil and completely shade it. Repeat with the same pencil at the beginning of every petal and shade lighter as you move towards the edges.
You can shade as light or as dark as you want. The guiding principle here is the color of your subject. For example, if you’re drawing a red rose, you’ll want to shade much darker than say drawing a white or yellow rose.
Besides, rose petals are extremely soft. We want to create that illusion of softness by thoroughly blending in the graphite.
Here’s a guide for drawing a rose with colored pencils.
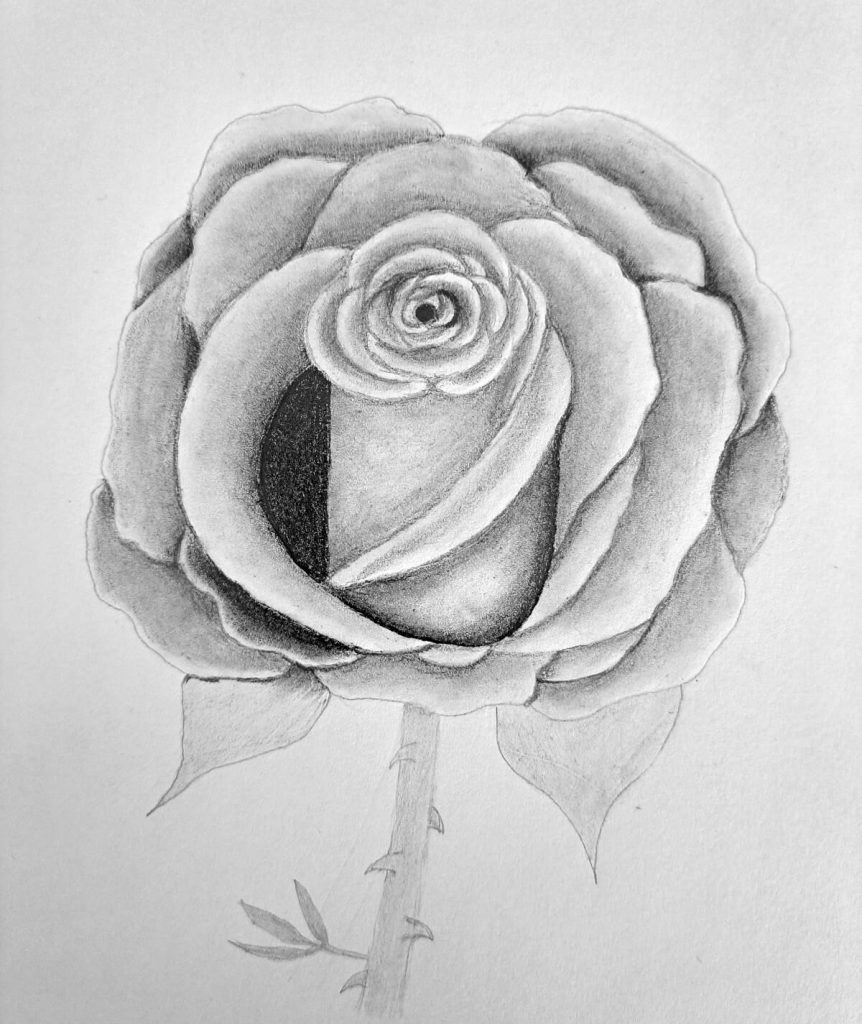
Once you are satisfied with shading and blending the petals and you have the desired 3D effect, move to the next final step.
Bonus Step: Shading the Sepals, Stem, and the Leaf
The stem of a rose is rather cylindrical. Decide where you want your light source to be and shade it accordingly. For my drawing, the light is coming from both ends of the stem.
Therefore, I’ll shade the middle darker than the edges while extending to the thorns that we sketched earlier. If you want more tutorials on sketching and shading cylinders, here’s a great guide about it.
Once you’re satisfied, begin shading the true leaf to add more context. This is rather optional, but if you want your piece to stand out, adding a realistic leaf is the way to go.
Unlike the sepals, the leaves of the rose aren’t that dark. Hence, you need to shade them slightly lighter for that much-needed contrast.

Final thoughts
There you have it!
A simple yet easy tutorial on how to draw a rose. If you’re interested, this is part of my series of articles on how to draw the most common flowers.
Be sure, to check out drawings of some other interesting flowers in that series. Join our club to be notified when the rest of the posts come out so that you never miss a thing.
Here are more popular post recommendations:
And as always, I’d love to see what you’ve created. Just share your art on your favorite social media platform preferably IG and tag me @muusart21 or tag #muusartrose.
It will make my day! Until then, keep creating.