
Let’s talk about lilies.
Let me interrupt you before you start wondering whether this is a botany class. It’s not.
If you’ve checked out my other tutorials, you’d know that quite often I like to discuss more about my drawing subjects, especially flowers.
Now, unlike most flowers, there are so many types of lilies in existence. It’s not our place to start exploring them all. Instead, we’re going to learn how to draw oriental lilies, which are known as the most flamboyant personalities within the world of lilies.
That said, I’ll walk you through simple steps for drawing a realistic lily flower from the first light sketch to the final shading.
The best part?
You’ll see how easy it is to build a lily that looks soft and realistic, even if you’re just starting out.
6 Easy Steps for Drawing a Realistic Lily Flower
Sketching the Shape of the Lily Flower
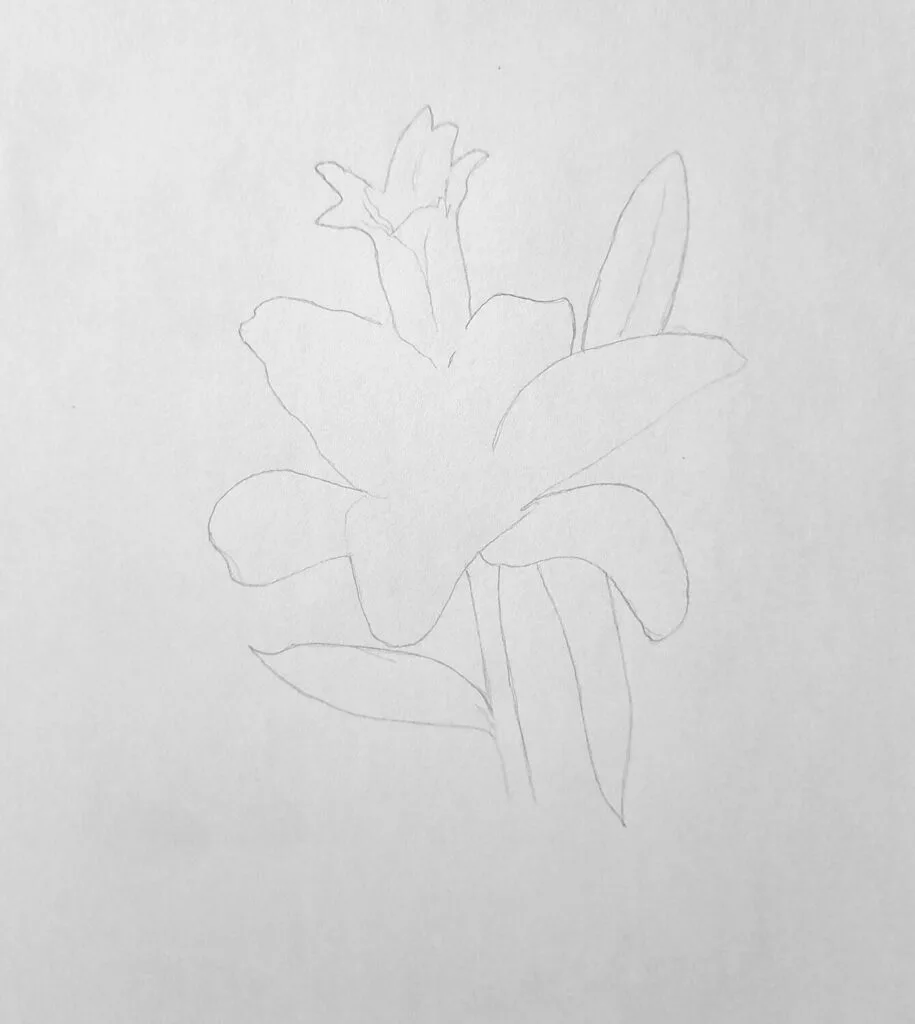
The first step is to look at the overall shape of your lily. This is where a reference photo comes in handy, but in most cases, there’ll be six petals radiating outward from a central point.
Lilies usually have long, curved petals that curl backward a little, so try to capture that flow.
Once you’re happy with the petals, add two thin lines for the stem and rough shapes for the leaves. Lilies have slender, sword-like leaves that grow along the stem.
If you’re drawing from a photo (which I recommend for beginners), squint your eyes to focus on the silhouette. That helps you see the overall shape before you get lost in the little things.
In my illustration, I’ve included an extra semi-opening flower and a flower bud.
Sketching the Stigma, Anthers, and Details
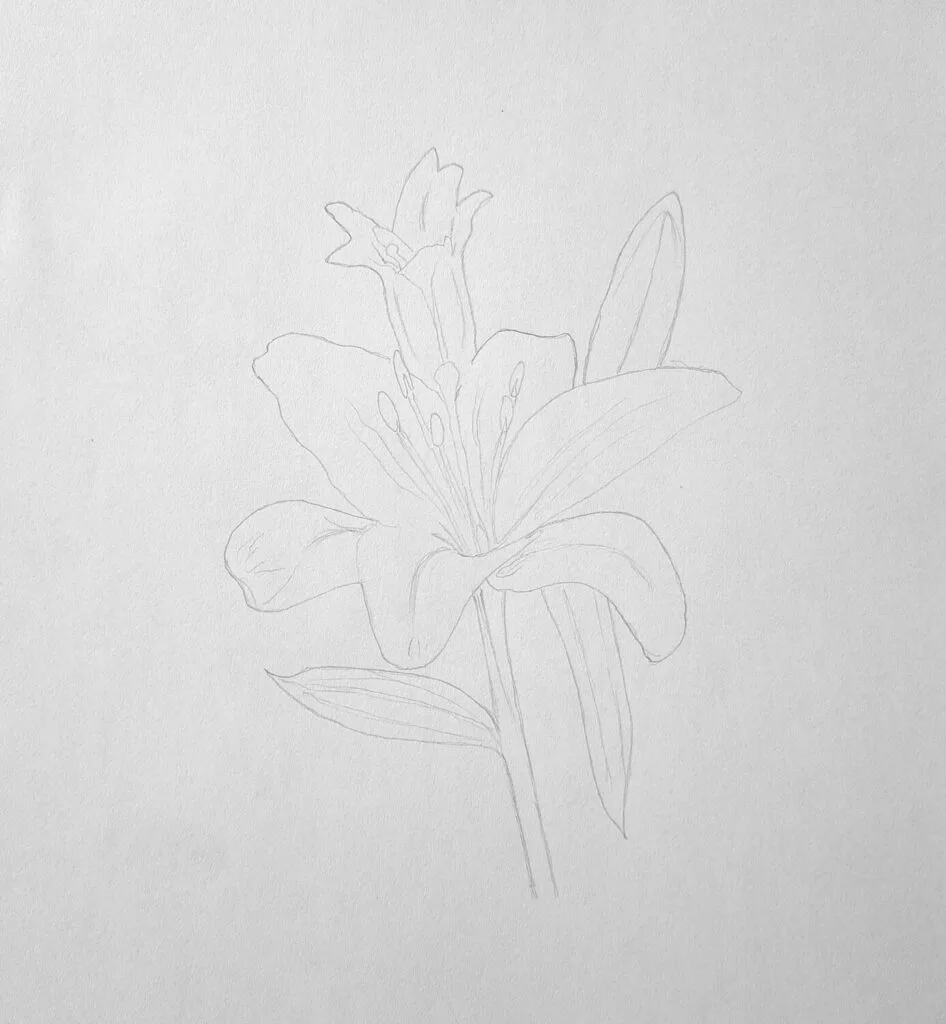
Now that the flower’s form is in place, it’s time to start sketching the flower’s anatomy. In the center of a lily, you’ll see a tall stigma (the central stalk) surrounded by six anthers on slender filaments.
The anthers hold the pollen, which gives lilies their characteristic speckled look.
Draw the stigma first, then sketch the six anthers around it, each attached to a thin filament. Don’t press too hard; instead, these lines should stay delicate.
Once that’s in, refine your petal edges. Add those subtle ruffles, tiny folds, or curls you see in your reference image.
By the end of it, you should have your complete lily sketch, which you can paint, shade with colored pencils, or the good-old black and white graphite. We’re proceeding with the latter
Basic Pencil Shading
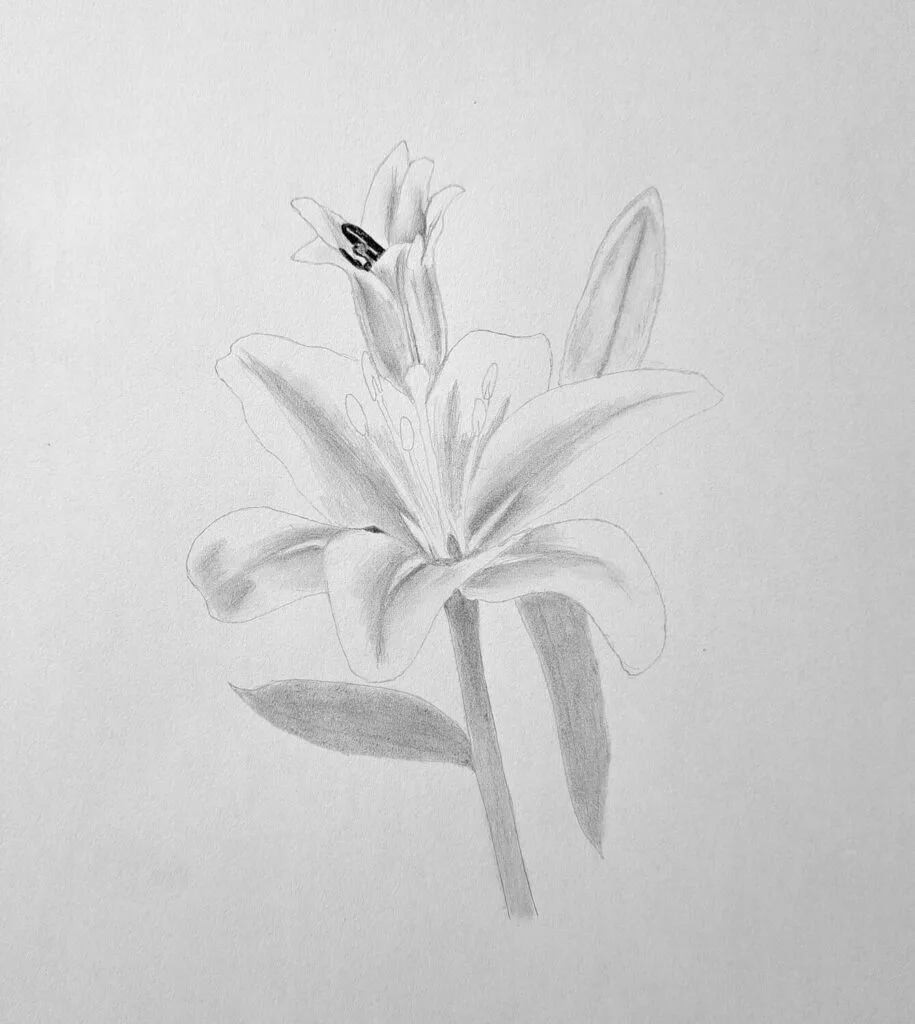
Before diving in, take a second to identify your light source. Where’s the light coming from? Once you know that, you’ll know where the shadows fall.
Use an HB or B pencil for your medium tones. Shade gently in the direction of the petal’s growth, usually outward from the center. Keep your strokes soft and build the tone gradually. Don’t rush it.
If you’re not sure how dark to go, remember that you can always deepen the shadows later. What matters most right now is creating a sense of volume, not contrast.
Pro Tip: tilt your pencil slightly and use the side of the lead instead of the point for smoother gradients. Don’t forget to blend.
Shading the Anthers and Dark Values
Now it’s time to add depth. Switch to a darker pencil, like a 4B or even a 6B. Shade the anthers first; these are the darkest elements in your drawing. Keep them crisp, but don’t overdo it. A little texture will make them pop.
Next, look for other dark spots. Maybe the base of the petals, where they meet the center, or areas where petals overlap and cast shadows on each other. Deepening those shadows will instantly add contrast and realism.
Again, you can always take a look at my illustration above to see all these in practice.
Form Shading of Petals, Leaves, and Stems
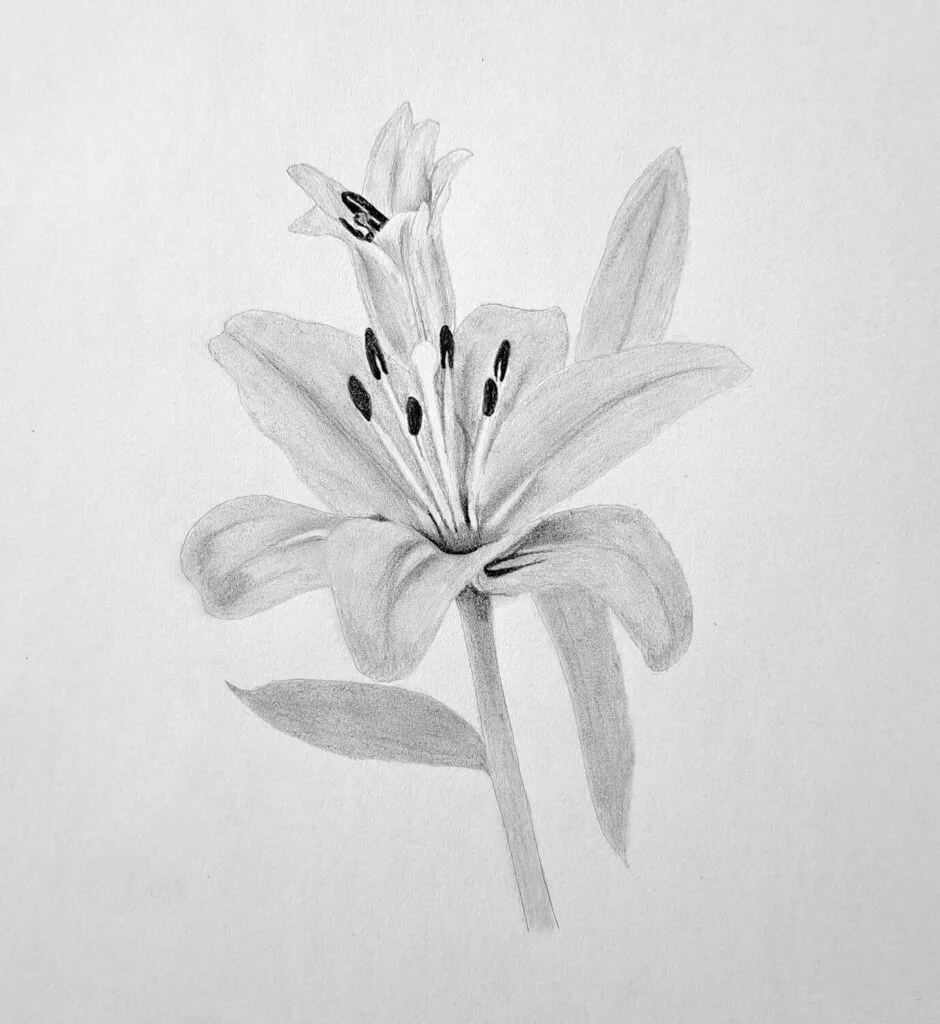
Once your darks are set, return to the softer pencils (H or 2H).
Use smooth, even pressure and follow the curvature of the petal with your strokes. You’re not adding shadows now, just refining transitions and rounding out the forms. The goal is to make the whole drawing have form and volume instead of sitting flat on the page.
For the stem and leaves, use slightly firmer pressure.
Alternatively, you can switch to an HB pencil for these. This is because the whole flower is blocking the light from shining down below.
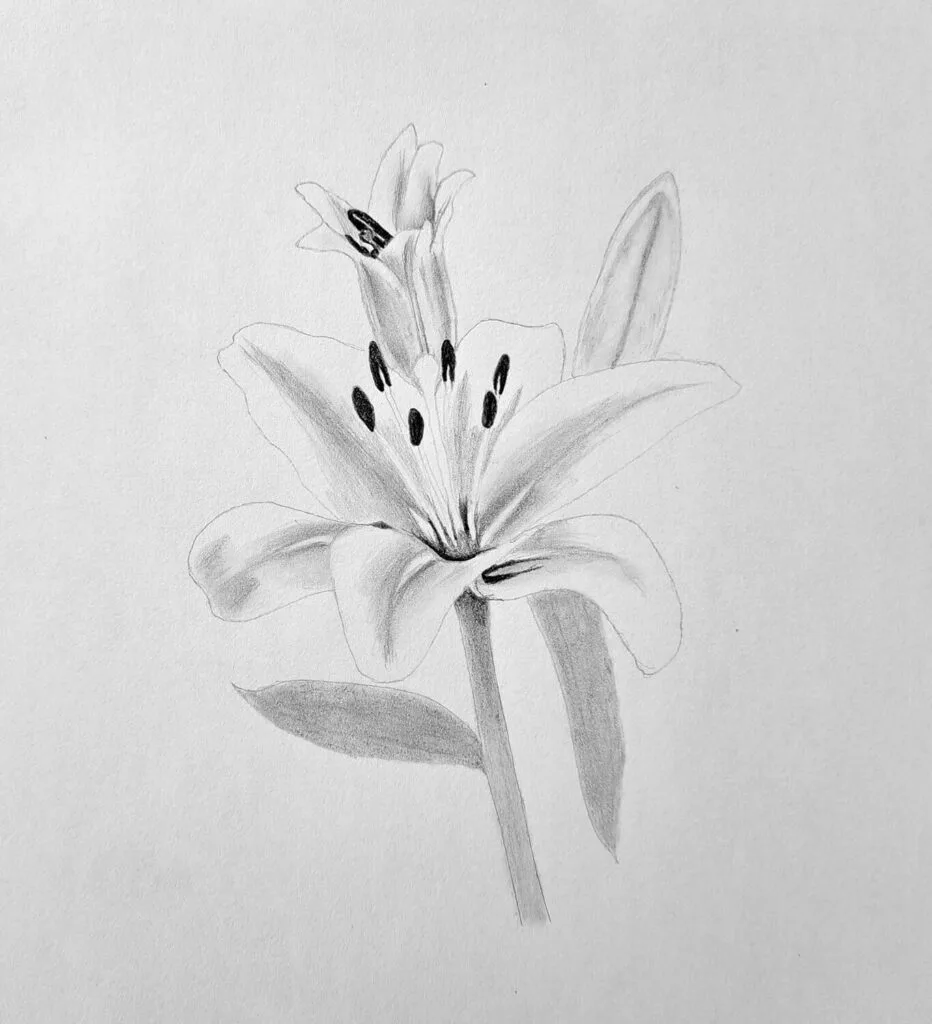
Contrast Shading to Finalize the Drawing
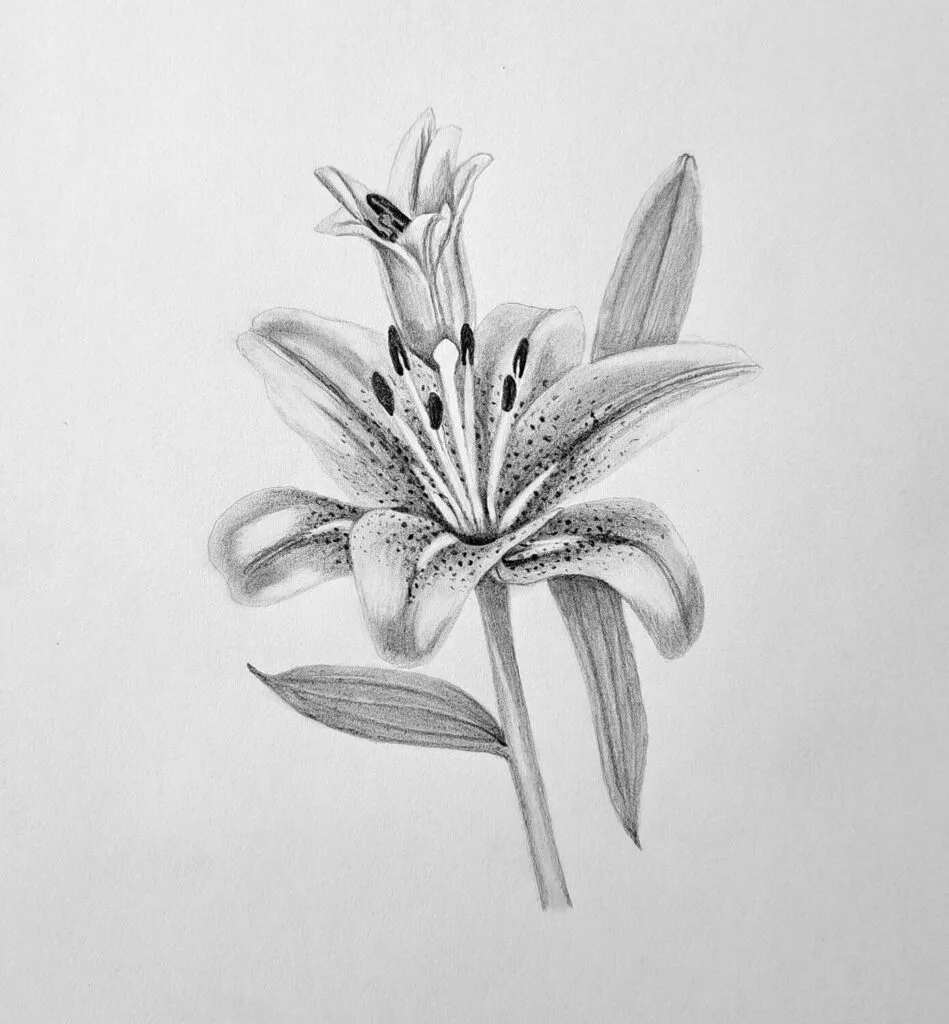
This is your finishing touch.
To do that, revisit your darkest areas with a 6B pencil to deepen the shadows and increase contrast. Then, with a kneaded eraser, gently lift highlights where the light hits the petals or the edges of the leaves.
Finally, add those tiny black dots or speckles that lilies often have near the petal base. They’re subtle but add so much realism. You can use a fine-point mechanical pencil for these details.
Take a step back. Does your drawing feel balanced? Does it have enough depth and light? Adjust as needed, blending some areas with a blending stump or tissue if things feel too harsh.
Don’t forget the semi-open flower and the flower bud!
More Tutorials About Drawing Flowers
There are more tutorials on this site about drawing different kinds of flowers, and keep practicing. I’ll not list all of them, but here are the popular ones:
- How to draw cosmos flowers
- Drawing hibiscus flowers
- Drawing sunflowers
- How to draw an orchid
- How to draw a rose flower
Conclusion
If you’ve reached this point, chances are you’re either done drawing your lily flower, motivated to start sketching, or you’ve saved this tutorial for when you’re ready.
Whichever the case, I’d like to commend you for sticking with me, but more importantly, it’ll mean the world if I could see what you’ve created.
Until then, here’s my parting advice:
When you finish your drawing, take a step back and really look at it. You’ll probably notice how the shading makes it feel almost real, like you could reach out and touch the petals. That’s the power of taking your time and paying attention to light and form.