Communication is not always about words. Sometimes observing nonverbal cues can reveal more than words ever could.
And what’s more revealing than two people holding hands?
While holding hands is a powerful way to communicate trust, pinkies interlocking means even more.
It can signal loyalty, romance, comfort, childhood promises, or quiet reassurance. Because the gesture is subtle, viewers notice every detail.
That’s why learning to observe and draw hand poses is a great learning experience for both novice and pro artists. This is because, besides drawing what can be observed, you’re drawing contact, weight, warmth, and shared space.
Let’s break down how to draw holding hands as realistically as possible.
5 Step Process to Drawing Holding Hands
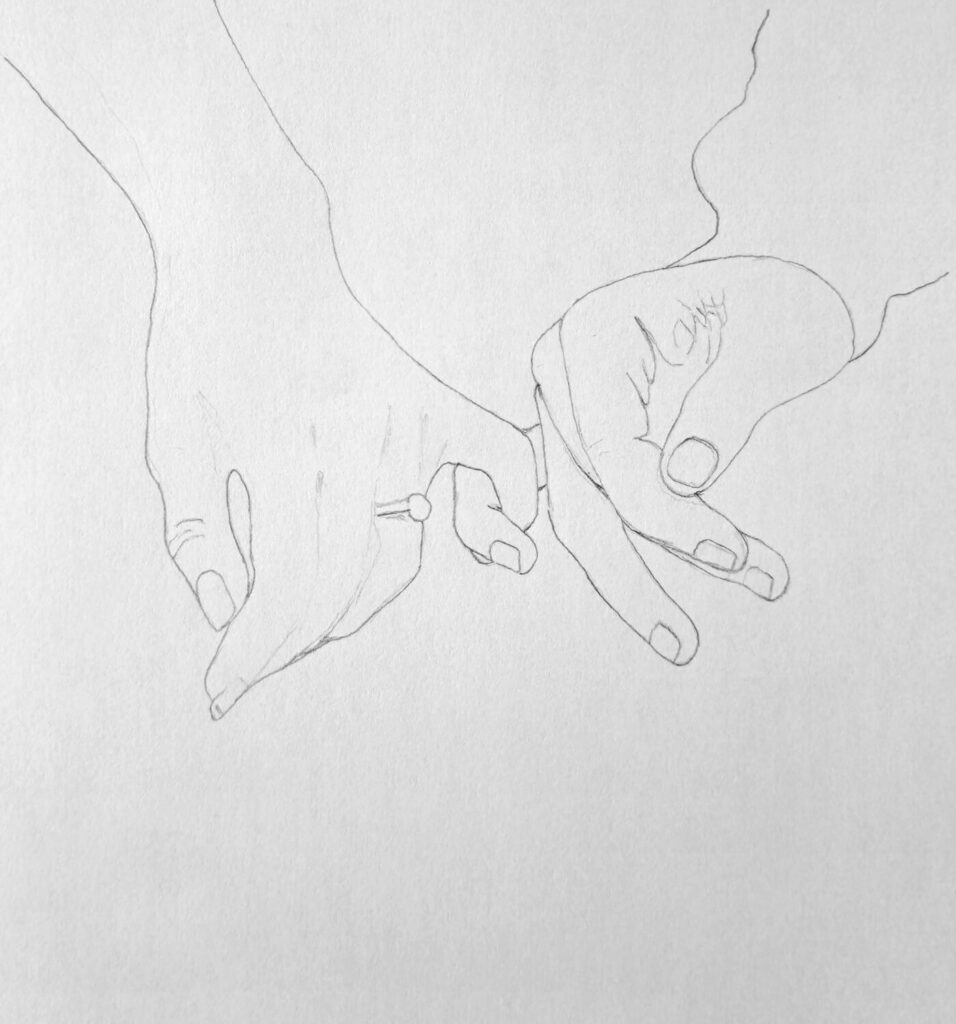
Sketching the Two Holding Hands (H Pencil)
I’m not really going to discuss the nitty-gritties of drawing hands in this tutorial. If you’re a beginner and would like the basics, here’s a great tutorial to help you.
Otherwise, let’s proceed.
First, always use a light pencil for sketching. I prefer an H pencil because it’s easy to erase without damaging the paper, and when sketching, I do a lot of erasing.
Secondly, it helps to have a reference image to study, even if you plan to draw from memory. Pay attention and suggest the wrist angles. Then, establish which finger sits slightly forward.
Next, locate the joints, but most importantly, pay attention to the interlocking pinkies. Each pinky has three phalanges. Keep that in mind as you continue working on your sketch, since it will be your only touchpoint.
Lastly, check the negative spaces between fingers. The tiny shapes between overlapping forms often reveal proportion errors faster than the fingers themselves. Adjust angles until the connection feels natural.
Basic Shading with HB Pencil
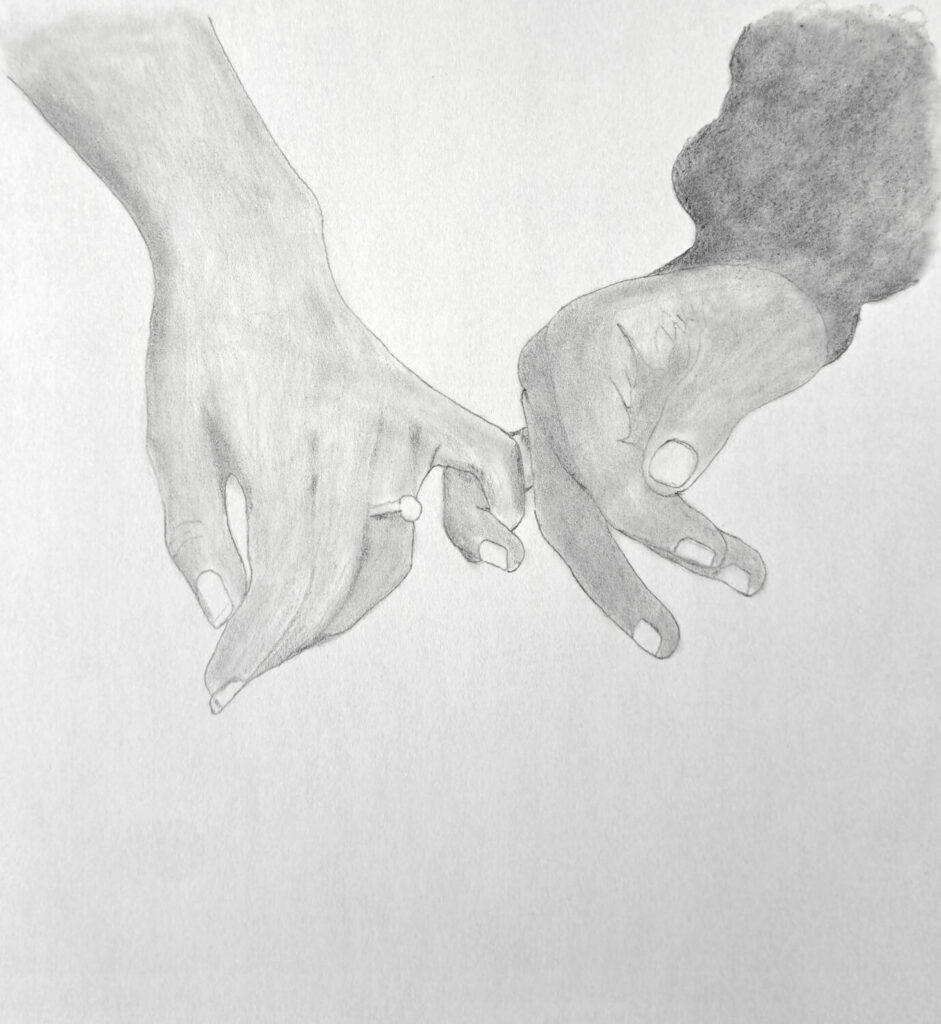
If you’ve read some of my other guides, you’ll realize that I never skip this step, regardless of whatever I’m drawing. It’s always a great idea to shade the subject with a first layer of graphite.
To do that, lay down an even, flat layer of graphite across the hands, keeping the pressure easy and consistent. You’re free to use any shading method as long as you control the strokes to avoid patchiness.
Remember, the goal is to eliminate white paper so the surface feels cohesive. I find that using an HB pencil delivers the best result – it’s neither too dark nor too light.
Uniform shading gives you a controlled midtone base. It also helps you see proportions more clearly because the bright paper no longer distracts you.
Also, proceed to shade the garment on the man’s arm, albeit with a darker pencil. Once satisfied, you can blend to smudge the graphite further.
Shading the Dark Values with a 2B Pencil
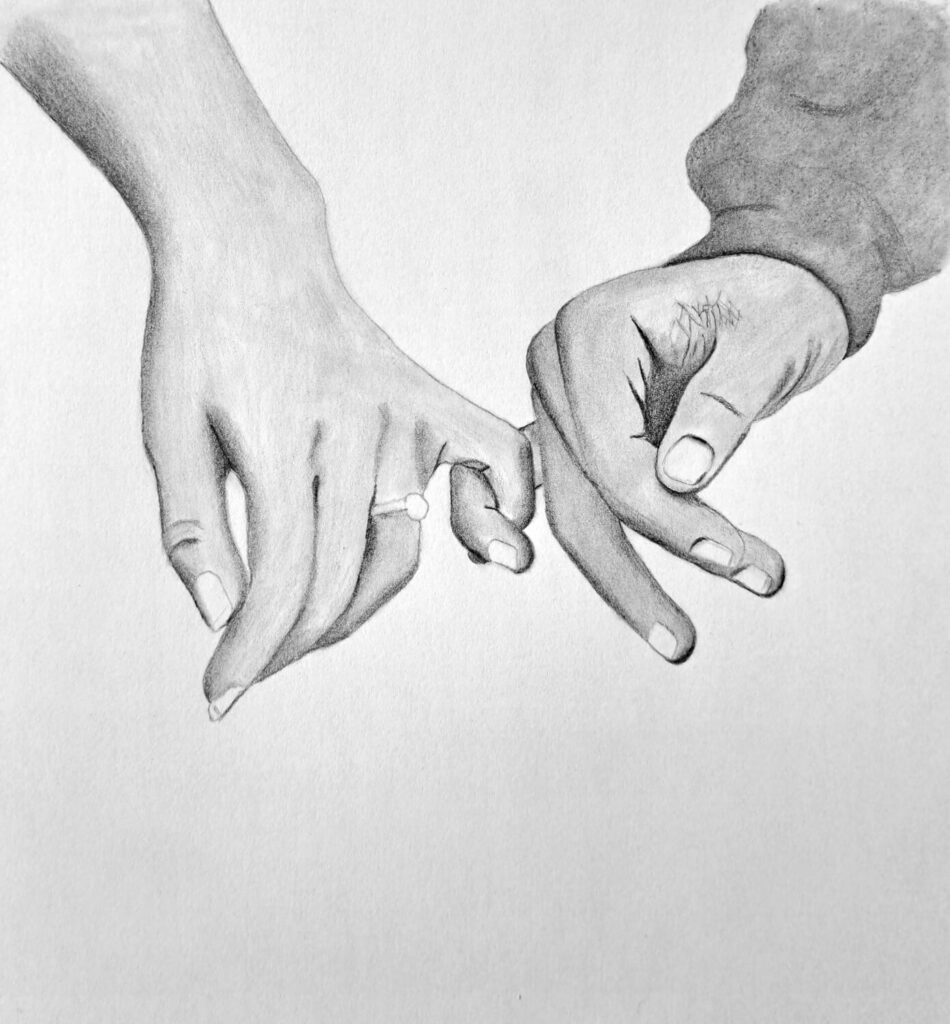
Up until this point, we haven’t discussed the details of the hands or their form. Not even when we were sketching. That’s deliberate for simple reasons; when drawing hands, we shade the details, not sketch. Otherwise, it will show as lines.
Therefore, switch to a 2B pencil and reinforce the deepest shadows. Focus on overlapping areas, under curled joints, and inside creases. Build darkness in layers instead of pressing hard immediately. Layering preserves paper texture and produces richer values.
Pay attention to core shadows.
On cylindrical forms like fingers, the darkest area typically sits slightly inside the shadow side, not at the outer edge.
Notice that on the man’s garment, there’s a slight shadow to indicate it’s not fused with the hand.
Take a moment to observe my drawing and see how I’ve executed this step.
Adding Texture with a Mechanical Pencil
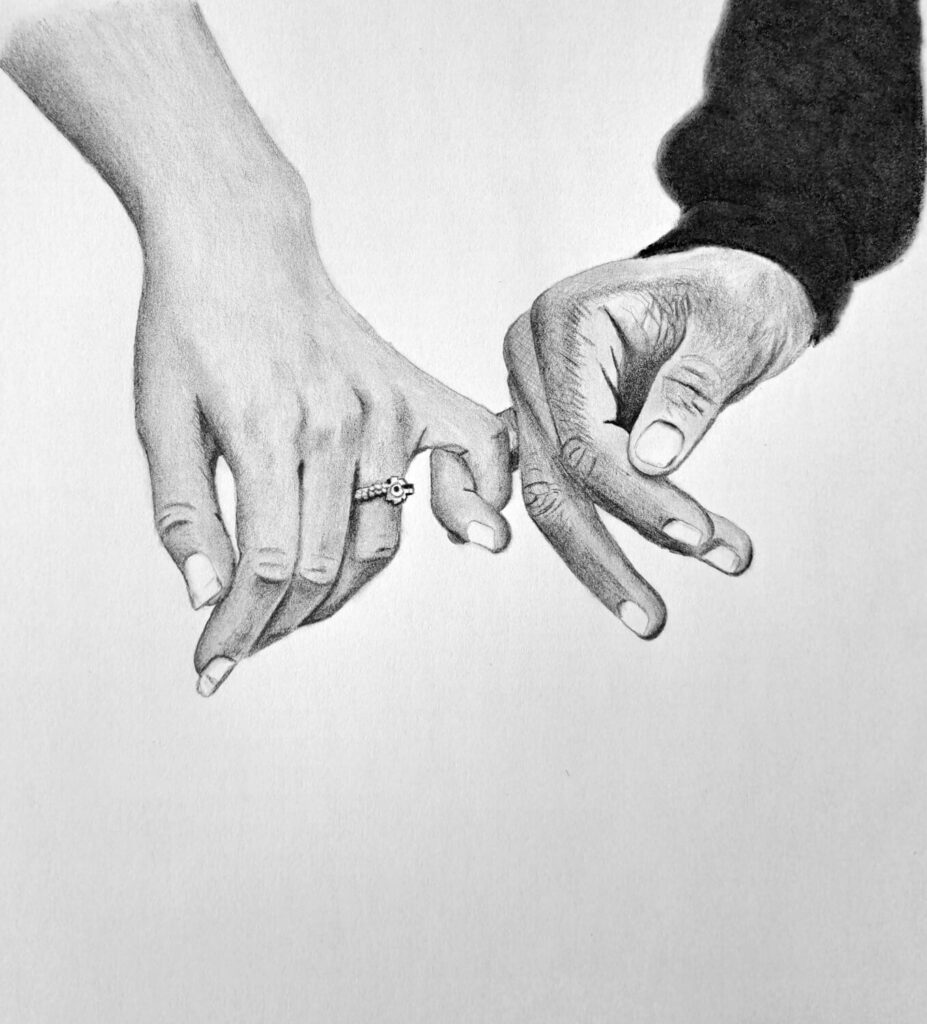
In the previous step, the hands were beginning to look realistic but very smooth. In this step, we need to create the illusion of texture. We also need to shade and refine the ornaments, such as the ring on the female’s finger, and darken the man’s garment.
Use a mechanical pencil to define fine creases around knuckles and subtle lines at the joints. Alternatively, a sharpened pencil to a point can also suffice. Remember to keep pressure light and blend once done.
Overemphasized wrinkles can unintentionally age the hands, so blending is key.
As a general rule, sharpen edges on the hand or fingers that sit closer to the viewer, while softening edges that sit farther behind. This difference in edge clarity creates depth.
The same rule can be used to shade the male vs female hand. Notice how the female hand looks smoother with minimal details compared to the man’s.
It can also create the perception that even though both hands appear to be on the same level, the man’s hand is slightly in front.
Make sure to capture all those minor details.
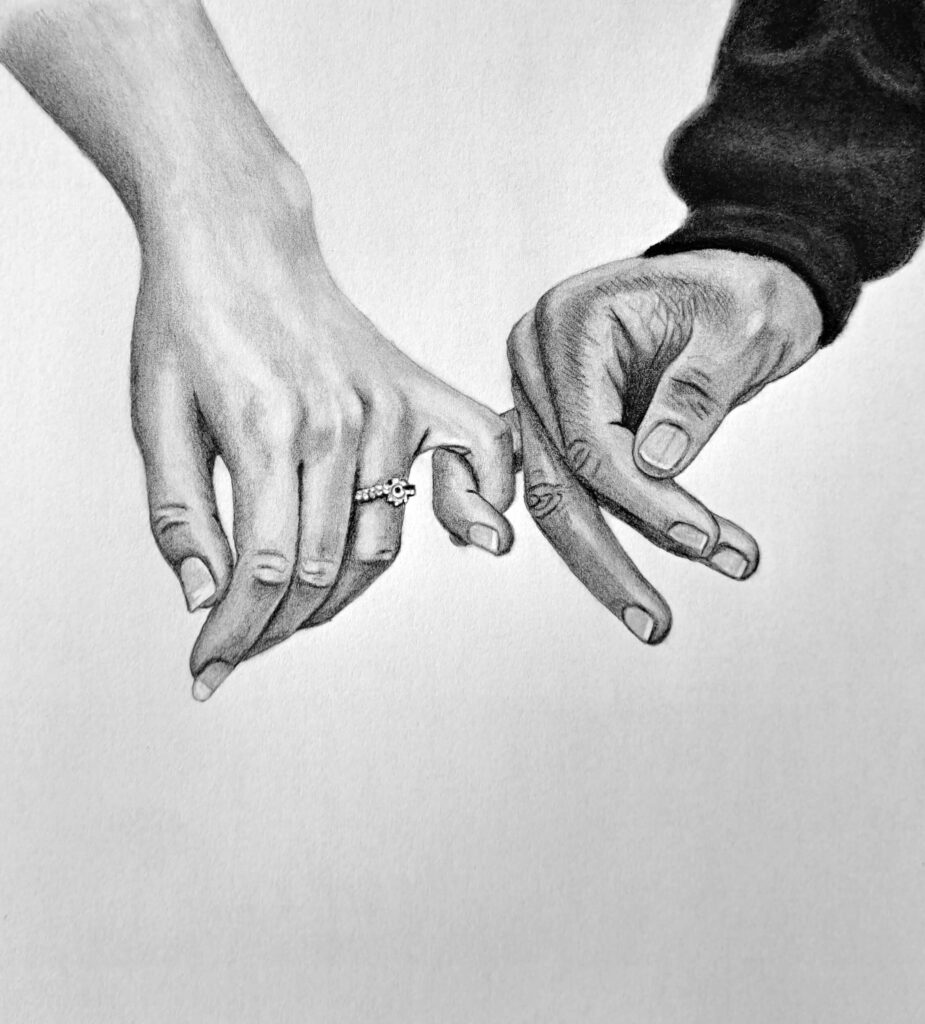
Final: Shading the Nails, Adding Highlights, and Refining

This final step involves shading the nails as curved surfaces instead of flat shapes.
Add a gentle gradient, slightly darker near the base and lighter toward the highlight area at the tip. Use a kneaded eraser to lift small highlights where light hits directly. Keep them subtle. Bright, sharp highlights can make the nail look artificial.
Next, reassess your value range.
Are the darkest areas deep enough to support the highlights? Realism depends on contrast. Light only appears convincing when dark values anchor it. For very dark ranges, I find charcoal to be appropriate, like I’ve done on the man’s garment.
An 8B pencil could also work, but it often leaves a shiny surface.
Lastly, soften any accidental harsh outlines. Reinforce contact shadows where needed. Clean smudges carefully without over-blending.
Conclusion
Drawing is meant to be fun.
But if you let perfectionism get in your way, it starts become overwhelming. The trick is to trust the process and move one step at a time.
And if you’re doing it for fun, as I do, take your time and admire every step accomplished.
I hope you’ve been inspired to continue filling up your sketchbook. Don’t forget to bookmark, save, or share on Pinterest, Facebook, or any platform of your choice.