
The peony is one of the most beautiful and elegant flowers, known for its lush, ruffled petals and intricate details. Drawing a realistic peony may seem challenging at first but with the right approach, you can create a stunning floral sketch.
In this tutorial, we’ll break the process into simple, easy-to-follow steps, guiding you from basic sketch to fine shading details. Whether you’re a beginner or looking to refine your floral drawing skills, this guide will help you bring your peony to life with shading and texture techniques.
All you need are:
- Graphite pencils (3H – H for sketching, HB-4B for shading).
- An eraser of your choice (Kneadable preferred).
- A regular sheet of printing paper or sketchbook.
- Patience and creativity!
By the end of this guide, you’ll have a realistic peony drawing that captures the delicate beauty of this beloved flower. Let’s get started!
How to Draw a Peony – Beginner to Advanced
Step 1. Sketch the Peony Outline
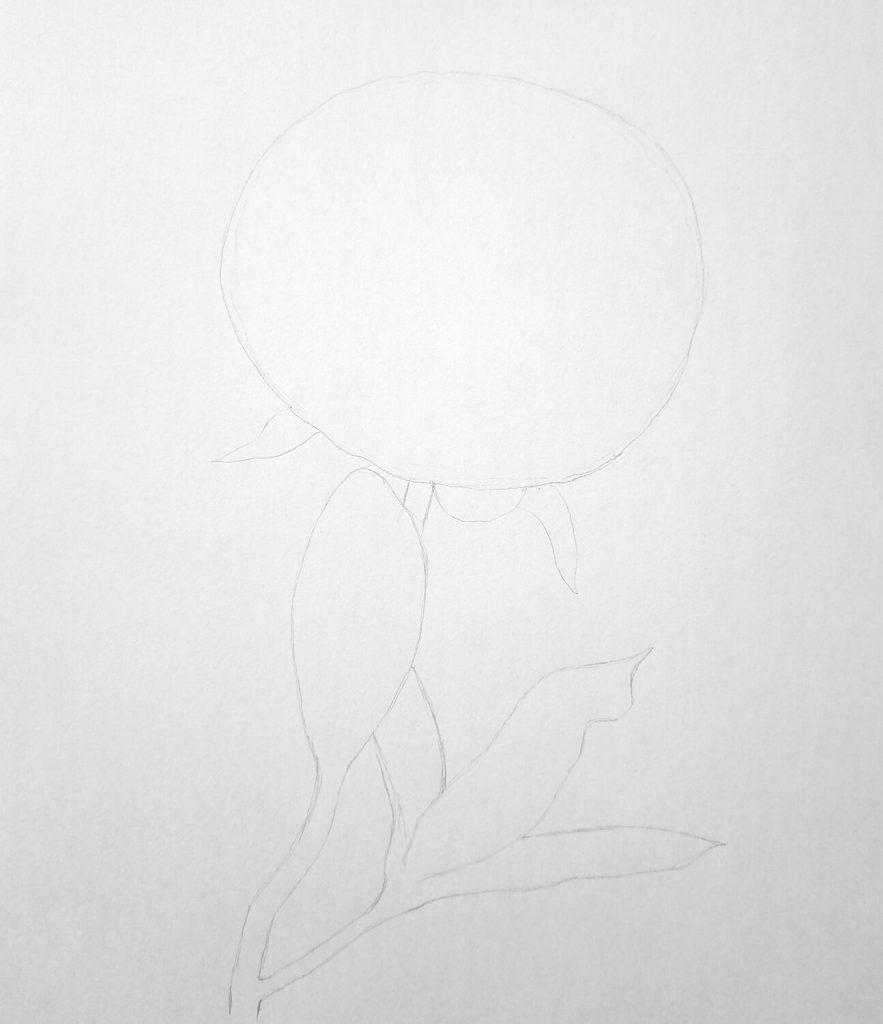
Before we begin, it’s important to establish the basic structure of the peony using a simple predominant shape. This will serve as a guide to help position the flower petals, leaves, stem, and sepals accurately.
Start with a light circle to a slightly oval shape to outline the overall size and position of the peony bloom. Since peonies have layers of petals, keep the oval slightly irregular to reflect the flower’s natural fullness.
Next,draw several small, curved shapes at the bottom of the oval. These are the sepals (calyx), the small leaf-like structures that support the flower. Look at my illustration above and observe how they curve.
To draw the stem, extend two vertical lines downward below the oval. Avoid making it perfectly straight all through as peony stems have a subtle, organic curve.
Lastly, outline the leaves.While there are different types of peonies, they generally have elongated and pointed leaves growing in pairs along the stem. Sketch oval or teardrop-shaped guides to position them.
Add a branching stem if you want extra leaves for a fuller composition.
At this stage, keep your lines light and loose, as you’ll refine them in the next steps when adding petal details and shading.
Step 2. Drawing the Peony’s Basic Sketch
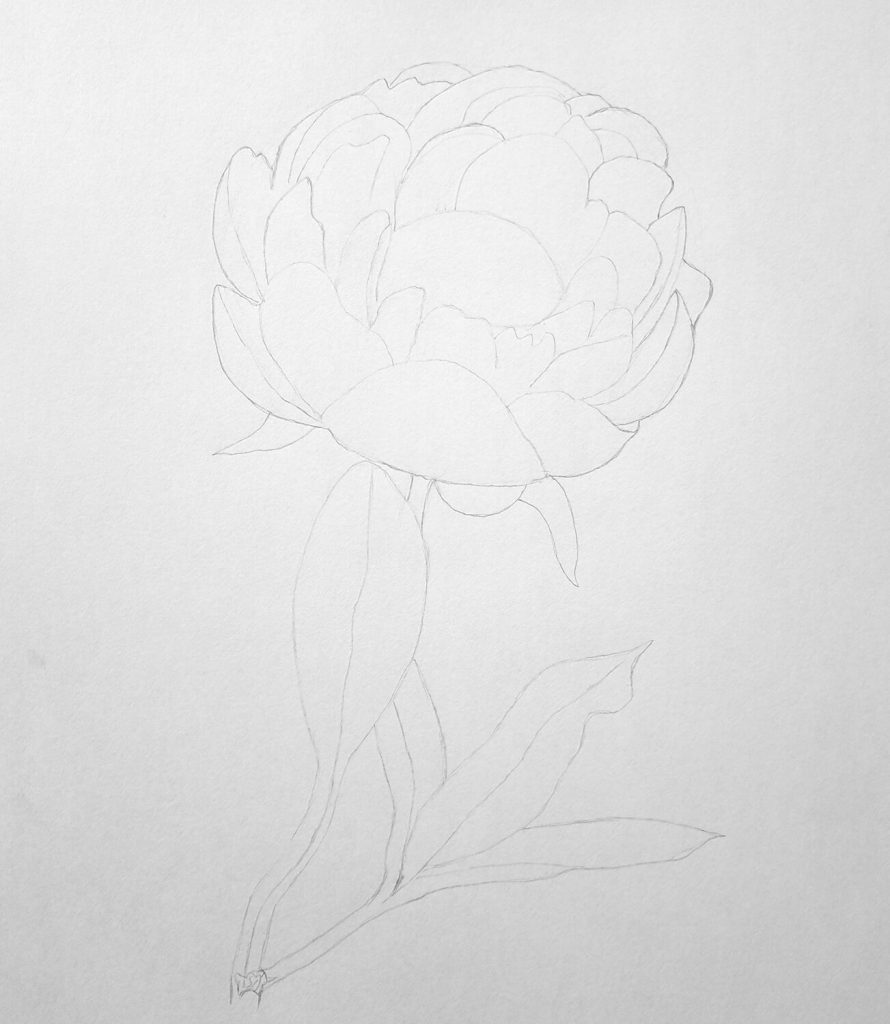
Now that we have the outline in place, it’s time to refine our sketch by adding the petals and leaves. At this stage, focus on capturing the natural shape and flow of the peony flower.
First and foremost, define the center of the peony with a semi-oval. This is where we’ll draw the reproductive features of the flower.
Next to the semi-oval, sketch smaller, more compact inner petals that curve toward the center. These petals should appear denser and more intricate, as they form the heart of the peony.
Work your way out sketching more petals.
Then define the outer petals by sketching wavy and irregular petal shapes around the outer edge of the oval. It’s helpful to have a reference photo to observe but in general, the outer petals are soft, rounded, and slightly ruffled. Some may have gentle folds or curves, so vary the edges to create a natural look.
Besides, you need to make sure the petals overlap slightly to give the flower a layered, full appearance. If you look at my image illustration, you’ll realize I’ve also sketched a slight midrib on the leaves – do the same.
At this stage, your peony should be fully sketched with all petals, sepals, and leaves in place.
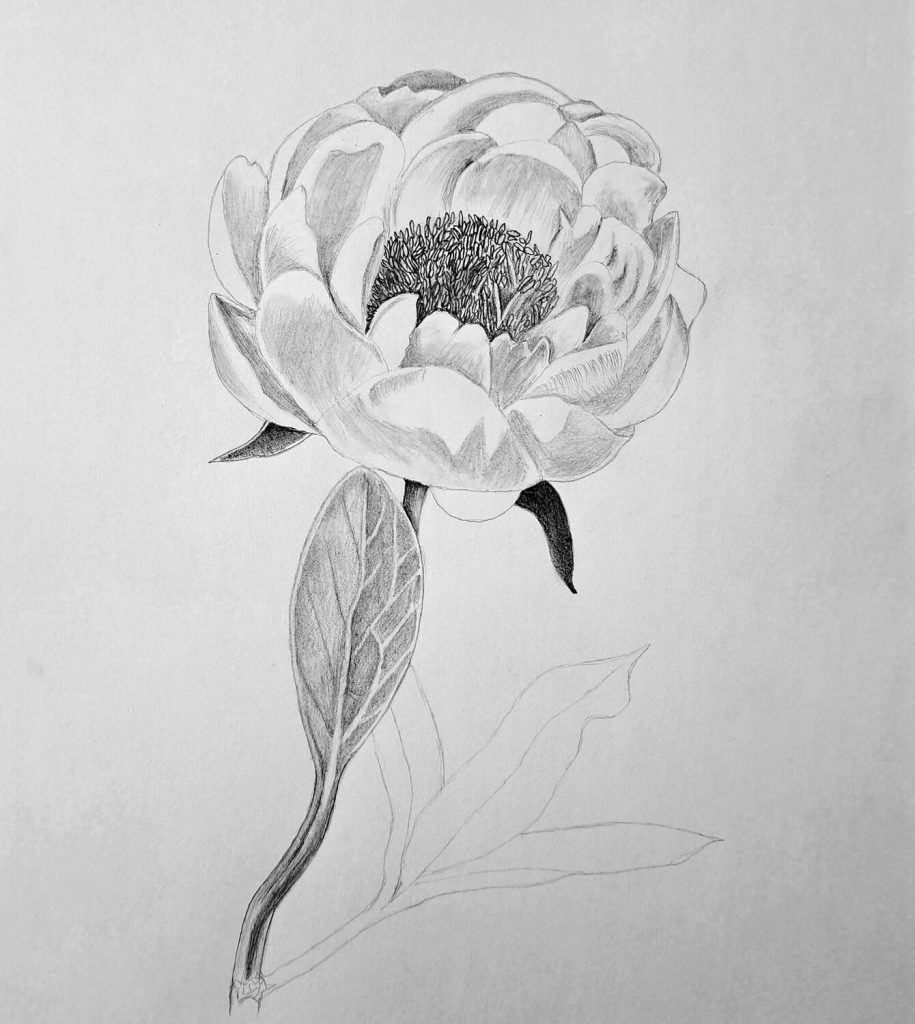
Step 3. Shading the center of the flower (Anthers, Stigma, and Calyx)
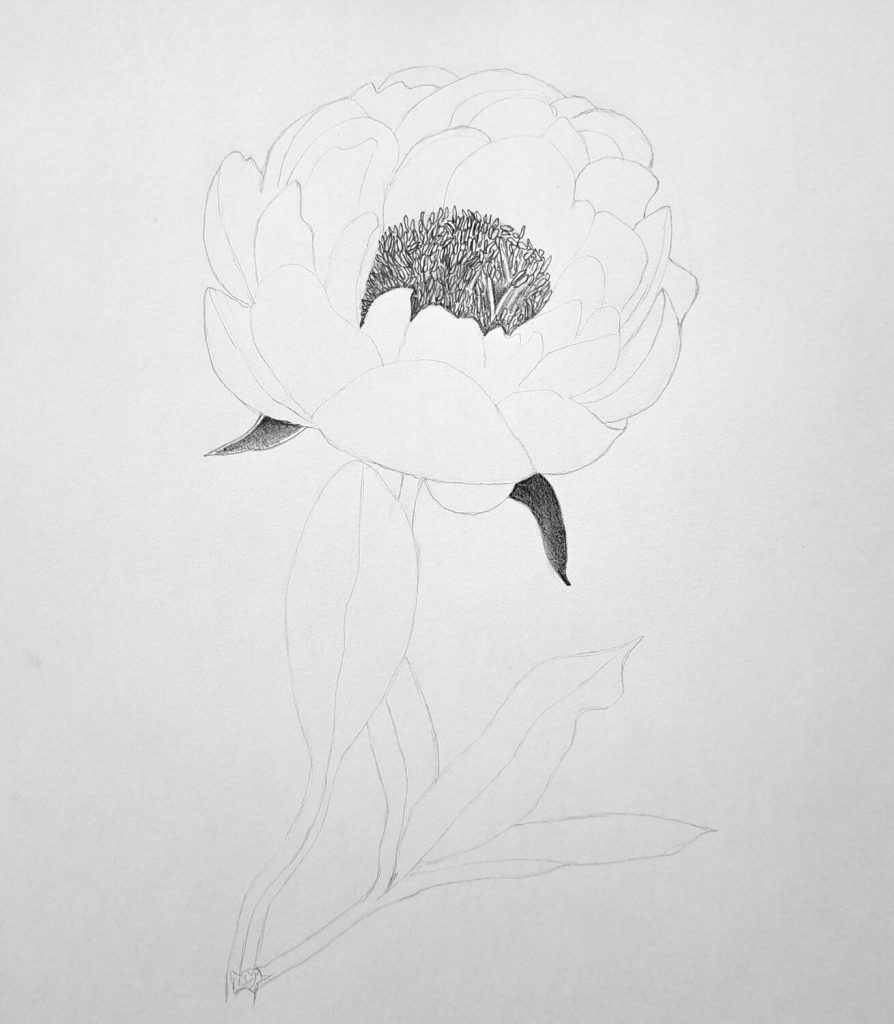
Remember the semi-circle we drew at the center of the flower? We need to shade that part using a 4B pencil. Make sure the pencil is sharpened and create several smaller cylindrical structures to represent the flower’s reproductive organs such as anthers and stigmas.
These structures don’t have to face in the same direction. Therefore, make the random and vary their sizes. If the peony flower was closed, this step wouldn’t be necessary.
Proceed to shade the calyx (sepals) as indicated in the illustration.
Step 4. Shading the Flower Petals
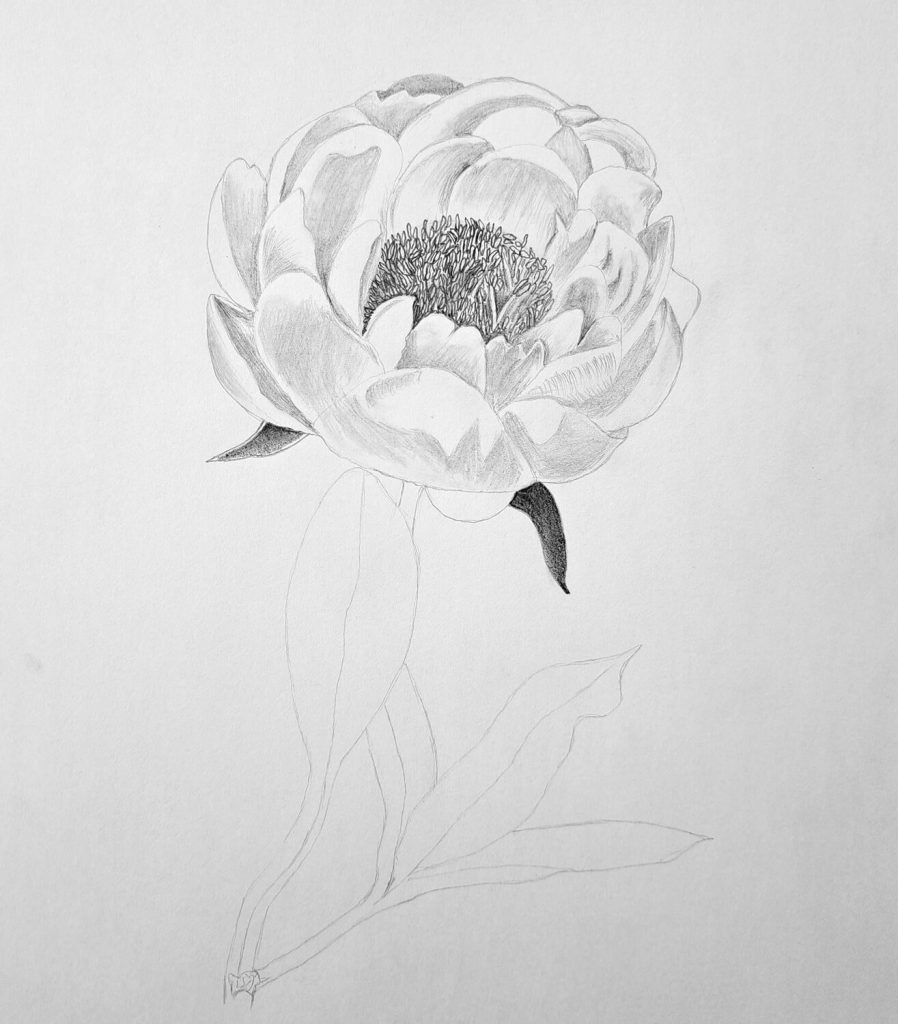
Shading adds depth, making the petals look soft, layered, and realistic. We’ll use different pencil grades to create contrast and texture.
Before shading, decide or understand where the light is coming from. This is important even if you’re drawing from observation. The areas facing the light will be lighter, while the parts hidden beneath overlapping petals will be darker.
Use an HB or 2B pencil to lightly shade the petals, following their natural curves. Use soft, curved strokes to avoid harsh lines. Leave the tips of the petals slightly lighter to create a delicate effect.
To add depth to the overlapping petals, shade underneath each petal where it overlaps another. Use a 2B or 4B pencil to darken these areas, making the petals appear more three-dimensional.
Blend gently with a Q-tip or a blending stump for a smooth transition between light and dark areas.
With careful shading, your peony will start to look full, soft, and realistic! Next, we’ll apply shading techniques to the leaves and the stem.
Step 5. Shading the Leaves and the Stem
Now that the peony’s petals have depth and softness, it’s time to shade the leaves and the stem. Leaves and stems have a slightly different texture than petals, so we’ll use shading techniques that emphasize their structure.
In most cases, the top of the leaves and stem will generally be lighter, while the lower and overlapping areas will be darker.
To begin shading the leaves, use an HB or 2B pencil to apply a base layer of shading, following the leaf’s natural shape. To create an illusion of subtle curvatures, darken the edges slightly.
Furthermore, peony leaves have visible and defined veins, so carefully outline the central vein and smaller veins branching from it. Use a blending stumpto soften the shading, but keep the veins slightly visible for realism.
For added depth, use a 4B pencil to shade the areas where leaves overlap or where they fold slightly.
Once you’re done with the one leaf, move to the next and repeat the process.
To complete this step, shade the stem to create the illusion of roundness. Use a 2B or 4B pencil to add gentle shading along the edges, leaving a lighter area in the middle where light hits.
Darken the base of the stem where it connects to the flower for a more natural transition.
Step 6. Detailed Shading and Finalizing the Drawing
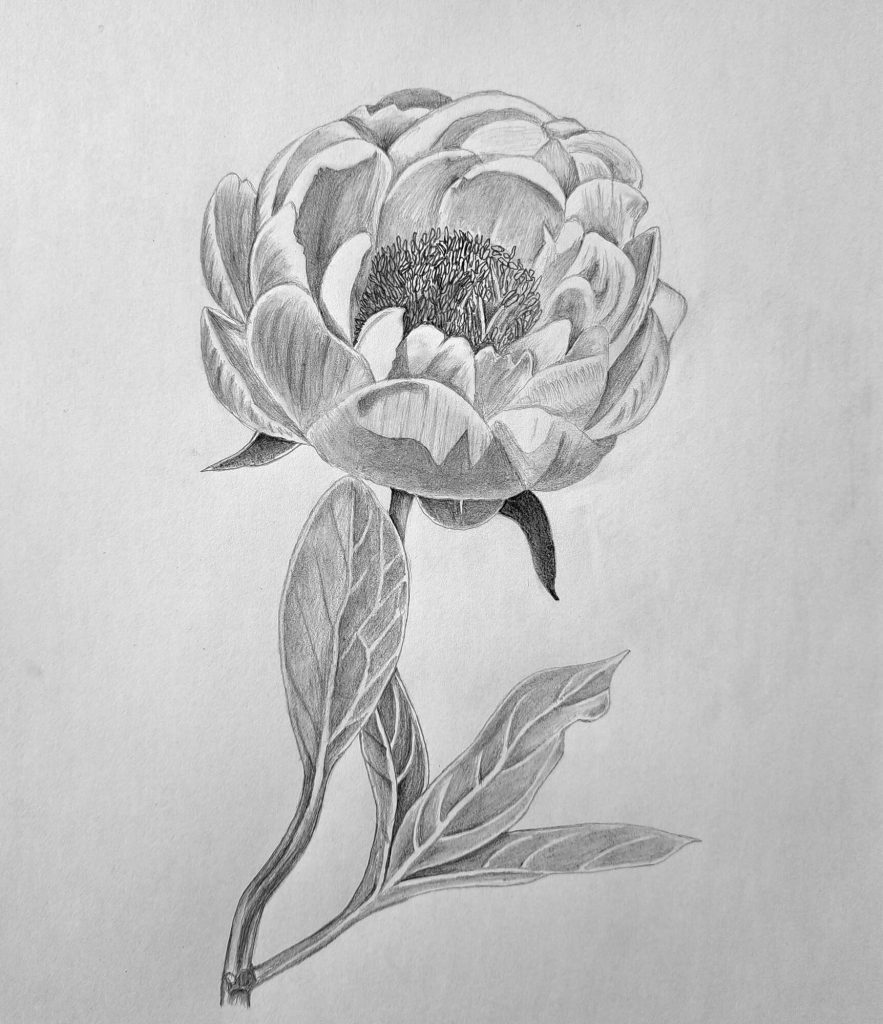
This is the final step and it requires a careful review of the entire drawing, refining details, and making any final adjustments!
For starters, peony petals have a silky texture. Use light, feathery strokes to add subtle shading without making the petals look too rough. If some areas appear too dark, use a kneadable eraser to dab off some graphite and create soft highlights.
To create a healthy contrast, use a 4B or 6B pencil to deepen the shadows between the overlapping petals, but keep some highlights to suggest folds and depth.
Lastly, go over the shaded areas with a blending tool to smooth out harsh lines. If necessary, use a kneadable eraser to add small highlights along the veins or the edges of the stem to create a more realistic look.
At this point, you should be having a realistic peony drawing!
I hope you’re very proud of yourself.
Other Flower Drawing Tutorials
Drawing sunflowers step by step
Conclusion
You’ve successfully drawn a beautiful peony using graphite pencils. By breaking the process into simple steps—starting with a basic outline, refining the sketch, and adding shading for depth—you’ve captured the delicate elegance of this stunning flower.
Remember, to keep practicing!
The more you draw, the more confident you’ll become. Don’t worry if your first attempt isn’t perfect—each drawing is a learning experience, and every stroke brings you closer to mastering the art of drawing realism.
Remember, this tutorial is part of our Drawing Flowers series, where we explore step-by-step techniques for sketching different blossoms. If you enjoyed drawing the peony, be sure to check out our other tutorials in the series!