
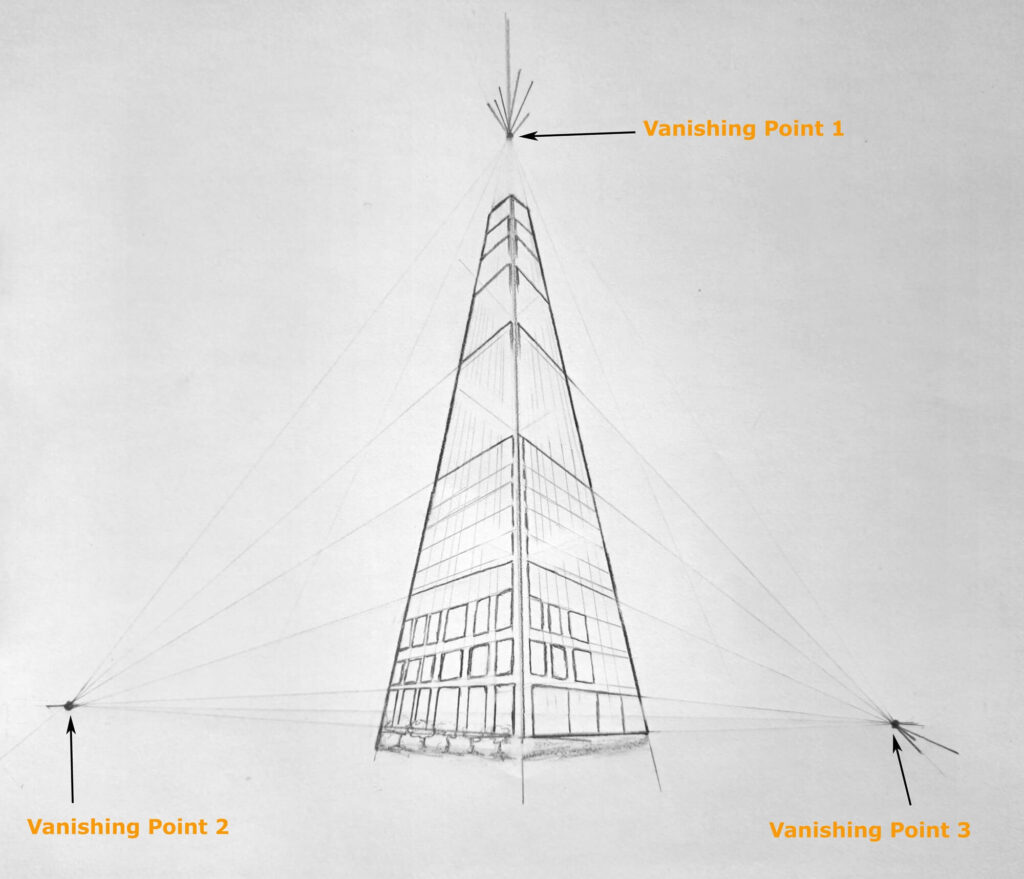
Stand at the foot of a skyscraper and look straight up.
The walls appear to tilt toward one another, the upper floors seem to shrink, and the top of the building feels much farther away than it really is. That dramatic view is one of the reasons tall buildings can look so imposing, even when you see them from several blocks away.
Three-point perspective helps you recreate this effect on paper.
It adds a third vanishing point to the two used in ordinary two-point perspective, allowing the building’s vertical edges to converge as they rise or fall through the scene.
It’s applied when drawing skyscrapers, towers (Eiffel Tower), monuments, and other structures viewed from an extreme angle. You can learn more about these principles in the Foundations of Drawing by Palomar Institute.
In this tutorial, I’ll walk you through the process of setting up the perspective, constructing your tall object, removing the guidelines, and refining the finished drawing.
You can use the same basic approach for a simple building or adapt it to the Eiffel Tower, whose distinctive iron framework makes an interesting subject.
Let’s get started:
Horizon, Vanishing Points, Orthogonal Lines
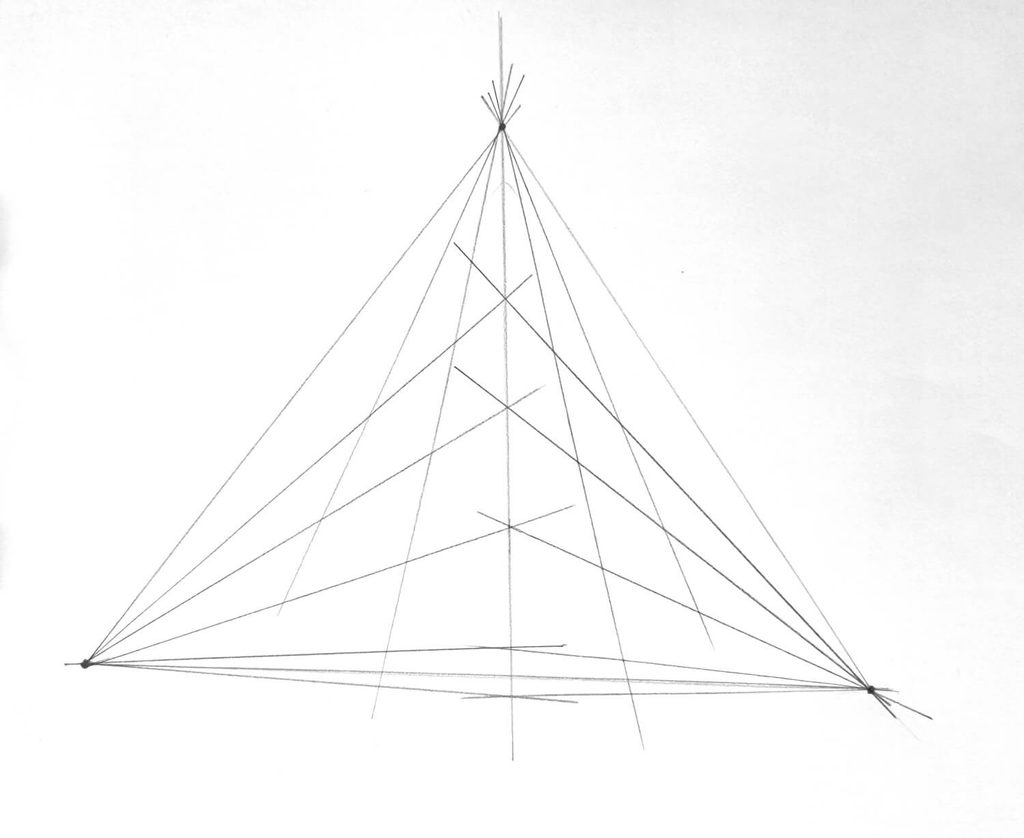
Before drawing windows, balconies, or the Eiffel Tower’s famous latticework, establish the framework that will control the entire structure.
Start with a portrait-oriented sheet of paper, a pencil, a ruler, and an eraser. Keep your initial marks light because you’ll need to remove many of these lines as the drawing develops.
Step 1: Draw the horizon line
The horizon line represents your eye level, whether or not the actual horizon is visible in the scene. Its position on the page helps establish where you’re viewing the object from.
Since we’re drawing a tall object from below, place the horizon line toward the lower part of your page. This leaves plenty of room above it for the building to rise dramatically.
The exact position depends on how much of the structure you want to show. A lower horizon generally leaves more space for the upward-looking view, while a higher horizon suggests that you’re looking down from an elevated position.
I’ve also discussed this concept in detail in the guide about one-point perspective drawing. I encourage you to check it out.
Step 2: Establish the three vanishing points
Three-point perspective uses three vanishing points, each controlling a different set of receding edges.
Place the first two vanishing points, one on the left and one on the right, along your horizon line. Spread them fairly far apart. When these points sit too close to the object, the sides can converge so sharply that the building looks unnaturally distorted.
Next, establish the third vanishing point above the building you’re planning to draw. For this upward-looking view, the vertical edges will converge toward that upper point.
If you were drawing the same kind of structure from high above, looking down, the third vanishing point would instead sit below the horizon line.
Don’t worry if the upper vanishing point falls beyond the top edge of your paper. The same goes for the two points on either side. Vanishing points don’t have to fit inside the picture, and placing them farther away can make the convergence more subtle and natural.
If you need to, tape a spare sheet beside your drawing so you can mark the points outside the main page.
Step 3: Draw the orthogonal lines
Orthogonal lines are the construction guides that run from the object’s edges toward their corresponding vanishing points. They help you determine the direction, depth, and proportions of the building.
In this scene, the edges that recede toward the left follow the left vanishing point, while those that recede toward the right follow the right vanishing point. The third set, which controls the vertical direction, converges toward the upper vanishing point.
Begin by lightly drawing a guide in the direction of the upper vanishing point through the area where you plan to place the nearest vertical corner of the building.
This gives you a reference for the structure’s height and helps you position its main edges.
Then use your ruler to draw the appropriate guides from the building’s intended corners toward the left and right vanishing points. Keep these lines faint, and extend them far enough to help you construct the form accurately.
Pro Tip: In three-point perspective, the building’s upright edges shouldn’t all remain perfectly parallel on the page. They should follow the direction of the third vanishing point. This convergence is what makes the viewer feel as though the structure is towering overhead.
Constructing the Object or Building in the 3-Point Scene
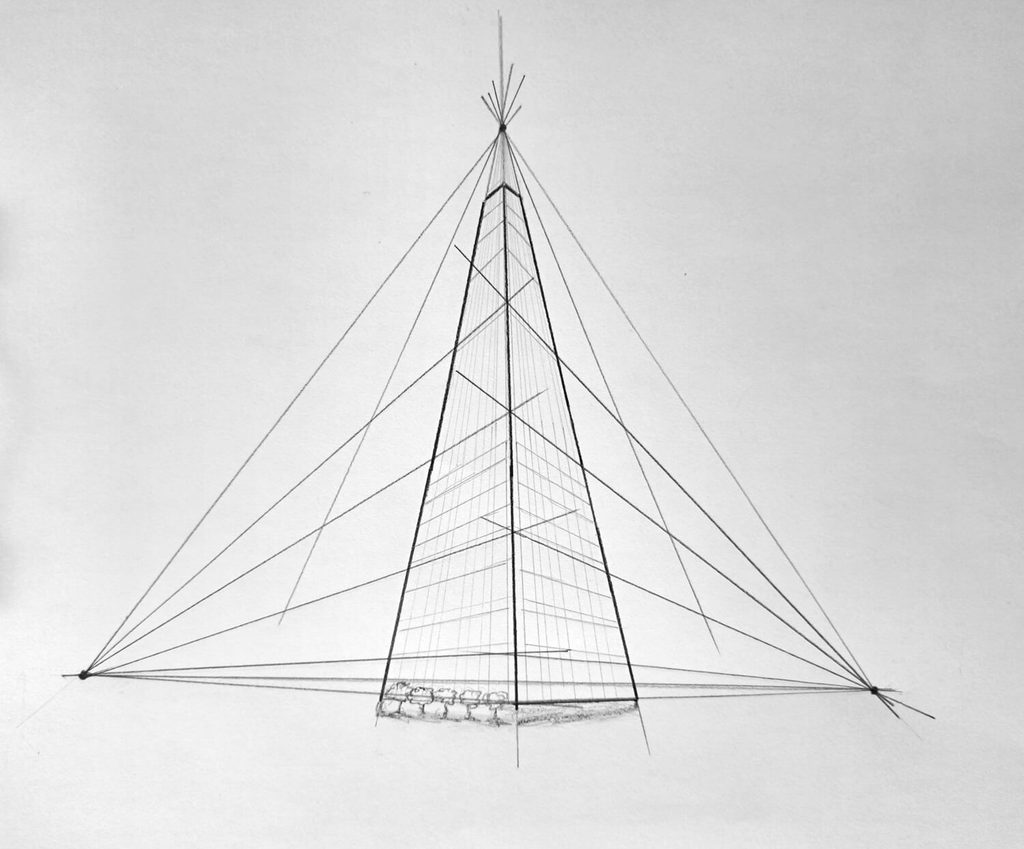
With the perspective framework in place, you can begin turning the guidelines into a recognizable structure.
I recommend starting with the building’s overall shape before adding any architectural features.
Step 1: Establish the main structure
Start with the nearest vertical corner of your building, using the guide that points toward the upper vanishing point. Decide where the base will sit and how much of the structure should rise into the scene.
From the upper and lower ends of this corner, draw light construction lines toward the left and right vanishing points. These establish the directions of the building’s receding edges.
Now decide how wide you want the two visible faces to be. Mark the positions of the other corners along the guides, then use the appropriate vanishing points to continue the edges and close the form.
Use the same system for the remaining corners, directing each vertical edge toward the third vanishing point. You should gradually see the basic volume of the building emerge.
Step 2: Develop the building’s framework
Once the basic construction is in place, refine the outline to suit your chosen subject.
For a modern skyscraper, you might keep the shape relatively simple, with a narrow top, clearly defined corners, and a broad base. You can add a stepped roofline or setbacks if your reference calls for them, but make sure each new part follows the same perspective system.
For the Eiffel Tower, you’ll need a different structure.
Begin with its broad footprint and four main supporting legs, then shape the framework so it narrows toward the top.
The tower’s legs, platforms, and supporting members should all fit within the perspective structure you’ve established.
Try to preserve the tower’s characteristic balance. Its base spreads outward, its legs curve or angle inward as they rise, and its upper sections become progressively narrower.
These changes in shape are essential to its identity, so avoid turning it into an ordinary triangular outline.
Step 3: Add the main architectural features
With the structure established, begin dividing the building into its major sections. For a conventional building, these might include floors, window bands, balconies, a rooftop, or a projecting entrance.
Use the appropriate vanishing point to guide each row of windows or architectural bands across its face.
Features on a receding side must follow that side’s perspective direction. The third vanishing point also controls the direction of the building’s upright divisions.
Pay attention to spacing as you work. Upper floors may appear more compressed because they’re receding from the viewer, so avoid copying identical-looking rectangles all the way up the page without accounting for the perspective.
Erasing the Unnecessary Lines
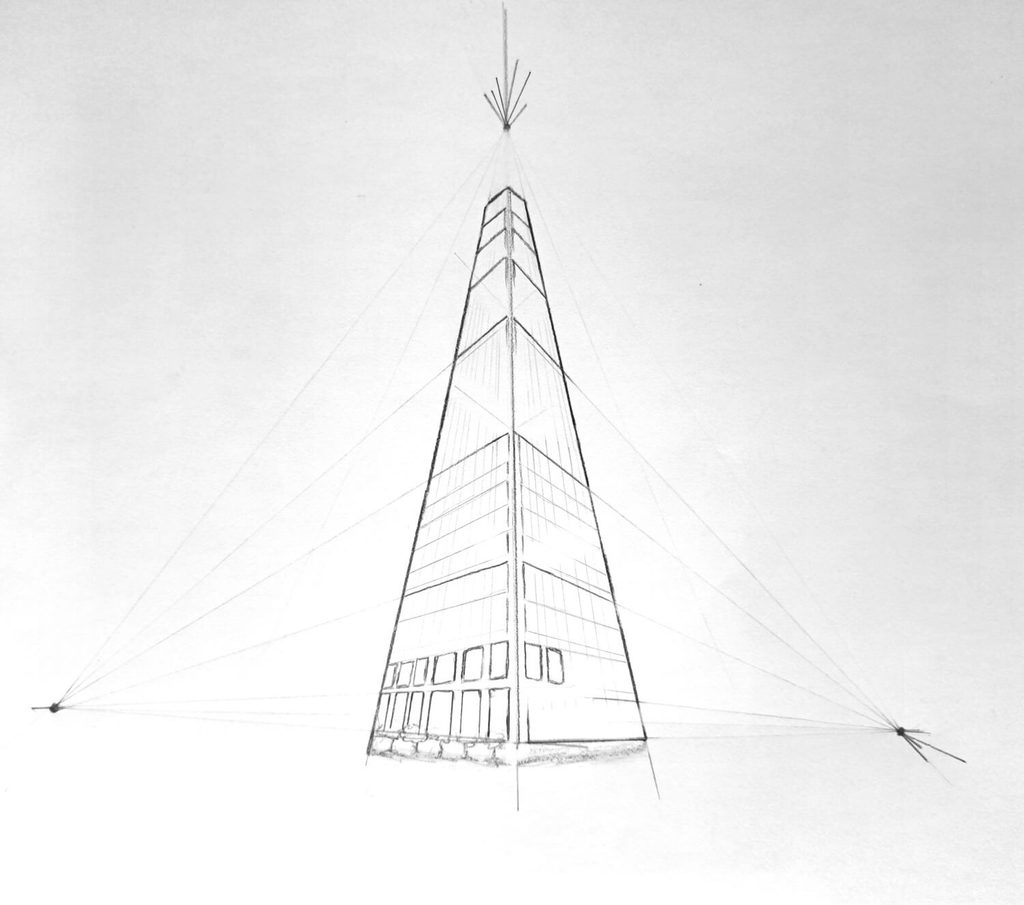
Now that the building has a clear shape, it’s time to remove the construction marks that helped you create it.
Before erasing, though, check the building’s major edges one more time.
Do they follow the appropriate vanishing points?
Do the two visible faces feel balanced?
Does the top appear to recede naturally toward the upper vanishing point?
Use your eraser gently to remove the guidelines that extend through the finished building or beyond its outline. Avoid pressing hard, especially around the corners and smaller architectural features, because you don’t want to damage the paper or remove lines you still need.
You don’t have to erase every construction mark immediately. Some guides may still help when you’re adding windows, platform levels, or other details. Keep the useful ones until you’re confident that the relevant features are correctly placed.
When you’re done, the remaining lines should clearly describe the building’s main form without the distracting web of guidelines that surrounded it during construction.
Refining the Building, Bolding, and Detailing
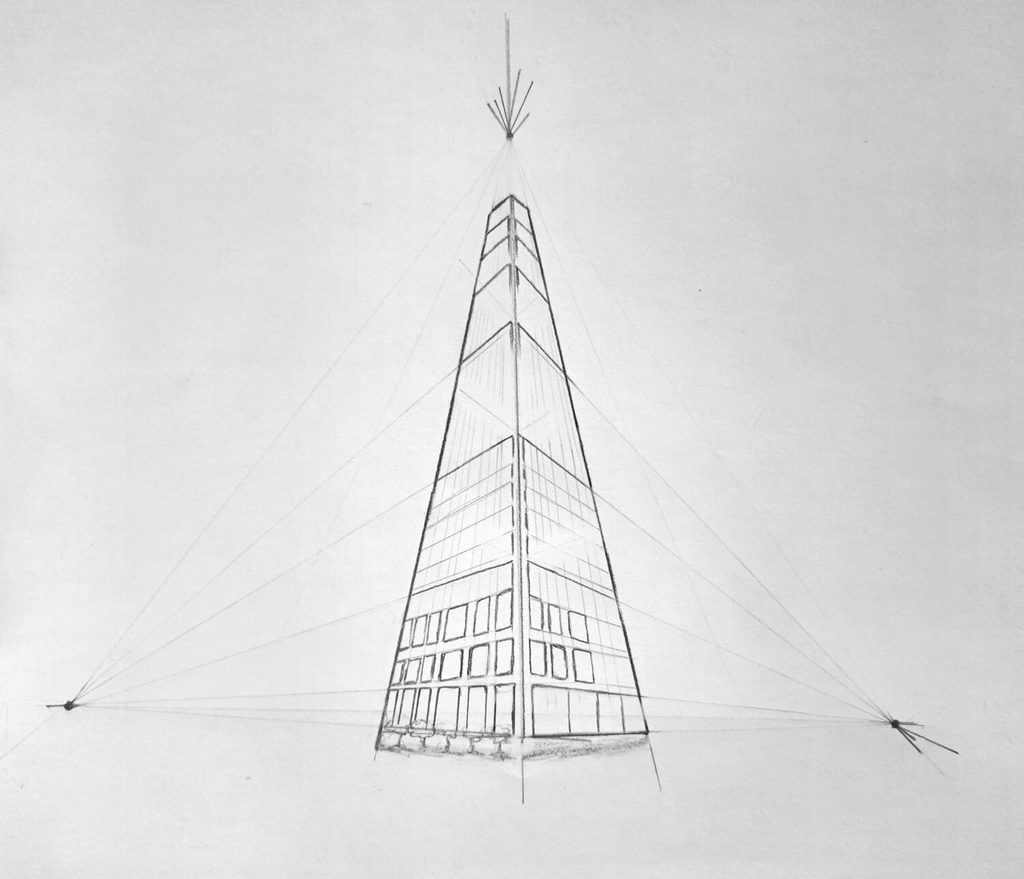
This is where you can give the structure its character. The perspective framework has done the difficult job of organizing the shape, so you can concentrate on making the building look finished.
Step 1: Strengthen the important outlines
Begin by going over the major visible edges with firmer pencil strokes. Give the outer lines enough definition to stand out from the smaller lines inside the building.
You can vary your line weight to create a clearer visual hierarchy.
For example, use stronger lines around the main structure and the most important structural edges, then use lighter strokes for window frames, railings, and smaller architectural features.
Be deliberate about which lines you darken. Bolding every edge equally can make a complicated structure look heavy, particularly when several converging lines meet around a narrow upper section.
Step 2: Refine the architectural details
For a conventional building, work through the windows, floor divisions, ledges, and other visible features. Keep checking their direction against the vanishing points as you go.
You can make the windows less prominent as they recede, adjusting their apparent size and spacing to suit the view. Remember that the goal is to show how the structure appears from your chosen viewpoint, not simply to reproduce a flat architectural elevation.
For the Eiffel Tower, the detailing requires a slightly different approach. Its appearance depends on the open iron framework, the broad arches at the base, the horizontal platforms, and the network of diagonal braces that connect its supporting members.
The official Eiffel Tower website’s key figures list 18,038 iron parts and 2.5 million rivets in the structure.
That’s a remarkable amount of engineering, but you don’t need to draw every component to communicate the tower’s character. Focus on the larger braces and cross-bracing first, then add finer lines where they’re most visible.
As the framework narrows toward the top, keep the smaller structural details consistent with the overall convergence.
Step 3: Check the drawing as a whole
At this point, you can also introduce shading to help distinguish the visible faces and create a stronger sense of depth.
Keep the shading consistent with the lighting in your scene, and avoid letting dark areas swallow the details that make the structure recognizable.
Remember, you can add as many details or as little as you wish. After all, it’s more about creating a believable perspective rather than the object itself.
Conclusion
A tall building viewed from below is a useful subject for understanding how three-point perspective works. Two vanishing points control the edges that recede across the structure, while the third controls the dramatic convergence of its height.
I’d challenge you to try and draw as many three-point perspective scenes as possible without worrying about individual subjects or objects.
As always, feel free to share your story and let me know how it goes. Alternatively, just share this guide on Facebook, Pinterest, or bookmark it for when you’ll need to revisit the concepts discussed.