
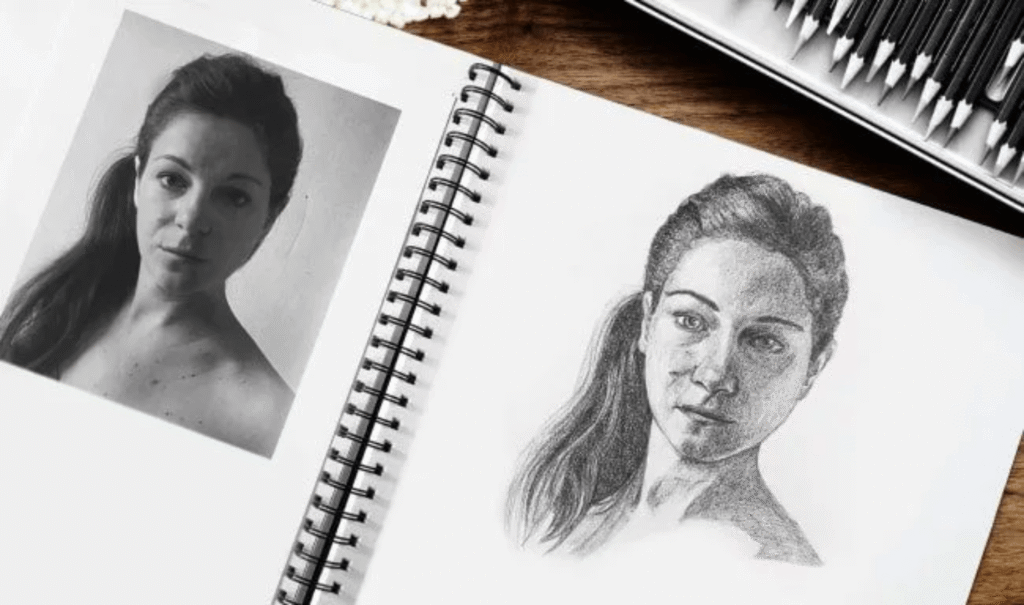
You have your reference photo open and your pencils ready.
You have watched the tutorials, followed the steps, and tried to be as careful as possible.
Yet, when you finally sit back and look at your drawing, something feels wrong.
Maybe the face looks like a different person.
Perhaps one eye is higher than the other, your drawing keeps slanting to the left, or the animal you spent hours drawing looks nothing like the photograph.
Sometimes, you cannot even explain what bothers you. You just know that something is missing.
And the most frustrating part?
You might have made dozens of drawings already, but you still find yourself asking, “Why do my drawings always look so bad?” or “Why does my drawing look nothing like the reference?”
I’ve been there, and I know how discouraging it can be.
You may even have days when everything you draw looks wrong, including the simplest sketches and doodles. Suddenly, you begin questioning whether you have any drawing ability at all.
Before you blame yourself, though, there is something worth understanding: drawing something incorrectly and knowing how to correct it are two different skills.
You can spend hours practicing without making much progress if you cannot identify what needs to change.
The good news is that you can learn to diagnose those problems, and you do not have to guess your way through every drawing.
Why does your drawing look nothing like the reference?
There is rarely just one reason.
Sometimes, your proportions are inaccurate.
Other times, the shapes are close enough, but the angles, spacing, shadows, or overall arrangement make the subject look different.
The tricky part is that these mistakes can be difficult to notice while you are drawing.
1. You are drawing what you think you see, not what is actually there
This is one of the most common problems in representational drawing.
Suppose you are drawing a human eye. You already know what an eye looks like, so your brain supplies that familiar image. You draw the eye you remember rather than carefully observing the exact shape in your reference.
The same thing happens when drawing noses, ears, flowers, animal faces, and almost any familiar subject. You unconsciously replace the particular shapes in front of you with simplified symbols you have learned over time.
The advice to “draw what you see, not what you think you see” is genuinely useful. However, putting it into practice takes time.
Try treating the subject as a collection of shapes, angles, and spaces instead of naming its parts. Rather than drawing an eye, observe the shape formed by the eyelids. Notice its angle, its width relative to its height, and its distance from the other eye.
You can also turn your reference upside down temporarily. This may help you pay more attention to the shapes and less to your assumptions about what the subject should look like.
2. Your proportions are slightly wrong
Small measurement errors can have a surprisingly large effect on the finished drawing.
An eye that sits a little too high, a nose that is too long, or a head that is slightly too wide can change the likeness of a portrait. When drawing an animal, a muzzle that is too short or ears that sit too far apart can make the whole subject look unfamiliar.
This is why adding more detail does not necessarily make a drawing more realistic. If the underlying proportions are wrong, beautifully rendered eyelashes, fur, or individual hairs will not solve the main problem.
Before you begin shading, compare the largest shapes in your drawing with those in your reference. Check the overall width and height, the position of important landmarks, and the distances between them.
One useful exercise is to draw several quick studies of the same subject, spending about 10 to 20 minutes on each. Concentrate on the basic shapes and their relationships rather than producing a finished illustration. You will get more opportunities to practice accurate placement without investing hours in details you might later need to erase.
3. Your drawing is lopsided or consistently slanted
Do your portraits look crooked, even when the reference is fairly symmetrical? Or do your drawings somehow end up leaning to the left, regardless of what you are drawing?
There are several possible causes, including inaccurate angles, misaligned features, the way you position your paper, or the way you view your reference.
If you are drawing from a photograph on a screen, perspective distortion is less likely to be the explanation than it would be when observing a three-dimensional object from an awkward viewing position.
Start by checking alignment.
Look for points that should line up vertically or horizontally. In a portrait, compare the eye corners, the base of the nose, the corners of the mouth, and the center of the chin. Do not assume that corresponding features are perfectly level. Follow the actual reference, including its asymmetries.
You can also hold your drawing at arm’s length, turn it upside down, or look at a photograph of it. These changes make it easier to notice errors that familiarity can hide.
If your drawings repeatedly slant, check that your paper is positioned comfortably and that you are not unintentionally tilting your head or turning your drawing surface. If the problem persists, use a few simple alignment exercises and compare the results rather than relying on the vague instruction to keep practicing.
4. Your drawing lacks convincing light and shadow
Sometimes, your outlines are reasonably accurate, yet your drawing still looks flat, muddy, or unlike the reference.
The problem may be the range and placement of your values. Value refers to how light or dark an area appears, regardless of whether the drawing is made with graphite, charcoal, or colored pencils.
For example, if a realistic portrait has very little separation between the light and dark areas, the nose, cheeks, and eye sockets may not read as three-dimensional forms. If you make every shadow equally dark, you can lose the subtle changes that describe the subject.
Try squinting at your reference to simplify the smaller details and reveal the broader light and dark patterns. Then compare those patterns with your drawing.
You can also temporarily view both images in grayscale. This removes color as a distraction and makes differences in tonal contrast easier to recognize.
For graphite drawing, pay attention to the darkest shadows, the middle tones, and the lighter areas you have deliberately left or lifted with an eraser. Your goal is not to make everything darker. It is to reproduce the relationships between the values you actually see.
5. You are adding details before correcting the main shapes
I know how tempting it is to start drawing individual hairs, scales, eyelashes, or delicate flower petals as soon as possible. Those details are often the most enjoyable part of realistic drawing.
But they can also become a distraction.
If the head is too narrow, spending another 30 minutes on the eyes will not make the portrait resemble the reference. If the outer shape of a rose is wrong, refining the veins on each petal will not fix its overall appearance.
When something looks off, temporarily stop working on details. Compare the outline, large internal shapes, proportions, and major shadows first. Once these are reasonably accurate, return to the finer work.
You may even find that correcting one large shape improves the appearance of several smaller details at once.
The advice is good, but what if you have already tried it?
When artists ask how to improve their drawings, the usual recommendations make sense.
Watch YouTube tutorials. Take drawing lessons. Read books about observation and perspective. Use references. Practice regularly. Draw what you see rather than what you think you see.
I would not dismiss any of that advice. These are valuable ways to develop drawing skills.
The difficulty is that much of this advice teaches you what you should learn, not necessarily what is going wrong in the drawing sitting in front of you.
A tutorial might explain how to measure proportions, but it cannot automatically tell you why your particular portrait looks different from its reference. A book might teach you how light behaves, but you still need to determine whether your shadows are too dark, too light, or incorrectly placed in your current drawing.
And telling someone to practice more is not very helpful when they already spend hours drawing and cannot work out what to change.
What you need is a way to connect the general principles of drawing with the specific mistakes in your own work.
That is the problem I wanted Drawing Doctor by Muus Art to help solve.
How Drawing Doctor helps you figure out what is wrong with your drawing
Drawing Doctor is a visual drawing diagnostic tool that helps you examine your own artwork against its reference. Instead of relying entirely on your memory or repeatedly guessing where you went wrong, you can compare the two images and investigate the differences.
You can try Drawing Doctor for free and use it to examine a drawing you are currently struggling with.
Here is how its tools can help with some of the problems we have discussed.
Compare your drawing with the reference instead of guessing

When you work on a drawing for a long time, it becomes surprisingly easy to overlook mistakes. You get used to the proportions you have drawn, and your brain begins to accept them as correct.
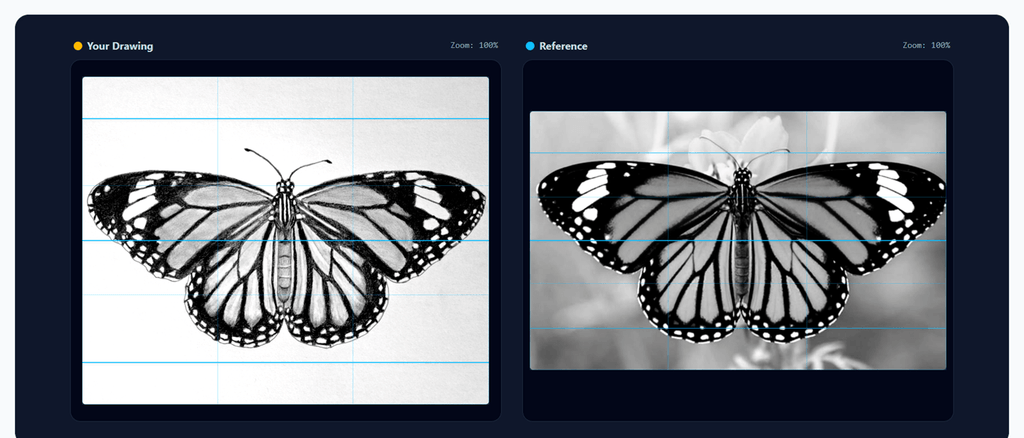
Drawing Doctor’s side-by-side comparison lets you look at your artwork and reference together. This makes it easier to check the overall shape, spacing, placement, and proportions without constantly switching between separate windows or relying on memory.
For example, suppose your animal portrait looks unfamiliar, but you cannot explain why. By comparing the two images closely, you can examine whether the head is too wide, the muzzle sits too low, or the ears are positioned incorrectly.
The overlay view offers another way to check the same problem. When the drawing and reference are superimposed, misaligned contours and misplaced features become easier to spot. This can be especially useful when a drawing looks almost right, but small differences keep it from resembling the subject.
You do not have to wonder whether the eye is slightly too high or whether the outline curves too far inward. You have a visual way to investigate those questions.
Understand why your shading does not look realistic
If you have ever finished a drawing and thought, “The outlines look fine, so why does the whole thing still look flat?”, take a closer look at the values.
Drawing Doctor lets you examine grayscale values and a five-value map, helping you focus on the broad tonal structure rather than getting distracted by individual pencil marks.
This is useful because realistic shading depends on more than making certain areas darker. It depends on how the light, midtones, and shadows relate to one another across the subject.
Imagine that you are drawing a shiny apple. The reference has a bright highlight, a relatively light area across the curved surface, middle tones, a deeper shadow, and a dark contact area where the apple meets the table.
If your drawing compresses most of these into similar shades of gray, the apple may look dull or flat even if its outline is accurate.
A value-based comparison gives you a clearer way to investigate the problem. You can see whether the tonal structure resembles the reference or whether you have lost important differences between light and dark areas.
The five-value map is particularly helpful when you need to step back from tiny details and examine the larger light and shadow pattern first.
Get advice on what to practice next
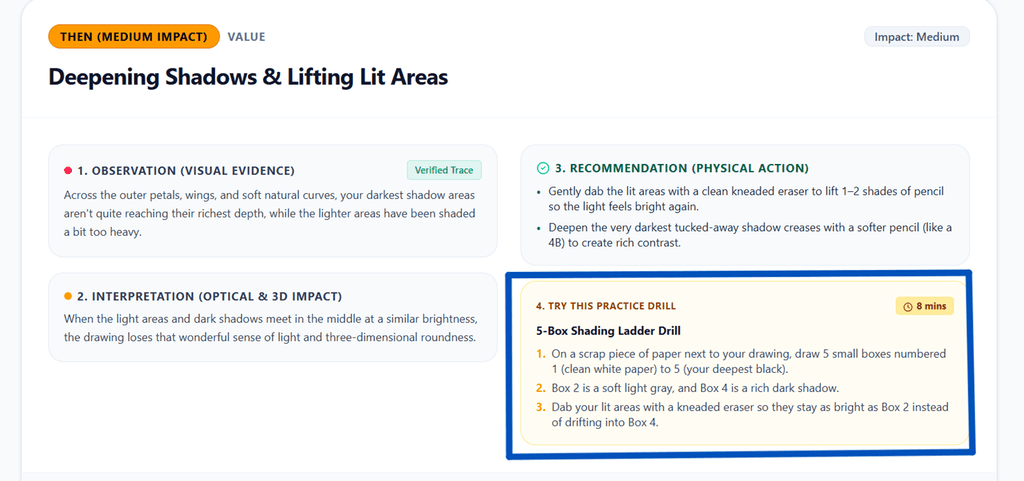
One of the most frustrating parts of learning to draw is knowing that something is wrong but not knowing what exercise will help.
You might spend a week drawing eyes when the real problem is your ability to measure the spaces between facial features. You might keep practicing shading when inaccurate proportions are making the whole portrait look wrong.
Drawing Doctor provides tailored practice exercises to help you direct your effort toward the areas that need attention.
Instead of leaving yourself with the vague instruction to “get better at drawing”, you can use your diagnosis to decide what to work on next.
For instance, if your main difficulty is proportion, you could concentrate on short measuring studies and landmark placement. If your values need work, you could practice matching a few broad tonal groups before attempting detailed shading.
These exercises still require your time and effort. The benefit is that you have a more deliberate starting point.
Track whether your drawing is actually improving

Have you ever looked at an old sketch and wondered whether your skills have improved at all? Or finished a particularly bad drawing and felt as though you had somehow lost everything you learned?
Progress in drawing is rarely a straight line. Some subjects are harder than others, and your results can vary depending on your energy, the reference, and the skills a particular drawing demands.
Drawing Doctor’s progress history and score trend give you a way to look beyond a single drawing and examine how your results develop over time.
Rather than treating one disappointing session as proof that you cannot draw, keep track of your attempts. Look for patterns across several drawings.
You may discover that your proportions are improving even though shading remains difficult, or that you consistently struggle with a particular type of subject.
Use the scores as one source of feedback, not as a verdict on your artistic ability. What matters most is whether you can identify recurring problems and make more informed decisions in your next drawing.
Keep a report you can return to
Sometimes, the most useful feedback is the feedback you can revisit.
Drawing Doctor lets you export high-resolution PDF reports. These give you a record you can keep alongside your sketchbook, consult when planning another drawing, or share with an art instructor when you want additional guidance.
This can also help you avoid repeating the same trial-and-error process every time you start a new piece.
Instead of remembering that a drawing felt wrong, you can return to your analysis and work deliberately on the issues you identified.
Try Drawing Doctor by Muus Art for free and use your own drawing as the starting point for your next practice session.
A simple drawing troubleshooting routine you can use today
You do not need to wait until your drawing is finished before looking for mistakes. In fact, checking your work throughout the process can save you a lot of frustration.
Here is a routine I recommend when a drawing is not going the way you expected.
Step 1: Stop adding details.
Put down your pencil for a moment. If you keep refining the same areas without understanding the underlying problem, you may simply be making an inaccurate drawing more detailed.
Step 2: Look at the whole drawing.
Move back from your paper or reduce the size of the image on your screen. Compare its overall width, height, shape, and placement with the reference. Does the drawing have the same general silhouette?
Step 3: Check a few important landmarks.
Choose three to five reference points, such as the top and bottom of the subject, the center line, or the position of important features. Compare their relationships instead of measuring every detail at once.
Step 4: Check the spaces around the subject.
Look at the shapes of the empty spaces between and around the objects you are drawing. These negative spaces can reveal proportion errors that are difficult to spot when you focus only on the subject itself.
Step 5: Compare the values.
If the proportions look convincing but the drawing still feels flat, examine the broad light and dark areas. Avoid adding random layers of graphite simply because the drawing does not look finished.
Step 6: Choose one problem to solve.
You do not have to fix everything in one session. Focus on the biggest issue first, make a correction, and compare the result again. Then move on to the next problem.
You can use this routine with any subject, from a quick pencil sketch to a detailed portrait. Drawing Doctor can make the comparison and diagnosis stages more structured, but learning to observe carefully remains an essential part of the process.
Useful YouTube videos and drawing tutorials
If you are looking for additional guidance, these resources cover some of the fundamental skills behind accurate drawing.
I would approach them with a specific problem in mind rather than trying to watch everything at once.
YouTube videos
- How to Measure Proportions in Figure Drawing: A helpful lesson on comparing proportions, measuring relationships, and checking the placement of important points. Although it focuses on figure drawing, the principles can help with other subjects.
- How to Draw a Grayscale in Pencil, Part 2: Kevin McCain demonstrates grayscale practice, which is useful when you want to understand tonal differences and create more controlled graphite shading.
- Drawing on the Right Side of the Brain, by Betty Edwards: An introduction to Betty Edwards’ influential approach to drawing and visual perception. It is worth exploring if you struggle to draw what is actually in front of you rather than what you expect a subject to look like.
More Muus Art tutorials
You can also explore these guides when you need practical advice you can apply to your own work.
- 10 Costly Drawing Mistakes to Avoid as an Artist: Revisit common problems involving proportions, premature detailing, shading, and drawing habits.
- 44 Drawing Cheat Sheets Every Artist Should Bookmark: Find reference guides for drawing fundamentals that you can keep nearby while working.
- My 3-Year Drawing Progress: From Stick Figures to Stunning: A reminder that developing your skills takes time and that improvement does not mean every drawing will turn out well.
Three drawing books worth reading
Sometimes, you need a more structured approach than a short video can provide. These books offer exercises and explanations you can return to as your drawing skills develop.
1. Keys to Drawing by Bert Dodson
This is a good starting point if you want to develop observation and drawing control. Its practical approach encourages you to pay attention to shapes, proportions, and visual relationships instead of relying on familiar symbols.
2. Drawing on the Right Side of the Brain by Betty Edwards
This book is useful for artists who want to improve the way they observe their subjects. Its exercises encourage you to pay closer attention to shapes, angles, spaces, and other visual information that you might otherwise overlook.
3. The Natural Way to Draw by Kimon Nicolaïdes
This book offers a structured approach to drawing practice, with exercises that help develop observation and sensitivity to form. It is a useful option for artists who prefer working through a sustained program rather than collecting isolated tips.
Choose one book that addresses your current difficulty and work through its exercises. Buying several books will not make a difference unless you give yourself time to apply what you learn.
What if everything you draw suddenly looks bad?
There are days when nothing seems to work.
You sit down with a reference you like, but your first sketch looks wrong. You erase it and start again. The next attempt is worse. Even a simple doodle looks awkward, and you begin questioning skills that seemed perfectly fine a few days earlier.
First, permit yourself to have an unproductive drawing session.
Your results can vary with your concentration, tiredness, the difficulty of the subject, and how much time you have spent looking at the same image. You may also be attempting a skill that has not yet become comfortable.
When this happens, try changing the task rather than forcing yourself to finish the same drawing.
Switch to a simpler subject. Spend ten minutes drawing only outlines. Make a page of small studies instead of one elaborate illustration. Or take a break and return to the reference later.
If you are repeatedly unhappy with your work, try to distinguish between two different problems: a drawing that has specific, correctable mistakes and a drawing that you simply dislike today.
The first calls for analysis and targeted practice. The second may call for patience and a little distance.
Drawing Doctor can help you investigate the first problem, but no diagnostic tool can replace the time needed to build skill or eliminate every difficult day.
And please do not assume that struggling means you are not artistic. Being able to recognize that your work does not match what you intended is an important part of developing your eye. The next step is learning to identify the differences and use them to guide your practice.
Start improving the drawing in front of you
When your drawing looks nothing like the reference, the answer is not always to erase everything, buy another pencil, or watch another dozen tutorials.
Sometimes, you need to revisit the basics. Sometimes, you need a break. And sometimes, you simply need a clearer explanation of what is going wrong in the particular drawing you are trying to finish.
That is where I think a more structured feedback process can make a difference. Compare your drawing with the reference, check the proportions and tonal relationships, identify the most important problem, and use that information to choose your next exercise.
You will still need patience. You will still make awkward sketches. You may even finish a drawing that does not meet your expectations.
But those experiences become more useful when you can learn something specific from them instead of leaving the page feeling that you have no idea what went wrong.
Ready to stop guessing and start diagnosing your drawings? Try Drawing Doctor by Muus Art for free. Upload a drawing you are struggling with, compare it with your reference, and use the feedback to decide what to work on next.
Your next step does not have to be drawing harder. It can be learning to see more clearly.
Featured Image: Corsidia