Petunias have been charming gardeners for more than two centuries. Native to South America, these cheerful flowers exploded in popularity during the Victorian era after being introduced to Europe in the 1800s.
Their trumpet-shaped blooms quickly found a place in cottage gardens, hanging baskets, and decorative flower beds.
Part of their appeal is variety. Few flowers come in as many colors and patterns as petunias. You can find them in pure white, deep purple, vibrant pink, soft lavender, and almost every shade in between.
Some varieties have striking stripes, while others feature delicate veins that spread across the petals like tiny rivers on a map.
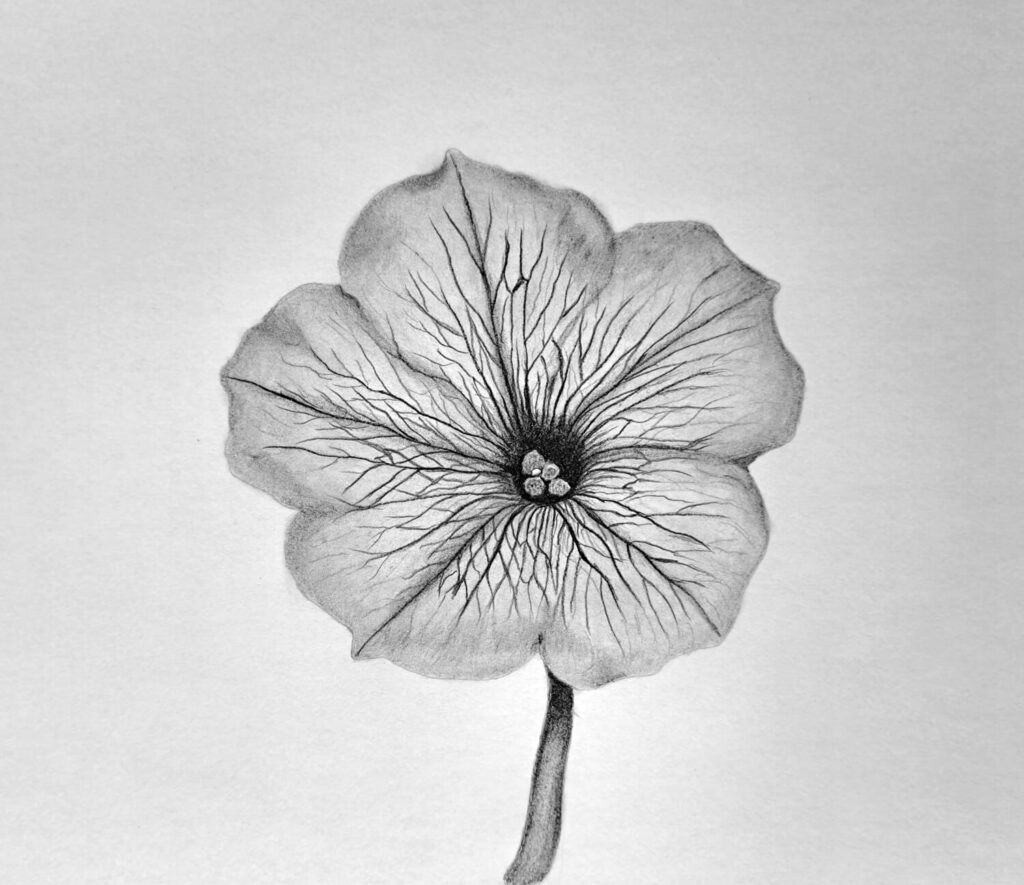
Those veins are one of the reasons petunias make such interesting drawing subjects. They create natural texture, guide the viewer’s eye, and provide excellent opportunities to practice shading and contrast with graphite pencils.
Today, you’ll learn how to draw a veined petunia flower using graphite pencils. Although the reference flower is colorful, we’ll rely entirely on values, shadows, and highlights to capture its beauty.
In a future update, I’ll also cover a colored-pencil version, so bookmark this article if you’d like to follow along when it’s published.
Let’s start.
How to Draw a Veined Petunia Flower
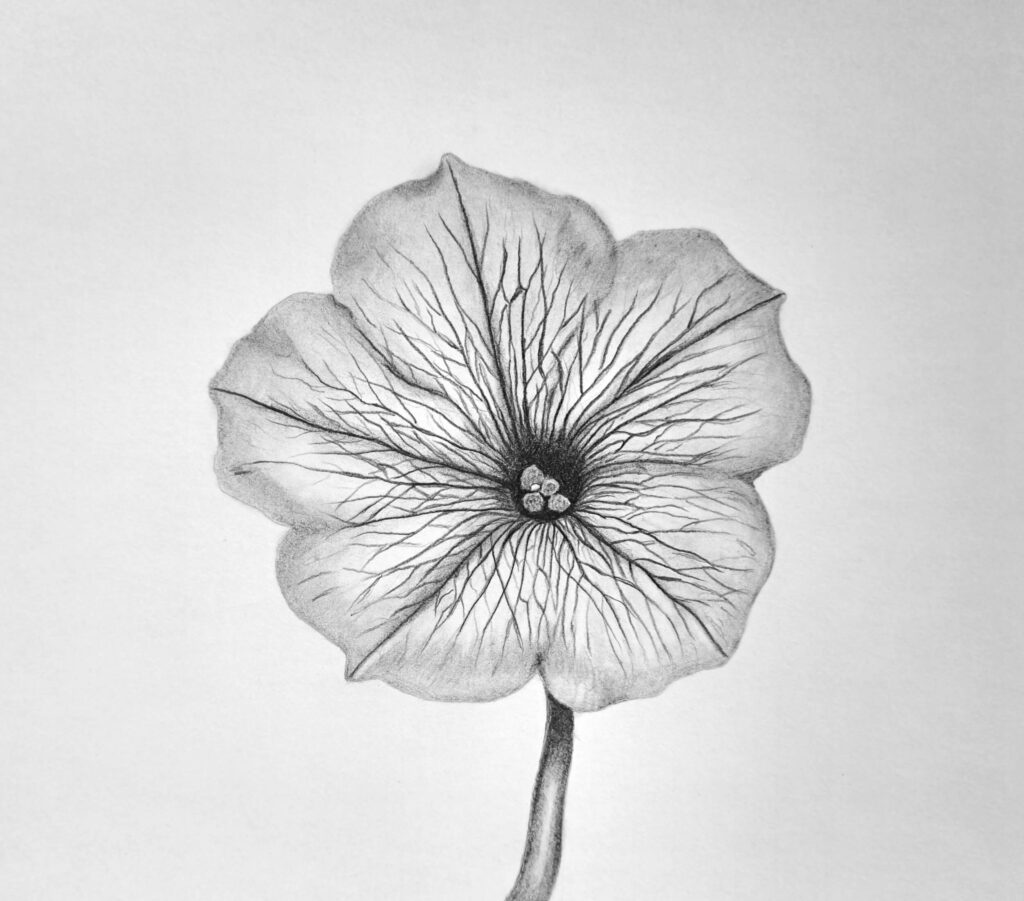
Before putting pencil to paper, take a moment to study your reference photo. Notice how the petals flare outward from a dark center. Observe how the veins branch from the middle and gradually fade as they travel toward the petal edges.
This observation stage might seem boring, but it’s often where the best drawings begin. Many artists rush into shading before understanding the structure of the flower. Spending a few extra minutes looking closely can save a lot of frustration later.
For this tutorial, you’ll need:
- HB pencil
- 2B pencil
- 4B or 6B pencil
- Kneaded eraser
- Drawing paper
- Pencil sharpener
Keep your pencils sharp throughout the process. Petunia veins can be surprisingly delicate, and a sharp point makes them much easier to draw.
Sketching the Flower Outline
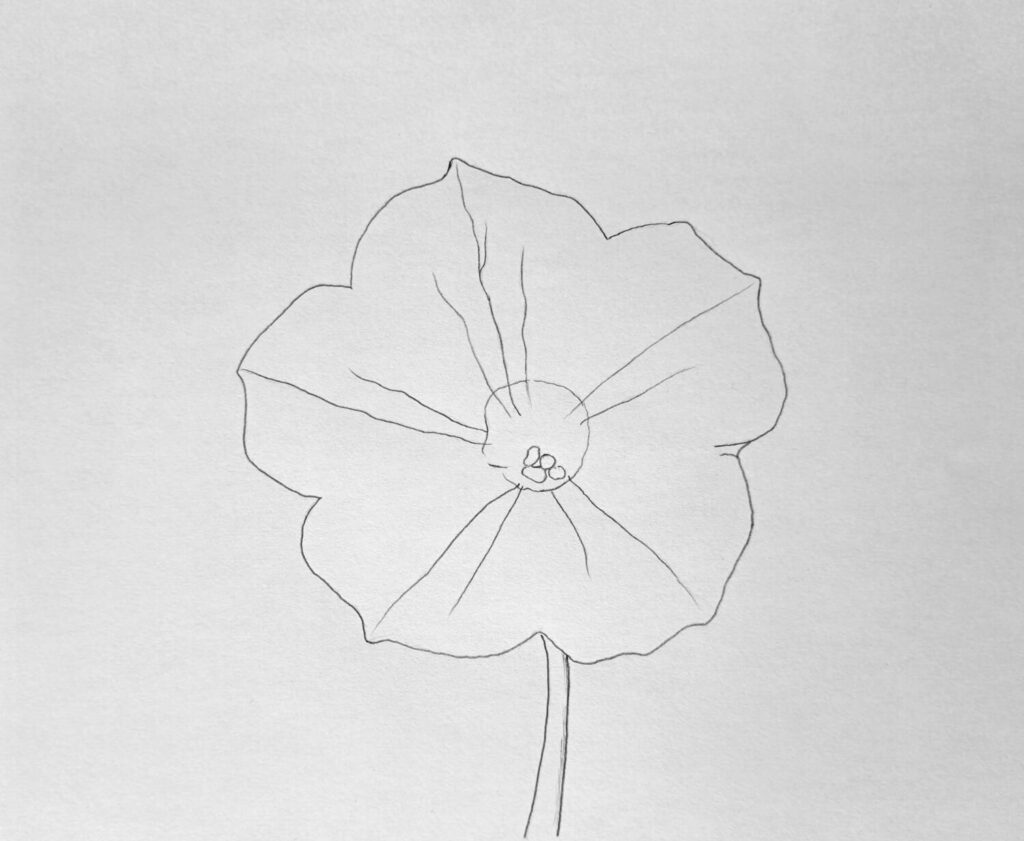
Begin by lightly sketching the outer shape of the flower.
Petunias have a funnel-like structure that opens into broad petals. Instead of drawing individual petals immediately, lightly establish the overall shape first. Think of it as building the framework before adding details.
Once the general shape looks correct, refine the petal edges. Pay attention to subtle waves and folds. Petunia petals are rarely perfectly smooth. Their edges often curl, ripple, and overlap slightly.
Next, sketch the center of the flower and lightly indicate the major veins radiating outward. Keep these lines faint. They are simply guides at this stage.
The Darks: Shade the Center and Veins
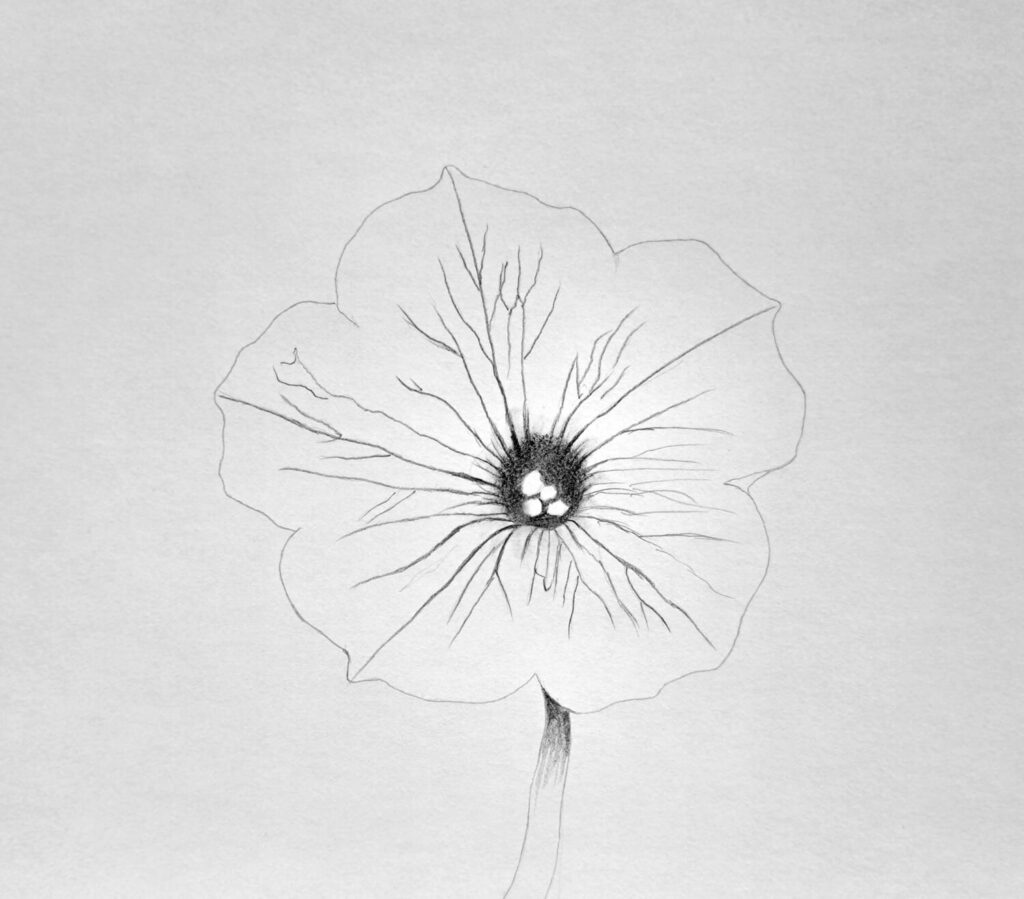
With the outline complete, it’s time to establish the darkest values.
Using a 4B or 6B pencil, carefully shade the flower’s center. In most veined petunias, the throat of the flower appears significantly darker than the petals surrounding it. This dark center acts as the focal point and immediately creates depth.
From there, begin shading the main veins.
Notice that petunia veins aren’t simply lines sitting on top of the petals. They’re often darker channels that flow through the flower’s surface. Vary the pressure as you draw them. Some veins should appear bold and obvious, while others can fade gradually into the surrounding petals.
This variation creates a more natural appearance.
At this stage, resist the temptation to darken everything equally. Nature rarely works that way. Some veins catch more light, while others sink into shadow.
The goal is to establish a strong value foundation before moving on to the lighter areas.
The Midtones: Shade the Whole Flower Uniformly with an HB Pencil
Now switch to an HB pencil.
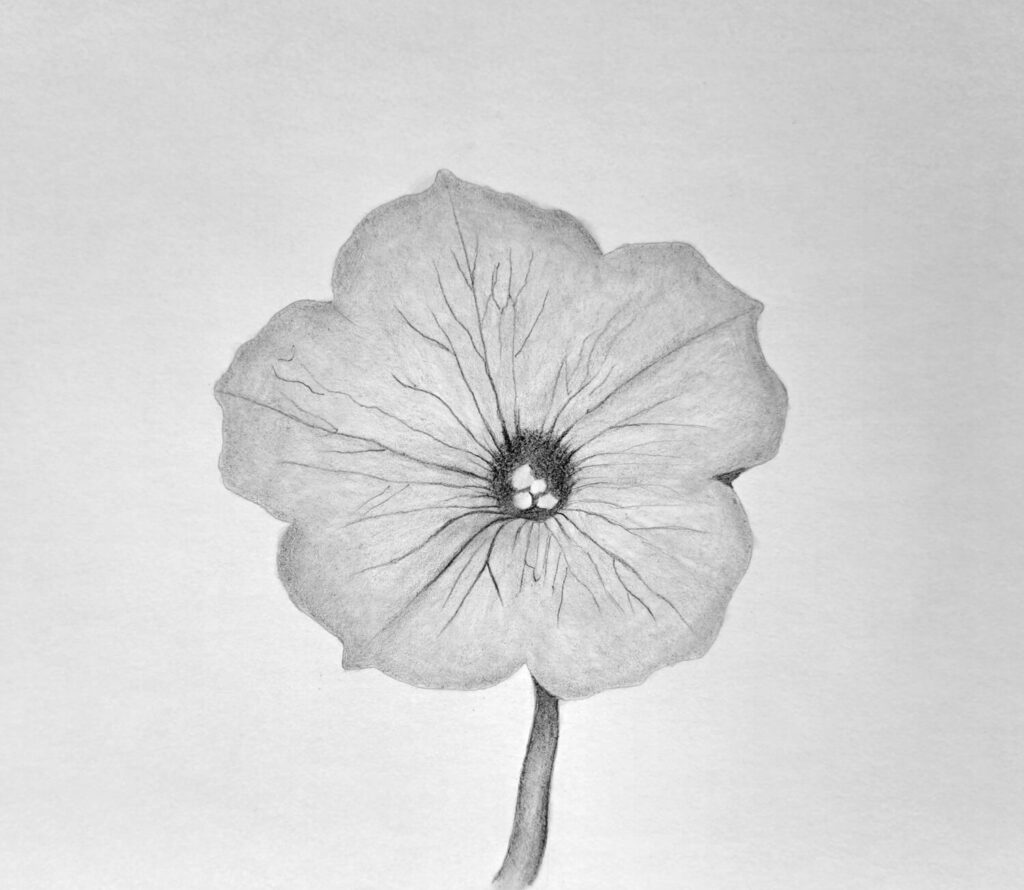
Apply a light, even layer of graphite across the entire flower, avoiding the brightest highlights for now. This layer serves as the flower’s base value.
Think of it like painting a wall before adding details. You’re creating a unified surface that ties everything together.
Use small circular motions or gentle pencil strokes to keep the shading smooth. Try not to create visible streaks. Uneven shading can distract from the delicate petal texture you’re trying to achieve.
As you work, allow the dark veins to remain visible beneath the lighter graphite layer. They should still stand out, but the transition between veins and petals should feel softer than before.
Many artists find this stage surprisingly satisfying because the flower suddenly begins to look three-dimensional. Instead of a collection of outlines and dark lines, it starts resembling an actual bloom.
Deepening the Shadows on the Flower
Once the midtones are established, it’s time to develop the form.
Look closely at your reference and identify the areas where petals overlap, fold, or curve away from the light source. These locations usually contain the richest shadows.
Using a 2B or 4B pencil, gradually build darker values in these areas.
Work slowly. It’s much easier to darken a shadow than it is to lighten one.
Pay particular attention to the area near the flower’s center. Petunia petals often curve inward toward the throat, creating soft shadow transitions that enhance depth. Strengthening these shadows helps pull the viewer’s eye toward the center of the flower.
At the same time, maintain the distinction between the veins and the surrounding petal surfaces. The veins should remain visible, but they shouldn’t overpower the flower.
One useful trick is to occasionally squint at your reference photo. Squinting simplifies details and makes value relationships easier to see. Many experienced artists use this technique when evaluating shadows and contrast.
As the darker values develop, the petals will begin to look more rounded and lifelike.
Highlights for Creating Contrast

Highlights are often the finishing touch that transforms a good drawing into a convincing one.
Using a kneaded eraser, gently lift graphite from the brightest areas of the petals. Focus on places where light naturally strikes curved surfaces.
Petunia petals have a soft, almost velvety texture. Because of this, highlights are usually subtle rather than harsh. Think soft glow rather than shiny reflection.
Pulling out highlights also increases contrast between light and dark areas. This contrast is what gives drawings their sense of dimension.
If a highlight appears too bright, lightly glaze over it with an HB pencil to soften it. Drawing is often a balancing act between adding and subtracting graphite.
Continue refining until the flower feels cohesive. Darken shadows where necessary, soften transitions where they appear abrupt, and strengthen highlights where the petals need more separation.
These small adjustments often make the biggest difference, and you can apply these techniques in almost all floral drawings. Below are some ideas to consider:
- How to draw cosmos flowers
- Drawing hibiscus flowers
- Drawing tulip flowers
- How to draw an orchid
- Lily flower drawing
Conclusion
Drawing a petunia flower with graphite pencils is an excellent exercise in observing values, textures, and organic forms.
The flower’s dramatic veins provide natural structure, while its soft petals offer plenty of opportunities to practice smooth shading and subtle transitions.
The most important thing is to take your time. Petunias reward careful observation. The more attention you give to their veins, shadows, and delicate curves, the more convincing your drawing will become.
If your first attempt doesn’t look exactly like the reference, that’s perfectly normal. Every flower teaches something new.
One drawing improves your shading, another improves your observation skills, and another helps you understand contrast a little better.
Keep a sketchbook nearby, draw a few different petunia varieties, and experiment with their unique patterns.
Before long, you’ll discover that these garden favorites are far more than pretty flowers; they’re outstanding subjects for developing realistic graphite drawing skills. Please feel free to share on Facebook or save on Pinterest for when you’re ready.